I would assume that most people, especially most people who have joined a car forum, have washed a car at least a few times in their lives. This article isn’t designed to make washing a car seem harder than it is, but rather to give a few tips that might not be widely publicized that will help keep your vehicle swirls and scratch free for a long time. With a small initial investment in tools and products, you can keep your vehicles looking great for a long time, and save money by not needing to pay to have the swirls and scratches removed.
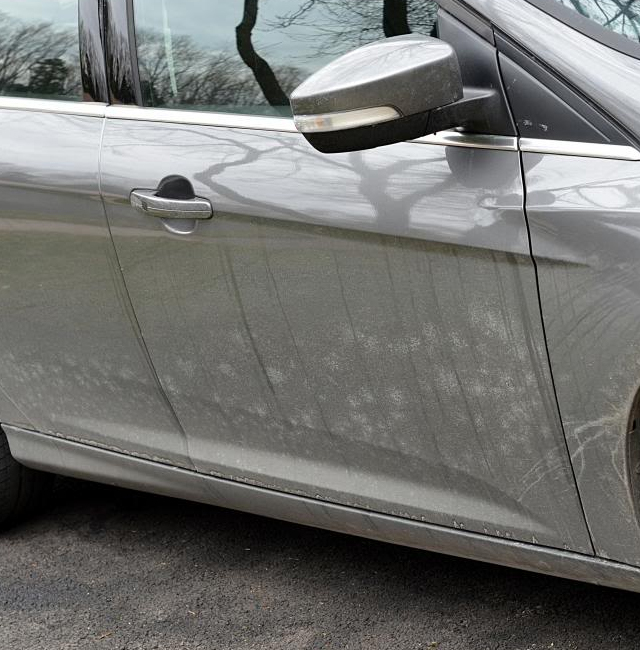
First of all, let’s talk about what we are trying to prevent here, swirls. I am surprised all the time when people tell me they thought swirls in their paint were normal and that there was nothing that could be done to get rid of them. This could not be further from the truth. Here is an example of what a badly swirled vehicle looks like.
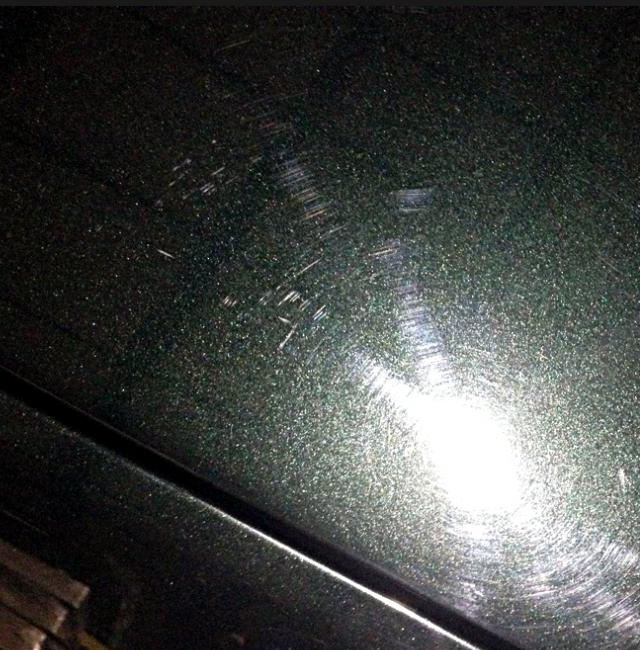
The circular marks in this paint are swirls. They look like they are round, but in reality there are thousands of tiny scratches in every direction that make it look round. Swirls like this are caused from a few things. The most common is taking a vehicle through a tunnel car wash that uses brushes or fabric to clean the exterior. They are just too stiff and not kept clean enough to be used on paint without causing swirls and other marring on the paint. Sure they will get your car clean, but at what price? The other cause is by using improper products to wash and dry a vehicle. You just can’t grab a bath towel from your bathroom to dry your car after you wash it. It is far too stiff to be used safely on the paint. You also can’t use the sponge in your sink to wash the paint. It may be soft enough, but it doesn’t have enough areas to pull dirt away from the paint. Since it can’t pull the dirt away from the paint, all you are doing is rubbing the dirt into your paint, which again, if causing swirls.
Let’s start with a type of wash that has gained a lot of following as of late, the Two Bucket Wash. The basic thought here is by rinsing off a dirty wash sponge in a second bucket, you will keep swirl inducing dirt out of your clean soapy water bucket. There are a lot of people who subscribe to this method, and when done correctly it works very well. We will start with what you need to perform a Two bucket Wash. This is just for the wash portion, the wheels, waxing, and other paint prepping items will be discussed in later articles.
• Two 5 gallon buckets (can be found at local home improvement stores for less than $5 each)
• Two Grit Guards ( $16 for the pair here Grit Guard Mix and Match 2-pk.)
• A wash sponge or mitt
• Car wash soap (Meguiars Gold Class is my favorite product that is locally available)
• A hose
• A drying towel (waffle weave microfiber towels are my favorite, but traditional chamois can also be used if cared for properly)
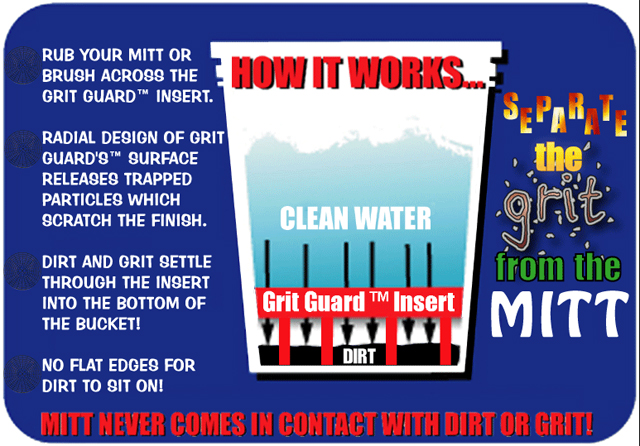
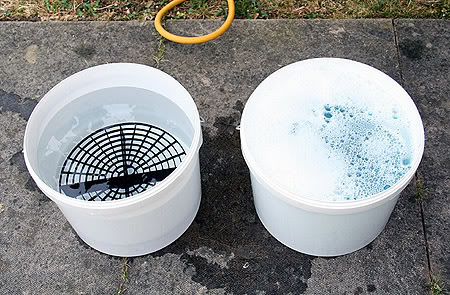
The two buckets and grit guard inserts are the best place to start. You want to put a grit guard at the bottom of each bucket. The Grit Guards serve two purposes. First you can scrub your wash media (sponge or mitt) against them to loosen and remove any dirt or debris that you removed from the paint. This will insure that you aren’t just rubbing dirt on the paint and causing swirls. They also keep that debris at the bottom of the bucket, so it can’t come back up and get onto the wash media. They are invaluable product, and should be used every time you wash with a bucket. Here is how it works.
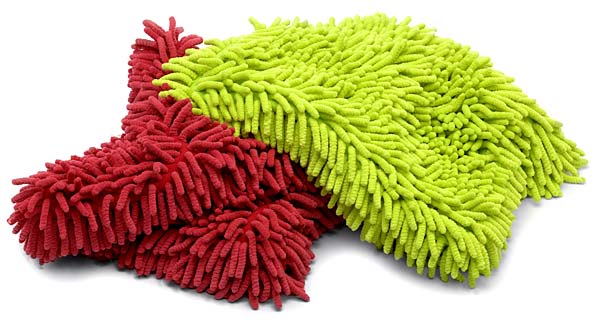
Next we will address that wash media, or what your will use to wash the vehicle. There are tons of different products out there from natural sea sponges to giant brushes, and a lot of them work very well. The main thing to look for is a product that has plenty of area to pull dirt away from the paint. For this reason I prefer using microfiber mitts or pads. These have hundreds of microfiber fingers that can pull dirt away from the paint. They are also easy to wash and can be used quite a few times before needing to be replaced.
The most important thing to remember is to clean your wash media after each use so you know it’s perfectly free of dirt and debris before your next wash. Also if you ever drop your mitt on the ground be 100% sure that you rinse it out before you touch the paint with it again. The last thing you want to do is get a small pebble in your mitt and then start rubbing it all over your car. It may take a little more time, but it is certainly worth the extra effort to keep your paint swirls free.
The carwash soap itself it fairly open to what you like best. The only info I would provide is to stay away from dish soap like Dawn. It has been proven that Dawn won’t damage the paint as it was once thought too, but at the same time it was designed to clean pots and pans, not painted cars. I just don’t trust that is has the same amount of lubricity that actual car wash soaps do. I would hate to skimp on a soap to save a few dollars and not know that it is perfectly safe for my paint. A good soap that is available over the counter is Meguiars Gold Class. If you want to find something online there are hundreds of different soaps, and pretty much all of them work well.
Finally I want to touch on what you are going to use to dry your vehicle after it is clean. Again you don’t want to use a cotton bath towel since they just aren’t soft enough to leave your paint swirl free. My favorite drying towels are waffleweave microfiber. They can absorb tons of water and as long as you keep them clean, they are soft and won’t add any swirls to your paint.

Some people use traditional chamois as well with great success, but they require a little more care to keep soft and supple than waffelweave microfiber towels. I would also stay away from the drying “blades” or squeegees on your paint. In theory they are perfectly safe, but if something as small as a grain of sand gets caught between the blade and your paint, you are looking at a scratch that could be too deep to remove. Again, they can be safe, but it takes way too much effort to make sure you aren’t causing more damage with them.
Ok, now we have gone over all of the tools and products you need to wash your car, so let’s talk about techniques to use.
First you want to fill both buckets with about 3 gallons of water, and then insert a grit guard at the bottom of each one. You can now add your soap to your wash bucket. It’s a good idea to mark your buckets “wash” and “rinse” if they are identical so you don’t get confused as you are washing. There are some buckets out there that are already marked if you want to get them, but usually they are marked up quite a bit just for having a sticker applied. After you add your soap be sure to mix it into the water, you can do this easily by spraying a few powerful jets of water from your hose into the bucket. At this point go ahead and put your wash media into your soapy bucket to let it soak and get soft.
Now that you have your buckets filled up, you want to pre rinse your vehicle. Use the jet setting on your hose and just rinse the vehicle as best you can. By removing as much loose dirt and debris as possible, you are cutting down your chances of marring the paint dramatically. This step will only take a couple minutes, and can save you from extra work during the wash.This is the kind of stuff that you want to pre-rinse off as much as possible.
Now you can start your wash. Make sure to start from the top, and work your way down. You want to break your car up into multiple sections. Do one section then rinse your wash media in the rinse bucket before loading it with more soapy water. Usually we do half of the roof, then rinse the mitt, do the other half, then rinse the mitt, and rinse the roof itself to remove the dirt and soapy water. We normally start with the roof, and then do the hood, followed by the top of the trunk. When doing the vertical panels (doors and fenders) you want to be smart at how your work. The lower parts of the vehicles are normally the dirtiest and have the most swirl inducing dirt. We normally wash the top 2/3 of all of the doors, fenders, and bumpers before we even touch the bottom 1/3 of the car. This makes sure that we are not pulling any of that nasty dirt up the car and causing damage. When working with the lower 1/3, or even just an excessively dirty vehicle, make sure to rinse your wash media often. An extra rinse or two of your wash media can save you from those nasty swirls and scratches in the paint.
When your paint is totally clean, you can begin to dry the vehicle. Again, start drying the roof, and work your way down. Be careful still when you get to the bottom of the vehicle not to pull anything up the car. We all do the best we can when we wash, but from time to time a spot may get missed and the last thing we want to do is pull that dirt up our already clean vehicle. Just make sure to pay attention when you are drying, and it will be fine.
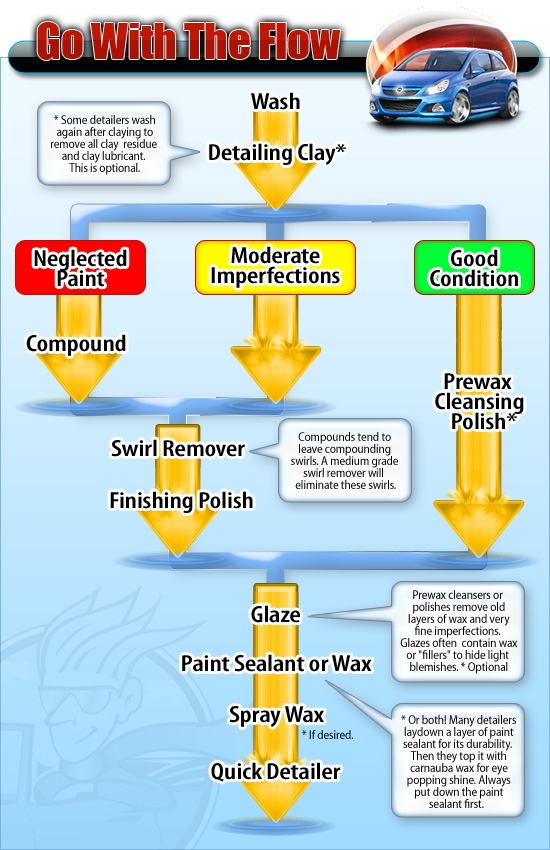
That about does it for the actual wash process of your detail. Now you can move on to your next step whether that be moving straight to waxing the paint, or maybe using a clay bar to remove some bonded contaminants.
Thanks for taking the time to read our write up, and please feel free to ask any questions or leave your feedback!
First of all, let’s talk about what we are trying to prevent here, swirls. I am surprised all the time when people tell me they thought swirls in their paint were normal and that there was nothing that could be done to get rid of them. This could not be further from the truth. Here is an example of what a badly swirled vehicle looks like.
The circular marks in this paint are swirls. They look like they are round, but in reality there are thousands of tiny scratches in every direction that make it look round. Swirls like this are caused from a few things. The most common is taking a vehicle through a tunnel car wash that uses brushes or fabric to clean the exterior. They are just too stiff and not kept clean enough to be used on paint without causing swirls and other marring on the paint. Sure they will get your car clean, but at what price? The other cause is by using improper products to wash and dry a vehicle. You just can’t grab a bath towel from your bathroom to dry your car after you wash it. It is far too stiff to be used safely on the paint. You also can’t use the sponge in your sink to wash the paint. It may be soft enough, but it doesn’t have enough areas to pull dirt away from the paint. Since it can’t pull the dirt away from the paint, all you are doing is rubbing the dirt into your paint, which again, if causing swirls.
Let’s start with a type of wash that has gained a lot of following as of late, the Two Bucket Wash. The basic thought here is by rinsing off a dirty wash sponge in a second bucket, you will keep swirl inducing dirt out of your clean soapy water bucket. There are a lot of people who subscribe to this method, and when done correctly it works very well. We will start with what you need to perform a Two bucket Wash. This is just for the wash portion, the wheels, waxing, and other paint prepping items will be discussed in later articles.
• Two 5 gallon buckets (can be found at local home improvement stores for less than $5 each)
• Two Grit Guards ( $16 for the pair here Grit Guard Mix and Match 2-pk.)
• A wash sponge or mitt
• Car wash soap (Meguiars Gold Class is my favorite product that is locally available)
• A hose
• A drying towel (waffle weave microfiber towels are my favorite, but traditional chamois can also be used if cared for properly)
The two buckets and grit guard inserts are the best place to start. You want to put a grit guard at the bottom of each bucket. The Grit Guards serve two purposes. First you can scrub your wash media (sponge or mitt) against them to loosen and remove any dirt or debris that you removed from the paint. This will insure that you aren’t just rubbing dirt on the paint and causing swirls. They also keep that debris at the bottom of the bucket, so it can’t come back up and get onto the wash media. They are invaluable product, and should be used every time you wash with a bucket. Here is how it works.
Next we will address that wash media, or what your will use to wash the vehicle. There are tons of different products out there from natural sea sponges to giant brushes, and a lot of them work very well. The main thing to look for is a product that has plenty of area to pull dirt away from the paint. For this reason I prefer using microfiber mitts or pads. These have hundreds of microfiber fingers that can pull dirt away from the paint. They are also easy to wash and can be used quite a few times before needing to be replaced.
The most important thing to remember is to clean your wash media after each use so you know it’s perfectly free of dirt and debris before your next wash. Also if you ever drop your mitt on the ground be 100% sure that you rinse it out before you touch the paint with it again. The last thing you want to do is get a small pebble in your mitt and then start rubbing it all over your car. It may take a little more time, but it is certainly worth the extra effort to keep your paint swirls free.
The carwash soap itself it fairly open to what you like best. The only info I would provide is to stay away from dish soap like Dawn. It has been proven that Dawn won’t damage the paint as it was once thought too, but at the same time it was designed to clean pots and pans, not painted cars. I just don’t trust that is has the same amount of lubricity that actual car wash soaps do. I would hate to skimp on a soap to save a few dollars and not know that it is perfectly safe for my paint. A good soap that is available over the counter is Meguiars Gold Class. If you want to find something online there are hundreds of different soaps, and pretty much all of them work well.
Finally I want to touch on what you are going to use to dry your vehicle after it is clean. Again you don’t want to use a cotton bath towel since they just aren’t soft enough to leave your paint swirl free. My favorite drying towels are waffleweave microfiber. They can absorb tons of water and as long as you keep them clean, they are soft and won’t add any swirls to your paint.
Some people use traditional chamois as well with great success, but they require a little more care to keep soft and supple than waffelweave microfiber towels. I would also stay away from the drying “blades” or squeegees on your paint. In theory they are perfectly safe, but if something as small as a grain of sand gets caught between the blade and your paint, you are looking at a scratch that could be too deep to remove. Again, they can be safe, but it takes way too much effort to make sure you aren’t causing more damage with them.
Ok, now we have gone over all of the tools and products you need to wash your car, so let’s talk about techniques to use.
First you want to fill both buckets with about 3 gallons of water, and then insert a grit guard at the bottom of each one. You can now add your soap to your wash bucket. It’s a good idea to mark your buckets “wash” and “rinse” if they are identical so you don’t get confused as you are washing. There are some buckets out there that are already marked if you want to get them, but usually they are marked up quite a bit just for having a sticker applied. After you add your soap be sure to mix it into the water, you can do this easily by spraying a few powerful jets of water from your hose into the bucket. At this point go ahead and put your wash media into your soapy bucket to let it soak and get soft.
Now that you have your buckets filled up, you want to pre rinse your vehicle. Use the jet setting on your hose and just rinse the vehicle as best you can. By removing as much loose dirt and debris as possible, you are cutting down your chances of marring the paint dramatically. This step will only take a couple minutes, and can save you from extra work during the wash.This is the kind of stuff that you want to pre-rinse off as much as possible.
Now you can start your wash. Make sure to start from the top, and work your way down. You want to break your car up into multiple sections. Do one section then rinse your wash media in the rinse bucket before loading it with more soapy water. Usually we do half of the roof, then rinse the mitt, do the other half, then rinse the mitt, and rinse the roof itself to remove the dirt and soapy water. We normally start with the roof, and then do the hood, followed by the top of the trunk. When doing the vertical panels (doors and fenders) you want to be smart at how your work. The lower parts of the vehicles are normally the dirtiest and have the most swirl inducing dirt. We normally wash the top 2/3 of all of the doors, fenders, and bumpers before we even touch the bottom 1/3 of the car. This makes sure that we are not pulling any of that nasty dirt up the car and causing damage. When working with the lower 1/3, or even just an excessively dirty vehicle, make sure to rinse your wash media often. An extra rinse or two of your wash media can save you from those nasty swirls and scratches in the paint.
When your paint is totally clean, you can begin to dry the vehicle. Again, start drying the roof, and work your way down. Be careful still when you get to the bottom of the vehicle not to pull anything up the car. We all do the best we can when we wash, but from time to time a spot may get missed and the last thing we want to do is pull that dirt up our already clean vehicle. Just make sure to pay attention when you are drying, and it will be fine.
That about does it for the actual wash process of your detail. Now you can move on to your next step whether that be moving straight to waxing the paint, or maybe using a clay bar to remove some bonded contaminants.
Thanks for taking the time to read our write up, and please feel free to ask any questions or leave your feedback!