ST XTA install tips with a few pics
Not sure where this post should go, so mods please move it if necessary.
Here's an image I stole from the Lethal Performance Website:

I had the chance to install the ST XTA suspension over the weekend which I bought used from a member here. I've attached the Setup Manual that ST emailed to me: View attachment ST Setup Manual.pdf I also have the Installation Instructions, but they are apparently too large a file to attach, so if anyone needs it just message me.
Anyway, if anyone is going to tackle this project, here are a few things I learned along the way:
1) Remove the wiper cowl; just do it. I thought I'd save time by not removing it, but getting to the nut at the back of the strut towers, especially on the driver's side is just a pain unless you remove the cowl. It's less of a problem on the passenger side. Nevertheless, the time you take you remove the cowl will likely end up saving you time in the long run.
2) If you're going to want to do camber adjustment at the camber plate, then you're going to have to drill a hole in the strut tower. I just couldn't bear to cut my car up like that, so I didn't. But, there is also camber adjustment at the knuckle via slotted mounting.
3) Set up the height adjustment off the car as best as you can. It's more difficult to adjust the height with the suspension installed.
4) When adjusting the rear ride height, remove the height adjuster from the car rather than trying to adjust it while installed. You only need to remove the lower shock bolts and the rear springs will pop right out.
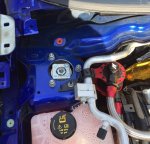
5) Where the shock mount bolts to the chassis and pokes through to the interior, you'll likely need to file the area down a bit or slightly enlarge it with a drill. Otherwise the nut may squeak due to tight clearance.
6) Take your time when removing the rear interior trim panels. There are many clips and you want to make sure that they don't get bent or improperly reinstalled or else you may introduce new squeaks into the cabin.
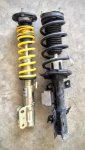
The coilovers are slightly shorter than stock. Here's my comparison:
And here's the end result with bad lighting:
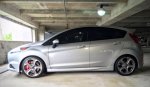
I have the height set about 5mm from the highest setting. It's still a bit low for my taste.
Not sure where this post should go, so mods please move it if necessary.
Here's an image I stole from the Lethal Performance Website:
I had the chance to install the ST XTA suspension over the weekend which I bought used from a member here. I've attached the Setup Manual that ST emailed to me: View attachment ST Setup Manual.pdf I also have the Installation Instructions, but they are apparently too large a file to attach, so if anyone needs it just message me.
Anyway, if anyone is going to tackle this project, here are a few things I learned along the way:
1) Remove the wiper cowl; just do it. I thought I'd save time by not removing it, but getting to the nut at the back of the strut towers, especially on the driver's side is just a pain unless you remove the cowl. It's less of a problem on the passenger side. Nevertheless, the time you take you remove the cowl will likely end up saving you time in the long run.
2) If you're going to want to do camber adjustment at the camber plate, then you're going to have to drill a hole in the strut tower. I just couldn't bear to cut my car up like that, so I didn't. But, there is also camber adjustment at the knuckle via slotted mounting.
3) Set up the height adjustment off the car as best as you can. It's more difficult to adjust the height with the suspension installed.
4) When adjusting the rear ride height, remove the height adjuster from the car rather than trying to adjust it while installed. You only need to remove the lower shock bolts and the rear springs will pop right out.
5) Where the shock mount bolts to the chassis and pokes through to the interior, you'll likely need to file the area down a bit or slightly enlarge it with a drill. Otherwise the nut may squeak due to tight clearance.
6) Take your time when removing the rear interior trim panels. There are many clips and you want to make sure that they don't get bent or improperly reinstalled or else you may introduce new squeaks into the cabin.
The coilovers are slightly shorter than stock. Here's my comparison:
And here's the end result with bad lighting:
I have the height set about 5mm from the highest setting. It's still a bit low for my taste.