• Sign Up! To view all forums and unlock additional cool features

    Welcome to the #1 Fiesta ST Forum and Fiesta ST community dedicated to Fiesta ST owners and enthusiasts. Register for an account, it's free and it's easy, so don't hesitate to join the Fiesta ST Forum today!


2J Cowl Intake Install, 2016+

Messages
81
Likes
29
Location
Tucson
#1
I have seen this come up a few times with no direct answer, so I am posting this thread to show how I went about installing the 2J cowl intake on my 2016 Fiesta ST. It is actually rather straightforward, and does not require much extra on top of what is required for a "normal" install on a '15 or older. This will NOT serve as a full install guide, as there are plenty of tips floating around in other threads, but this will serve as a checklist for those of you wishing to perform the install on your newer model FiST. Total cost is around $340-$350 for a plug and play solution.

1. 2J Cowl Intake (obviously) - $220
a. K&N Dry Flow Wrap $30 - Recommended for anyone who uses their car as a daily, regardless of local weather patterns - many people have reported totally clean cowl areas, but I had a decent layer of dust/dirt under mine. Good insurance for the cost.

2. JMS MAF Extension "05-14 Mustang" - $49 (~$63 after shipping)
For those who don't want to cut into their MAF harness, this will be required, just like on the '15 and older. Exact same setup.
image3-5 forum size.jpg

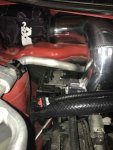
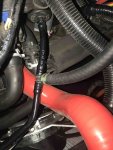
3. Whoosh Motorsports "EVAP" Fix Kit, w/ 42" Vacuum Line (~$45 before shipping)
Make sure you contact Ron @ whoosh before ordering - it is at his discretion whether or not he wants to continuously cater to this specific application and whether or not he will charge extra. 42" of vacuum line is the perfect length for you to route wherever you'd like. This is the piece that attaches to the t-fitting; the other bit with the red cap attaches directly to the intercooler pipe, as it normally would.
image2-5 forum size.jpg

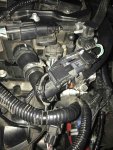
4. Joe sends a small rubber section that (I presume, as I did not try) connects to the crankcase to act as an attachment point for the thick hose that he also provides. Not sure if this is the case on the '15 and older, but my '16 has a sensor of some sort (not sure what it does, but wanted to retain it) at that point that I did not want to delete; I simply removed the sensor from the factory hose assembly, as pictured, and attached Joe's new hose to it (fits perfectly). I used my own clamp at that point as well for added security.
image1-5 forum size.jpg

Other than these points, all install steps are exactly the same as on the earlier model years. I hope this helps some of you who are looking to do this!


OP
AZST

AZST

Member
Messages
81
Likes
29
Location
Tucson
Thread Starter #3
Beautiful.

How many miles so far and any CEL's? Are you running this with a tune?
No CEL. Hardly any miles yet (40), and yes, I did other mods at the same time and just had my Stratified flash tune revised. I'll post back after 1000 or so to give further feedback.


Last edited:
OP
AZST

AZST

Member
Messages
81
Likes
29
Location
Tucson
Thread Starter #4
Threw a CEL for the evap system this morning. Not sure what I would do to fix it, but the intake is 100% functional so I'll likely just live with it.

I wrapped the tube in Mishimoto heat defense tape (the gold stuff)... not sure if it has any deadening properties or not, but I'm thinking it does based on the fact that the induction noise is not nearly as loud as others have described. I would never even think about taking it off due to volume, the sound is perfect.


OP
AZST
Messages
81
Likes
29
Location
Tucson
Thread Starter #5
UPDATE:
I have had a P2288 code for quite some time, until today. The Whoosh-provided check valve was installed on the end closest to the intake tube, and I chose to add a UPR valve on the end of the hose near the t-fitting. This cured the CEL, improved idle, and greatly diminished compressor surge.


ron@whoosh

3000 Post Club
Vendor
Premium Account
Messages
3,928
Likes
3,976
Location
Las Vegas
#6
UPDATE:
I have had a P2288 code for quite some time, until today. The Whoosh-provided check valve was installed on the end closest to the intake tube, and I chose to add a UPR valve on the end of the hose near the t-fitting. This cured the CEL, improved idle, and greatly diminished compressor surge.
nice!!!!!


LILIKE16ST

Senior Member
Messages
862
Likes
252
Location
Saltville
#7
Thank you so much for paving the way for other 16 and 17 owners who want this intake (myself included). I was discouraged from not getting a direct answer or seeing anyone else do it I was about to go with another intake setup that's actually made for the 2016 and has been proven but thanks to this and the work you've done along with whoosh I will probably go this direction again. As for the noise I think some are just more sensitive to that type of thing...just like exhaust drone and virbrations from rmm and any other mod you can think of. Some think it's unbearable while others don't get bothered by it at all. I find myself in the latter most of the time and I'm confident I will in this case too just as you said you was. I don't doubt it's louder than any other intake by far...I'm sure it is....but unless it's so loud you can't even hear the radio when the volumes up and can't hear yourself talk or carry on a conversation with anyone in the car then it's not too loud. My car at 75 mph with a resonator and muffler delete isn't exactly quiet but it's just fine with me. I welcome the noise so I can hear the intake without the windows down. This intake sounds wicked hands down the best. I also love that the piping is much much shorter thats like half the reason I want it right there along with cool consistent intake temps and what I believe would be a small weight loss off the front end. When I do it I'm going to weigh both stock intake setup and this and see what the weight difference is. I can imagine it'd be at least 2-3 lbs and any weight off the front is good.

Thanks again for this I really appreciate it and I'm sure others do too!


PunkST

2000 Post Club
Messages
2,239
Likes
1,413
Location
Menasha
#8
I am doing this tomorrow. Let's hope I can get it all sorted easily.


OP
AZST
Messages
81
Likes
29
Location
Tucson
Thread Starter #9
Of note, make sure to pick up a 2nd check valve for the vacuum line for sure. Ron said one check valve should be fine (just switch ends) but I found adding a 2nd one to be more comforting. You will have a recirculation issue if the provided valve isn't oriented properly.


PunkST

2000 Post Club
Messages
2,239
Likes
1,413
Location
Menasha
#10
Got it installed and all sorted. A bit difficult when you don't have instructions (bought kit used) I placed whoosh's check valve on the side closest to the T fitting. After reassembly I had to sprint to Madison. (An almost 2 hour stint) for an emergency a close friend was having with their car. No CEL the entire trip blasting down the road.


LILIKE16ST

Senior Member
Messages
862
Likes
252
Location
Saltville
#11
I'm glad to see multiple people have success installing this on a 16 and up. Thanks guys for paving the way for others in the future. I'm deciding between a big mouth snorkel combined with a cpe Intake or this intake. The bm+cpe is obviously more expensive but should get results close to the same (you can get slightly more boost while the turbo works slightly less with the big mouth and the same is true with the 2jr due to shorter piping). The bm+cpe is more year round daily friendly which is what my car is and quieter but the 2jr is cheaper in total and probably sheds a small amount of weight off the front but is louder and possibly harder to install overall. I'm really having trouble deciding and 2jr has this intake on sale for 179 new if you preorder with orders shipping middle of October. I can be into the intake under 300 total even with the extra stuff needed for the 2016.

What is yall honest opinion of the intake in both performance all around and the noise level? Just curious and thanks for your contributions


PunkST

2000 Post Club
Messages
2,239
Likes
1,413
Location
Menasha
#12
The 2j is hilariously noisy, if you can handle it. Get it and make sure you run an outerwears filter cover. Popping the cowl apart isn't too crazy hard


Messages
27
Likes
3
Location
Dunlap
#13
The kit COBB offers for 16+ intakes does it do the same thing as the whoosh kit? I'll be getting my 2j intake this week and want to make sure I have everything ready for the install.


PunkST

2000 Post Club
Messages
2,239
Likes
1,413
Location
Menasha
#14
Yes and no, the Cobb kit will not be long enough to reach the 2j intake. Get the whoosh adapter with the longer line. Then pop it apart and re insert the check valve in the tubing so itā€™s closest to the factory T location. Did this and no CEL at all.


M-Sport fan

9000 Post Club
Messages
14,088
Likes
6,746
Location
Princeton, N.J.
#16
I'm glad to see multiple people have success installing this on a 16 and up. Thanks guys for paving the way for others in the future. I'm deciding between a big mouth snorkel combined with a cpe Intake or this intake. The bm+cpe is obviously more expensive but should get results close to the same (you can get slightly more boost while the turbo works slightly less with the big mouth and the same is true with the 2jr due to shorter piping). The bm+cpe is more year round daily friendly which is what my car is and quieter but the 2jr is cheaper in total and probably sheds a small amount of weight off the front but is louder and possibly harder to install overall. I'm really having trouble deciding and 2jr has this intake on sale for 179 new if you preorder with orders shipping middle of October. I can be into the intake under 300 total even with the extra stuff needed for the 2016.

What is yall honest opinion of the intake in both performance all around and the noise level? Just curious and thanks for your contributions
Even if I loved, and wanted the noise, I would be reluctant to get this intake because of having to take apart the whole cowl every time I wanted to check, clean (or replace) the filter.


Messages
108
Likes
27
Location
Westland
#17
This might be a dumb question, but where does the pcv hose connect to this intake? The hose does not have much play so I don't see how it would reach to attach to this intake. On the stock intake and my cp-e, there is a location for this hose but I don't see how it would work with this 2j.


Messages
397
Likes
104
Location
YYC
#18
This might be a dumb question, but where does the pcv hose connect to this intake? The hose does not have much play so I don't see how it would reach to attach to this intake. On the stock intake and my cp-e, there is a location for this hose but I don't see how it would work with this 2j.
He extended it, you can see that in the pictures


Messages
27
Likes
3
Location
Dunlap
#19
Who all is waiting for their 2jr intake to ship? Last I was told it would ship today. Fingers crossed.


PunkST

2000 Post Club
Messages
2,239
Likes
1,413
Location
Menasha
#20
I have extended both the big and small lines that connected with rubber hose. I routed them as clean as I could around the back side of the valve cover. This way they are hidden when the engine cover is on..... well mostly hidden.


Similar threads

Ford Community Posts


Top