
FYI - This is a re-post of a thread I started over on fiestast.org (here).
This project came about as I was researching boost gauges for the FiST. I had looked into a COBB Accessport, but wasn't ready to drop the $$$ for a tune/risk my warranty. After watching a review for the new WRX, I noticed that Subaru included a digital boost gauge in their software. It got me thinking - "How hard can it be?".
Then I remembered reading about a custom OBD-II/Raspberry Pi project on a blog (check it out here) and thought it would make a great end-of-summer project (I started this back in July). In addition, I'd have access to whatever vehicle data I wanted. The plan was to output this information to a 2x16 character LCD (example) for simplicity, and also because I managed to find one that matched the FiST's dash LCD pretty darn well.
In summary, the goals for this project are:
Helpful links (running list):
FAQ:
"Why not use Torque Pro? (OBD-II Android app) There's already been lots of development on that."
Since originally responding, I've actually utilized Torque Pro a bit and found it to be very useful! However, it was a bit "busy" for my tastes, and I use my phone for calls/music when driving. In addition, I have a 5" Nexus 6P, which I don't really feel like mounting to the windshield. Finally, I'm a software engineer by day, so the opportunity to learn a new programming language is a great opportunity to expand my skill set
"It would be cool if you could interface a pressure transducer to the Raspberry Pi and design a digital display without the need to occupy the OBD-II port!"
There are already quite a few projects I've found where this had been done. Also, I'm interested to see if there's any latency issues with utilizing the OBD-II interface.
Update 8/27/15:
Working Python script to grab the engine RPM:
[video=youtube;JbrFzkmqNC4]https://www.youtube.com/watch?v=JbrFzkmqNC4&feature=youtu.be[/video]
Update 9/10/15:
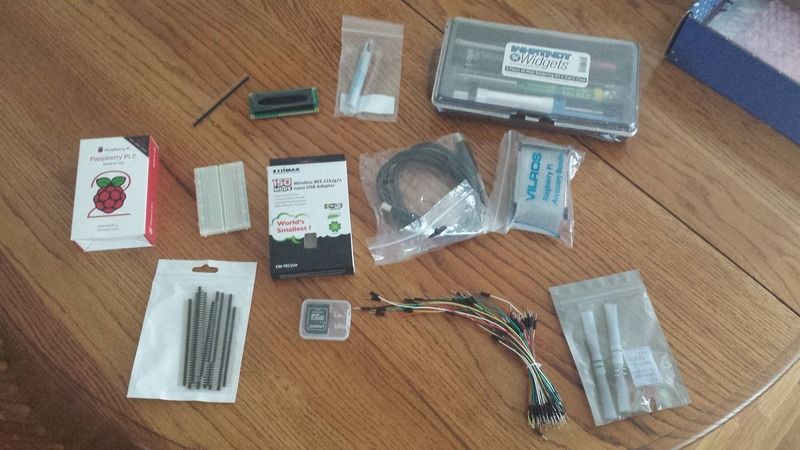
Supplies from Amazon arrive:
Everything wired up (attempt #1):
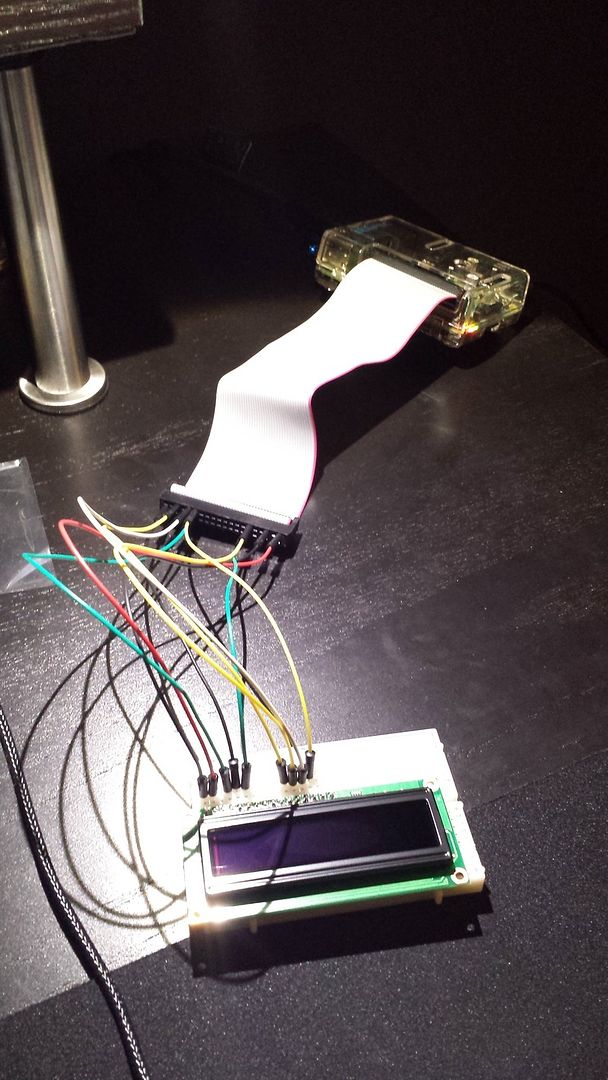
Unfortunately, this attempt resulted in a fried OLED display. Some wiring adjustments were necessary.
Update 9/21/15:
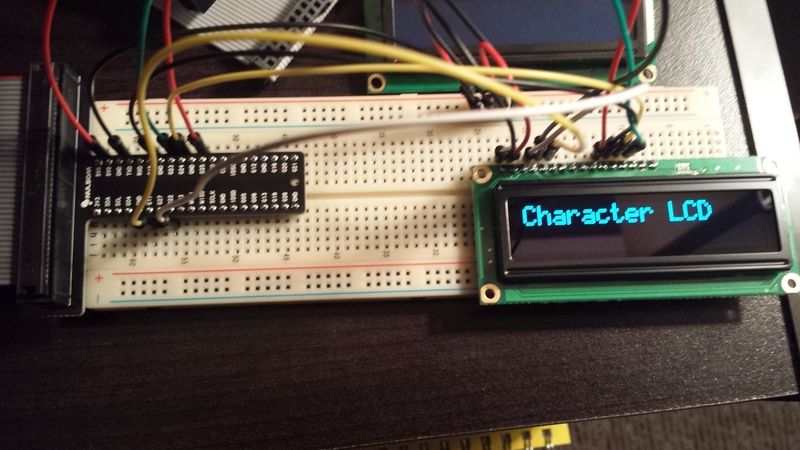
New display arrives, testing:
Python code working on Raspberry Pi:
[video=youtube;USFfg1GxvGw]https://www.youtube.com/watch?v=USFfg1GxvGw&feature=youtu.be[/video]
Update 2/7/16:
I updated my Python scripts to utilize the python-OBD library due to it's excellent documentation and expansive features/functions (i.e. RPM's, throttle position, boost pressure, etc.).
These scripts are running on the Raspberry Pi, outputting data successfully to the OLED display. I am now looking into wiring the Pi's power into the FiST, and am exploring the Mausberry 2A Car Supply/Switch.
Due to the way the Mausberry switch works, I need to tap three locations in the glovebox:
Update 6/29/16
I've got a blog post together here chronicling the entire project!
This project came about as I was researching boost gauges for the FiST. I had looked into a COBB Accessport, but wasn't ready to drop the $$$ for a tune/risk my warranty. After watching a review for the new WRX, I noticed that Subaru included a digital boost gauge in their software. It got me thinking - "How hard can it be?".
Then I remembered reading about a custom OBD-II/Raspberry Pi project on a blog (check it out here) and thought it would make a great end-of-summer project (I started this back in July). In addition, I'd have access to whatever vehicle data I wanted. The plan was to output this information to a 2x16 character LCD (example) for simplicity, and also because I managed to find one that matched the FiST's dash LCD pretty darn well.
In summary, the goals for this project are:
- Learn how to code in Python
- Learn how to output data from Raspberry Pi to LCD
- Display diagnostic data from OBD-II (mainly boost pressure)
- Don't electrocute myself
- Don't start anything on fire
Helpful links (running list):
- How to interface with your car?s ECU through OBD2 and Python | Brian Hemeryck - Tutorial on Python/OBD-II
- https://pythonfun.wordpress.com/2012...ith-python3-2/ - Installing the pyserial library on Windows
- https://pythonspot.com/getting-started/ - Learning Python
- https://en.wikipedia.org/wiki/OBD-II_PIDs - OBD-II PID code reference
- http://python-obd.readthedocs.org/en/latest/ - Python-OBD library documentation
- http://mausberry-circuits.myshopify.com/pages/car-setup - Wiring Mausberry circuit tutorial
FAQ:
"Why not use Torque Pro? (OBD-II Android app) There's already been lots of development on that."
Since originally responding, I've actually utilized Torque Pro a bit and found it to be very useful! However, it was a bit "busy" for my tastes, and I use my phone for calls/music when driving. In addition, I have a 5" Nexus 6P, which I don't really feel like mounting to the windshield. Finally, I'm a software engineer by day, so the opportunity to learn a new programming language is a great opportunity to expand my skill set
"It would be cool if you could interface a pressure transducer to the Raspberry Pi and design a digital display without the need to occupy the OBD-II port!"
There are already quite a few projects I've found where this had been done. Also, I'm interested to see if there's any latency issues with utilizing the OBD-II interface.
Update 8/27/15:
Working Python script to grab the engine RPM:
[video=youtube;JbrFzkmqNC4]https://www.youtube.com/watch?v=JbrFzkmqNC4&feature=youtu.be[/video]
Update 9/10/15:
Supplies from Amazon arrive:
Everything wired up (attempt #1):
Unfortunately, this attempt resulted in a fried OLED display. Some wiring adjustments were necessary.
Update 9/21/15:
New display arrives, testing:
Python code working on Raspberry Pi:
[video=youtube;USFfg1GxvGw]https://www.youtube.com/watch?v=USFfg1GxvGw&feature=youtu.be[/video]
Update 2/7/16:
I updated my Python scripts to utilize the python-OBD library due to it's excellent documentation and expansive features/functions (i.e. RPM's, throttle position, boost pressure, etc.).
These scripts are running on the Raspberry Pi, outputting data successfully to the OLED display. I am now looking into wiring the Pi's power into the FiST, and am exploring the Mausberry 2A Car Supply/Switch.
Due to the way the Mausberry switch works, I need to tap three locations in the glovebox:
- Fuse with a constant 12V supply (even when car is off)
- Fuse with switched 12V supply (relies on ignition/accessory)
- Ground
Update 6/29/16
I've got a blog post together here chronicling the entire project!