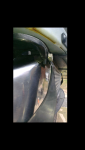
This is the top tab with the post. You remove the rubber plug from.the oem and slip it on top of the post of the new one. This pic shows that the intercooler needed to be pushed up just a little further but couldn't because the lower tabs were up tight already...

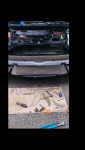
My solution was to remove this bracket from the car (2 bolts). The side facing you goes in against the car. There was a rubber isolator in the notch where i have the bolt now. After removing it, the IC could be pushed up the extra 1/8"-3/16" it needed. But since the rubber grommet had a threaded sleeve in it to catch the bolt that mounts the bottom tabs of the IC, i had to come up with a new way to secure the bottom tabs. That's where the bolt comes in... I slipped in in the notch the grommet came out of and reinstalled these brackets in the car. once in the car, the opening is on the backside up against the car so the bolt isn't gonna fall out. Then I pushed the IC up one side at a time and kinda wiggled it to get the bolt to drop through the hole of the tab. Lock washer, nut and a little pressure to hold the bolt still and it was in.
I got the bottom trim back in but I had to remove the center bracket that holds that bottom air damn. I notched it with my dremel so it would clear the bottom of the IC. In an above post, it's mentioned that the bracket was removed and not used. I didnt want to omit this altogether so I clearanced the bracket. Sorry, no pic of this.
Now came time to reattach the bottom air dam to the bracket that holds the intercooler in (the one removed to replace grommet with the bolt). But since the end tanks are so big on the IC, it was rubbing pretty bad in that spot and if I'd have used the original bolts, they wouldve been seriously digging into the end tanks... Not to mention the little nut clips were already scratching the piss outta the tank. So I removed the nut clips, stuck a piece of weatherproof electrical tape (thick, rubbery tape) and used a big machine screw pushed in from the backside. The round head of the screw, along with the tape should protect the tanks enough not to cause any damage.
So with all that taken care of, it finally was in... You can see the shiny machine screws/nuts above the end tanks holding those together. Where those brackets come up and around the front of the tanks, I took my dremel and shaved off a little on each corner of the plastic there so it wasn't pushing so hard on the tanks. From there, it was just a matter of putting the bumper back on and headlights in.
Some of this may seem a little hard to follow but you'll see what I mean when you get in there and start putting this in. The only thing I wish that was different is that the tabs need welded 1/8"-3/16" lower so the IC will push up all the way without having to remove those grommets. Other than that, I think the rest is just a byproduct of cramming the biggest possible IC into the factory location. I'm glad it's finally in and it looks good. I chopped the lower grill supports out to do the lower grill delete and show this bad boy off. I hope my experience helps you guys....

![[nutkick]](/images/smilies/icon_smile_nutkick.gif "Nut Kick [nutkick]")
 .
.