
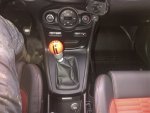
If you read my post on the Redline Goods padded armrest cover you will know that a few weeks ago I ordered the Redline Goods shift boot and padded armrest. I selected charcoal leather as it looked the closes to the seat colour, with orange thread. The charcoal is a tad light but I think black would have been to black to match the seats. I did not select any other options on the shift boot, stock height and stock stitching. The order took about 2 weeks to get to me bonus it was free shipping. The first thing that struck me when I opened the package was the smell of leather. Similar to the old baseball glove I use. The padding is not attached to the leather. The stitching look strong and straight.
This is actually very easy in terms of install as you simply need to take things apart and reinstall it the same way with the new shift boot. No extra finagling required. The instruction of the website are great and helped greatly. I have added a few points to help.
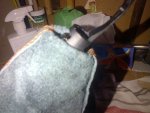
Use a trim tool to pop the cover. Start by pulling the rear of the cover towards the back of the car and up.
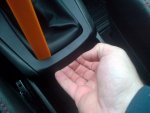
Then work towards the front. Going in from the shift boot is the easiest
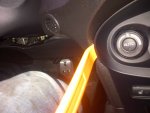
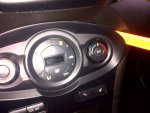
Next the top around the climate control. Careful on the amount of pressure used as there are wires to disconnect.
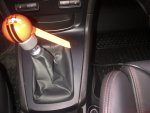
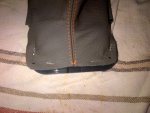
Once you have the boot out follow the instruction on getting the top of the boot reverse lock out off. and slide the boot back on. Now I may have said there was no finest but here you want to have a nice line of the stitching so take you time before installing the chrome piece to line up the stitching with the reverse lock out. I suggest to test fit the boot at this point for stitching alignment. Now the new boot is a little stiffer material than the original leather because it is not worked in so it will be harder to flip and reverse it. Just take your time.
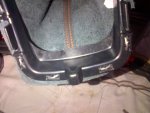
Once happy install the chrome piece making sure the clips line up as before. You could use a dab of glue, but I did not. Staple in the same spots and the OEM (use 1/4") and bend the staples with a pair of pliers. Now is a good time to use some leather conditioner before completing the install in the car.
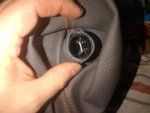
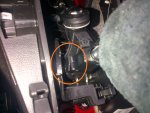
Now time to reinstall. Slide the boot on and screw your knob or lockout adapter. The trick of the reverse lock out is to adjust it until the plastic blocker and clear the edge when pulled up(circled area in the pictures. This is easiest to accomplish before fully reinstalling the trim as you can see what you have to do (loosen or tighten). Also make sure the reverse lock out slides easily on the shifter shaft. I added a smidgen of silicone grease to help it slid freely.

Reattach the trim in the reverse order (do not forget to connect the wires).

All and all the boot is well made, fit perfectly and easy to install. This is what the original boot should have been. A suggestion might be a shorter boot as there is quite a lot of material that puddles. If anyone is on the fence get it. As for colour match it is charcoal is not perfect but I doubt there is a perfect match.
![[raceflag]](/images/smilies/icon_smile_race.gif "Race Flag [raceflag]")
This is actually very easy in terms of install as you simply need to take things apart and reinstall it the same way with the new shift boot. No extra finagling required. The instruction of the website are great and helped greatly. I have added a few points to help.
Use a trim tool to pop the cover. Start by pulling the rear of the cover towards the back of the car and up.
Then work towards the front. Going in from the shift boot is the easiest
Next the top around the climate control. Careful on the amount of pressure used as there are wires to disconnect.
Once you have the boot out follow the instruction on getting the top of the boot reverse lock out off. and slide the boot back on. Now I may have said there was no finest but here you want to have a nice line of the stitching so take you time before installing the chrome piece to line up the stitching with the reverse lock out. I suggest to test fit the boot at this point for stitching alignment. Now the new boot is a little stiffer material than the original leather because it is not worked in so it will be harder to flip and reverse it. Just take your time.
Once happy install the chrome piece making sure the clips line up as before. You could use a dab of glue, but I did not. Staple in the same spots and the OEM (use 1/4") and bend the staples with a pair of pliers. Now is a good time to use some leather conditioner before completing the install in the car.
Now time to reinstall. Slide the boot on and screw your knob or lockout adapter. The trick of the reverse lock out is to adjust it until the plastic blocker and clear the edge when pulled up(circled area in the pictures. This is easiest to accomplish before fully reinstalling the trim as you can see what you have to do (loosen or tighten). Also make sure the reverse lock out slides easily on the shifter shaft. I added a smidgen of silicone grease to help it slid freely.
Reattach the trim in the reverse order (do not forget to connect the wires).
All and all the boot is well made, fit perfectly and easy to install. This is what the original boot should have been. A suggestion might be a shorter boot as there is quite a lot of material that puddles. If anyone is on the fence get it. As for colour match it is charcoal is not perfect but I doubt there is a perfect match.
Attachments
-
 342.8 KB Views: 176

