Adventures in repairing a radiator

V_2

Active member
Member ID
#3696
Messages
504
Likes
166
#1
I have this aluminum radiator that was on the car when I bought my ST that I'm trying to repair. Basically the fan shroud was cut to fit and attached with push through zip ties (or whatever they're called). I'm guessing the fan shifted over use and this is what I ended up with.

20160120_190953.jpg

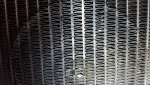
It's a one-off piece from Griffin and I'd really like to re-install it. I can't weld for a crap, nor do I have equipment to do so.

I attempted to use some of these with a propane torch to patch it up. Well, that didn't work.

So I decided to take it to a local radiator shop. They were also unable to make a repair.

After several hours of research online, I ordered some hy-poxy h450. It seems to have made effective repairs on similar issues.

Has anyone ever used this stuff, or before I resort to epoxy, any suggestions on getting a better repair? Any help is greatly appreciated.


OP
V_2

V_2

Active member
Member ID
#3696
Messages
504
Likes
166
Thread Starter #2
Got my hands on the radiator again yesterday when I was able to pick it up from the shop and it looks like they used some type of clear/yellow epoxy to attempt sealing everything up. So it's going to be a PITA to try anything beyond this point.

BUT...I noticed the pressure relief valve was very loose, which would be an obvious leaking point during the quickly failed pressure test the shop did. I tightened the relief valve and ran 20psi of air into the radiator after sealing it up as best as I could and noticed no leaks around the damaged tubes.

I'm going to the hardware store today to find some materials that will allow me to better seal the unit up and work on doing a "proper DIY" pressure test with the radiator filled with water. If it passes that, then I'm going to get a second opinion from another shop in town.


Member ID
#815
Messages
221
Likes
16
#3
Good luck with your repair. Would it not be cost wise to just replace it?


Sourskittle

4000 Post Club
Member ID
#864
Messages
4,567
Likes
862
#4
[MENTION=1146]Joszer[/MENTION] has one he just upgraded


Cyborg turbo, TBE, panda TR6 intercooler, drop in green filter.
245whp 293Tq V-dyno
13.3@104mph


OP
V_2

V_2

Active member
Member ID
#3696
Messages
504
Likes
166
Thread Starter #5
Good luck with your repair. Would it not be cost wise to just replace it?
So far I'm out $18 for the materials I've purchased. The radiator shop didn't charge me for their work since the repair didn't take.

I wouldn't know where to start on getting a replacement since the part is a one-off piece and likely pretty expensive. I'd likely be better off buying the mishi radiator if I can't fix it.


CanadianGuy

4000 Post Club
Member ID
#2134
Messages
4,097
Likes
946
#6
Another way to test for leaks is fill it with a UV die (some antifreeze are UV) and let it sit for a while. Use a UV light to see any seepage. Works like air leak but this way you know where easier.


OP
V_2

V_2

Active member
Member ID
#3696
Messages
504
Likes
166
Thread Starter #7
Nice, thanks for the info. I think the auto parts store here sells some UV dye for cooling systems. I'll mix some of that with water (I assume I won't have to mix in any antifreeze for the dye to work) and use that when I do the pressure test.


CanadianGuy

4000 Post Club
Member ID
#2134
Messages
4,097
Likes
946
#8
Water is fine fore the test. Just make sure to look over the rad with the uv lamp before pooring in the dye in case there are spot that glow which would be false positive.


OP
V_2

V_2

Active member
Member ID
#3696
Messages
504
Likes
166
Thread Starter #9
Well I think it's good to go...

I picked up some dye, a tire fill valve and some rubber plugs. I hollowed out one of the plugs to fit the valve. Filled the radiator to 20psi and let it sit for 30 mins. It held 15psi, my seal wasn't 100% perfect. But no glow under blacklight.

Think I'm still going to take it to get tested somewhere else but this is definitely promising.


frankiefiesta

1000 Post Club
Member ID
#1060
Messages
1,852
Likes
509
#10
Well I think it's good to go...

I picked up some dye, a tire fill valve and some rubber plugs. I hollowed out one of the plugs to fit the valve. Filled the radiator to 20psi and let it sit for 30 mins. It held 15psi, my seal wasn't 100% perfect. But no glow under blacklight.

Think I'm still going to take it to get tested somewhere else but this is definitely promising.
I would let it sit overnight. Some leaks are small and slooowwww


CanadianGuy

4000 Post Club
Member ID
#2134
Messages
4,097
Likes
946
#11
x2 leave it over night to make sure the stability of the repair as well.


OP
V_2

V_2

Active member
Member ID
#3696
Messages
504
Likes
166
Thread Starter #12
It's just hanging out at the moment. I doubt it will hold pressure that long, but I guess I can pump it up intermittently.


OP
V_2

V_2

Active member
Member ID
#3696
Messages
504
Likes
166
Thread Starter #14
Seems to have held 15psi all night. I guess it sealed better than I expected.

I'm going to take it to another radiator shop next week to have them do their own pressure test. From there, if it passes, I'll probably go ahead and re-install it and do a real world test. Replacing the radiator is actually pretty easy in our cars when the stock airbox is removed, so I'll just swap the OE radiator back if a leak shows up, no big deal.

Thanks for everyone's help! I'll report what I find out.


Thread starter Similar threads Forum Replies Date
G Exterior Cosmetic & Lighting Modifications 7

Similar threads


Top