Here we go.....
1. Remove the 4 push pin style clips from your upper radiator shield/ upper bumper cover.

2. Remove Both headlight assemblies by removing the Torx bit bolts. Then remove the assemblies at the same time unplugging them from the car completely and setting the aside somewhere safe or on a blanket so you dont scratch the lenses.
Sent from my SM-N950U1 using Tapatalk


3. Remove the two torx bit screws from each wheel well along with the push pin style clips.

4.Remove the three Bolts from each side of the bumper that connect it into the fenders. While the headlights are out dont forget to unplug the Fog lights either.

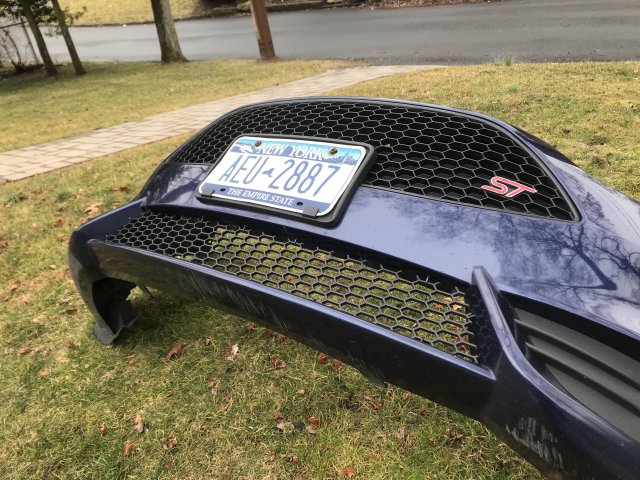
5. Remove bumper assembly from vehicle. Then bring into a well lit area for install of the lower grill that you got from Customcargrills. Let your Mans best friend wonder what the hell you are doing and come over to monitor and question your abilities.


6. Remove the lower OEM Style worthless couldn't stop a good dam Boulder grill... it will simply just pull out / un-snap from the bumper.Then grab any detail spray you have to clean up any remainder dirt or debris that has collected over the thousands of miles getting beat on and bug filled.


7. Now comes the fun part get the new customcargrill and get it setup where you want it in the lower opening. I then zip tied it to the bars to hold it in place while I got the vinyl dipped half clips in position from behind the bumper.


8. After you figure out where you want to mount your Half clips drill holes to start the #10 Screws with Phillip's Stainless style heads that are painted black with 1/4 stainless washers. I used a little tight access screwdriver with my 1/4 ratchet to get it started and put in the bumper. Then have your accomplice come over and patronize you for not throwing his Toys for him to fetch.


9. Tighten the Screws all down and you can pull down on the rubber boarder tubing to get rid of any tiny gaps also.

10. Install bumper in reverse order....sit down and blow the Froth off a cup and revel in your new found glory lower intercooler grill....that will protect and look nicer than that plastic piece of shit Ford gave us!


If anyone is interested in a grill please PM me and we can get it figured out with Customcargrills. I'd also like to thank Matt of custom car grills in helping facilitate this project for the Fiesta ST. This was done completely on my own Dollar also....no members funds were required to complete this project besides my own. Plus...I don't dillydally ...I get shit done!

1. Remove the 4 push pin style clips from your upper radiator shield/ upper bumper cover.
2. Remove Both headlight assemblies by removing the Torx bit bolts. Then remove the assemblies at the same time unplugging them from the car completely and setting the aside somewhere safe or on a blanket so you dont scratch the lenses.
Sent from my SM-N950U1 using Tapatalk
3. Remove the two torx bit screws from each wheel well along with the push pin style clips.
4.Remove the three Bolts from each side of the bumper that connect it into the fenders. While the headlights are out dont forget to unplug the Fog lights either.
5. Remove bumper assembly from vehicle. Then bring into a well lit area for install of the lower grill that you got from Customcargrills. Let your Mans best friend wonder what the hell you are doing and come over to monitor and question your abilities.
6. Remove the lower OEM Style worthless couldn't stop a good dam Boulder grill... it will simply just pull out / un-snap from the bumper.Then grab any detail spray you have to clean up any remainder dirt or debris that has collected over the thousands of miles getting beat on and bug filled.
7. Now comes the fun part get the new customcargrill and get it setup where you want it in the lower opening. I then zip tied it to the bars to hold it in place while I got the vinyl dipped half clips in position from behind the bumper.
8. After you figure out where you want to mount your Half clips drill holes to start the #10 Screws with Phillip's Stainless style heads that are painted black with 1/4 stainless washers. I used a little tight access screwdriver with my 1/4 ratchet to get it started and put in the bumper. Then have your accomplice come over and patronize you for not throwing his Toys for him to fetch.
9. Tighten the Screws all down and you can pull down on the rubber boarder tubing to get rid of any tiny gaps also.
10. Install bumper in reverse order....sit down and blow the Froth off a cup and revel in your new found glory lower intercooler grill....that will protect and look nicer than that plastic piece of shit Ford gave us!
If anyone is interested in a grill please PM me and we can get it figured out with Customcargrills. I'd also like to thank Matt of custom car grills in helping facilitate this project for the Fiesta ST. This was done completely on my own Dollar also....no members funds were required to complete this project besides my own. Plus...I don't dillydally ...I get shit done!
Last edited: