Some of you might remember that a few months ago I set out to swap base FiST seats for BRZ seats. Well I succeeded in chopping up the Fiesta rails and got it to work. After a few weeks I reverted back. The seating position just wasn't right. It felt more like I was sitting on the can not in the car. Well I decided to try my other idea of using the planted brackets and BRZ rails and I'm happy to report that it was a huge success. If you're going to do this this is the route to go.
***Disclaimer- Do this at your own risk. You will be swapping out safety equipment and bypassing airbags. I'm not responsible for any injuries resulting from this swap.
Legalities out of the way here's what you're going to need:
-1 pair of BRZ seats with the rails.
-1 pair of Planted Technology brackets.
-8 grade 8 bolts (5/16-8 thread 1 inch long)
-8 grade 8 lock washers (5/16)
-8 grade 8 nuts (5/16-8 thread)
-10 grade 8 washers (5/16)
-12mm socket
-1/2 inch socket
-T-50 star socket
-Driver and extensions
-12mm box wrench
-1/2 inch box wrench
-5/16" drill bit
-Drill press or drill
-Vice grips
-Various screw drivers
-Wire cutters
Step 1: Tear down the BRZ seats
I didn't get any good photos of this but the process it pretty straight forward. Start by taking off the seat wiring harness and seatbelt buckles. After that, remove the reclining handle. This is done by prying on the interior plastic tab and sliding it off, from there remove all the pieces of plastic trim.
After removing the plastic trim,the bottom cushion needs to be removed. Again pretty straight forward. There are clips on the back, side and front. There is also a clip on each side near the hinge. Once the clips are off, the cushion lifts out.


Step 2: Removing the rails
Technically a subset of step one, but I'm breaking in out. The rails are held on by 6-12mm nuts on the passenger seat and 7 on the drivers side. You'll need to use a combination of the socket and box wrenches to get these off. The drivers side has a bracket for the seatbelt buckle, make sure to save this.
Step 3: Removing the Feet
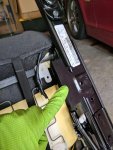
This is where having a drill press will come in handy. It's possible to do it without but it'll be much more difficult. The feet are riveted on with 2 rivets per foot. You will need to remove both the front and rear feet. This is arguably the hardest part. It's a huge pain but keep at it. You also need to make sure to get the rivets completely out of the rails so that you have the holes. These will be the holes we use to attach the rails to the brackets.
Step 4: Take a break
Crack open a beer and take a load off. The hardest part is now behind you.
Step 5: Modifying the Rails.
There are a few things you'll need to modify to make them work. The first is the tabs for the slide stops.


There is a set of these front on each rail. They need to be bent up slightly using the vice grips. This is so they can clear the bolts after installation.
The other modification is to the rear plastic caps.

You need to cut off the part after the tabs and then widen the arch slightly using some scissors or wire cutters. After modifying reinstall on the rails.
Step 6: Reattaching the rails.
After modifying the rails re-attach them to the seat bases. Make sure to include reinstall the seatbelt bracket on the drivers seat.
Step 7: Test fitting the rails.
Start by bolting up the front of the rails to the Planted Bracket. Ultimately the world is your oyster on this but if you want the most similar seat placement as stock you're going to want to bolt through the 2nd hole on the rails and the 2nd Planted hole.

From there you'll need to drill 2 holes in the bracket. Use masking tape and mark where you need to drill the back holes.


After marking, drill the holes. Note that it will not be a full "hole" but rather will connect with the existing slot on the Planted bracket to make a sort of "L" shaped hole.

After drilling, make sure that all bolts can go through the bracket and be bolted. Also make sure that the rails have the full range of motion that they should.
Step 8: Removing Fiesta Seats.
Remove the Fiesta seats. They're held on by 4-T50 star bolts. Make sure to disconnect the wiring harness before removal.
After removing the seats remove the wiring harness. For the passenger seat you'll also need to remove the occupancy sensor. The best way to do this is to unclip the cushion on the front and shimmy it out of there.
Step 9: Reconstruct the BRZ seat/Transfer the Fiesta stuff over.
At this point you're going to put the BRZ seats back together. Make sure you move the occupancy sensor over the the passenger seat.

Move over the wiring harness to the BRZ seat.

For the seatbelt buckle you're going to remove the Torx bolt from the buckle and reinstall using the BRZ nut.

Now is also when you're going to want to put in the resistors to fool the computer for the airbags.
Step 10: Installing the Seats.
You're almost there! The order of operations on this step is VERY important. If you don't do it in the correct order you will not be able to bolt in the seats.
First, loosely bolt the seat to the bracket on the front ONLY. Assemble the bolt like it will be the final assembly as it will be. You should have a washer on top and then a washer, lock washer, and bolt on bottom. Once, loosely assembled you can take the assembly to the car.

Second, place the assembly into the car. (Again at this point the bracket should only be held on by the 2 front bolts). Once in the car start the front torx bolts on the bracket but only start them.

Third, move the seat all the way up and go to the back. In the rear you're going to lift the seat and bolt in the bracket with the torx bolts. You will fight with the seat a bit but you will be able to tighten down the rear bolts.

Forth, attached the rear seat rails to the bracket. You will have enough room to start and assemble the rail bolts to the bracket. For the rear I doubled up on the washers under the rail as the hole was a bit bigger on the bracket. Go ahead and tighten the rear bolts all the way.


Fifth, not that the rear is done slide the seat all the way back. Now you can tighten the front bolts down that you started before placing in the car. (You did start those like I said right?!?!).


Step 11: Plug in the seats.
Step 12: Go enjoy!!


All in total cost comes to roughly $800. ($500 for the seats, $240 for the brackets, and $50 for hardware). There are some that claim they can find Focus Recaro's for this price but I certainly haven't been able to and I've scoured the internet.
From a comfort standpoint these seem like a good compromise between the base and Recaro's. Not as bolstered but more comfortable in my opinion.
***Disclaimer- Do this at your own risk. You will be swapping out safety equipment and bypassing airbags. I'm not responsible for any injuries resulting from this swap.
Legalities out of the way here's what you're going to need:
-1 pair of BRZ seats with the rails.
-1 pair of Planted Technology brackets.
-8 grade 8 bolts (5/16-8 thread 1 inch long)
-8 grade 8 lock washers (5/16)
-8 grade 8 nuts (5/16-8 thread)
-10 grade 8 washers (5/16)
-12mm socket
-1/2 inch socket
-T-50 star socket
-Driver and extensions
-12mm box wrench
-1/2 inch box wrench
-5/16" drill bit
-Drill press or drill
-Vice grips
-Various screw drivers
-Wire cutters
Step 1: Tear down the BRZ seats
I didn't get any good photos of this but the process it pretty straight forward. Start by taking off the seat wiring harness and seatbelt buckles. After that, remove the reclining handle. This is done by prying on the interior plastic tab and sliding it off, from there remove all the pieces of plastic trim.
After removing the plastic trim,the bottom cushion needs to be removed. Again pretty straight forward. There are clips on the back, side and front. There is also a clip on each side near the hinge. Once the clips are off, the cushion lifts out.
Step 2: Removing the rails
Technically a subset of step one, but I'm breaking in out. The rails are held on by 6-12mm nuts on the passenger seat and 7 on the drivers side. You'll need to use a combination of the socket and box wrenches to get these off. The drivers side has a bracket for the seatbelt buckle, make sure to save this.
Step 3: Removing the Feet
This is where having a drill press will come in handy. It's possible to do it without but it'll be much more difficult. The feet are riveted on with 2 rivets per foot. You will need to remove both the front and rear feet. This is arguably the hardest part. It's a huge pain but keep at it. You also need to make sure to get the rivets completely out of the rails so that you have the holes. These will be the holes we use to attach the rails to the brackets.
Step 4: Take a break
Crack open a beer and take a load off. The hardest part is now behind you.
Step 5: Modifying the Rails.
There are a few things you'll need to modify to make them work. The first is the tabs for the slide stops.
There is a set of these front on each rail. They need to be bent up slightly using the vice grips. This is so they can clear the bolts after installation.
The other modification is to the rear plastic caps.
You need to cut off the part after the tabs and then widen the arch slightly using some scissors or wire cutters. After modifying reinstall on the rails.
Step 6: Reattaching the rails.
After modifying the rails re-attach them to the seat bases. Make sure to include reinstall the seatbelt bracket on the drivers seat.
Step 7: Test fitting the rails.
Start by bolting up the front of the rails to the Planted Bracket. Ultimately the world is your oyster on this but if you want the most similar seat placement as stock you're going to want to bolt through the 2nd hole on the rails and the 2nd Planted hole.
From there you'll need to drill 2 holes in the bracket. Use masking tape and mark where you need to drill the back holes.
After marking, drill the holes. Note that it will not be a full "hole" but rather will connect with the existing slot on the Planted bracket to make a sort of "L" shaped hole.
After drilling, make sure that all bolts can go through the bracket and be bolted. Also make sure that the rails have the full range of motion that they should.
Step 8: Removing Fiesta Seats.
Remove the Fiesta seats. They're held on by 4-T50 star bolts. Make sure to disconnect the wiring harness before removal.
After removing the seats remove the wiring harness. For the passenger seat you'll also need to remove the occupancy sensor. The best way to do this is to unclip the cushion on the front and shimmy it out of there.
Step 9: Reconstruct the BRZ seat/Transfer the Fiesta stuff over.
At this point you're going to put the BRZ seats back together. Make sure you move the occupancy sensor over the the passenger seat.
Move over the wiring harness to the BRZ seat.
For the seatbelt buckle you're going to remove the Torx bolt from the buckle and reinstall using the BRZ nut.
Now is also when you're going to want to put in the resistors to fool the computer for the airbags.
Step 10: Installing the Seats.
You're almost there! The order of operations on this step is VERY important. If you don't do it in the correct order you will not be able to bolt in the seats.
First, loosely bolt the seat to the bracket on the front ONLY. Assemble the bolt like it will be the final assembly as it will be. You should have a washer on top and then a washer, lock washer, and bolt on bottom. Once, loosely assembled you can take the assembly to the car.
Second, place the assembly into the car. (Again at this point the bracket should only be held on by the 2 front bolts). Once in the car start the front torx bolts on the bracket but only start them.
Third, move the seat all the way up and go to the back. In the rear you're going to lift the seat and bolt in the bracket with the torx bolts. You will fight with the seat a bit but you will be able to tighten down the rear bolts.
Forth, attached the rear seat rails to the bracket. You will have enough room to start and assemble the rail bolts to the bracket. For the rear I doubled up on the washers under the rail as the hole was a bit bigger on the bracket. Go ahead and tighten the rear bolts all the way.
Fifth, not that the rear is done slide the seat all the way back. Now you can tighten the front bolts down that you started before placing in the car. (You did start those like I said right?!?!).
Step 11: Plug in the seats.
Step 12: Go enjoy!!
All in total cost comes to roughly $800. ($500 for the seats, $240 for the brackets, and $50 for hardware). There are some that claim they can find Focus Recaro's for this price but I certainly haven't been able to and I've scoured the internet.
From a comfort standpoint these seem like a good compromise between the base and Recaro's. Not as bolstered but more comfortable in my opinion.
Last edited: