
Ambition breeds adversity. 2 days and roughly 14 hours of work time later, I finally feel worthy of creating a build thread for Magnus. Up until this point, he's had a couple things done, but nothing more intensive than unscrewing and re-screwing a couple of bolts, or at least, nothing that I've PERSONALLY done that intensive. Some of you may scoff. Some of you may say to yourself "That's a piece of cake, you should try [insert task here]." Some of you may take away something that helps you not make the same mistakes I did. Respond how you will, I will rest easy tonight knowing that I did something worthwhile and eventually (after a lot of sweat and frustration) succeeded.
The background: I got Magnus brand new back in October 2018, stepping up from my parents' '05 Corolla S. My first car I've owned, first car I've paid insurance for, and first manual car I spent any substantive amount of time with. Also, my attainable dream car, a title it has continued to deserve ever since, every single time I clutch in, start it up and jiggle the gear stick in homage to the manual gods. For the Corolla that I drove previously, the extent of my modifications and 'wrenching' was affixing a pair of questionable black hub caps and putting a couple new screws into the spring mechanism attached to the center armrest storage cubby. With Magnus, I hoped to be a bit more involved than that. Keep in mind, Magnus is my daily driver and only car, so I don't want (nor do I have the budget![[mecry]](/images/smilies/icon_smile_mecry.gif "Me Cry [mecry]") ) to go all out with performance or visual mods.
) to go all out with performance or visual mods.
Old and Busted...New Hotness
Previous mods done: The first thing I did, following the sage wisdom of you lot, was putting on a Cobb rear motor mount (RMM hereafter). This happened just over 2000 miles into ownership, and WOW!, I felt ZERO difference. My biggest annoyance with the car, and what I thought this would fix, was how slow(smooth) you have to be on the 1-->2 gearshift. I didn't understand about rev hang or wheel hop or any of that stuff yet, I just had seen person after person after person putting RMM at the top of the 'first mods' list. Since that time, I have gained a bit more knowledge, and can imagine how much engine movement there would be if I drove the car the way I do now with the stock RMM. 2 months after the RMM install, I did the next thing, which I think is my favorite overall mod in terms of actual effect on the driving experience. I put on a No Pistons 3/8" gas pedal lift spacer. I'm 6'4" with long legs but with small, skinny feet, and the stock pedal placement made it nearly impossible to rev match unless I was stomping on the brakes. The spacer raised it up a noticeable amount and allows me to comfortably rev match using the left side of my foot on the brake and right side on the throttle. Only about 2 weeks after that, I got an Injen intake installed. My boss at the time had connections at Injen, and they used my car as a test to see if their old intake system (14-15) would fit the updated (16-19) Fiestas. The full system didn't fit, due to the different evap wiring, but I got a free cone filter and heat shield out of it to replace the stock airbox and filter. The next thing done happened in the beginning of this year, where I bent my 3rd wheel and busted a tire hitting a piece of wood on the freeway at around 80 mph, and I replace the stock wheels and tires with a set of 16x7 et 42 Sparco Assetto Gara wheels wrapped in 205/50 Firehawk Indy 500s. Oh yeah, and sometime recently I popped out that horizontal grille that covers the intercooler. I have more bent than straight intercooler fins now but man does it look cool haha
The last 2 days: And now we've caught up to the present. In the last 36 hours, I took on (with a friend) the challenge of installing the Cobb intercooler and first-gen intake that I scored at an absolutely obscene deal from my work ($350 for everything, including hot and cold charge pipes and all intake piping to the turbo). I'm gonna start with the tale of the intercooler and me learning some valuable lessons about taking your time, notating where everything was originally, and above all, NOT OVER-TORQUING YOUR BOLTS. I'll set the scene: I arrived at my friend's house at 11:30, full of excitement - not so much for seeing how the car would perform with the new parts, but mainly just the fact of working on the car myself. I had tried and failed before to even remove the headlights, because I couldn't figure out how to get the little Phillips-head retainer screws out (don't look under my hood, the plastic around those fasteners is so scratched it looks like a tiny crazed weasel got stuck under there). Anyway, we get to work, start removing everything to take the headlights, bumper and lower air dam out.
SIDE NOTE: my original plan was to ideally get the intercooler and intake installed on the same day. We got hung up a bit on the stupid bolts that hold the bumper to the fender, those things are a PITA to get at.
Quick thing to note, followed by what may be a tip. The note is that I was referencing this video as the guide, and it only mentions three 8 mm bolts on each side holding the bumper on, but my friend and I had to remove an additional two 10 mm bolts on each side to get it off...When putting it back on, it appears they can be fastened in such a way that they are only attached to the fender, and just slip through holes when you pull the bumper off after detaching the three 8 mm bolts, so I'm not sure if we even needed to take them off, and they caused no shortage of confusion at the end of the install. The tip is the same as the video that I linked says, a flexible bit driver is basically a MUST for removing those bolts connecting the bumper and the fender, especially on the driver's side where there's even less room due to the washer fluid reservoir. Now back to your regularly scheduled programming. We got the front of the car pulled off, exposing the horribly undersized stock intercooler. The removal of that was super simple, just a few bolts off and clamps to loosen and voila. I knew the Cobb intercooler was 50% larger than stock, but I didn't realize just how trash the stock one was until I compared the weight difference of the 2. The stock one feels like a 5 lb dumbbell after you've been curling with 30s for a couple reps. And by curling I mean the upper arm exercise, not the winter Olympic sport, because I know you all were confused on that one. The install problems started when we tried to attach the intercooler first before the new charge pipes. At this stage, with the new intercooler seated what I thought was properly, we realized that we definitely had to get the pipes installed before the intercooler, so we took the intercooler back off, installed the pipes and went to put the intercooler back on.
This is where things got frustrating. I had over tightened the bolt that screwed into this grommet, which is 1 of only 2 mounting points for the intercooler, and had stripped out the bolt badly. We went to an Ace hardware to get a bolt to replace it, though at that point we didn't know that the grommet itself was screwed up. The threading inside was wrecked, and the rubber gasket around it had broken off at the top, so anything attempting to screw into it would just spin in place. We discovered this when we got back, put the intercooler in place and tried the new bolt which promptly got stuck and would not go either in or out. After like 30 mins of trying to remove it, we were finally successful, using a spare piece of rubber to provide enough friction that the new bolt would actually come out. But then we had to figure out how to mount the intercooler, as I was understandably not comfortable only having it attached by 1 bolt. We went to the nearest Ford dealer to see if they happened to have a replacement in the parts department, but they were closed for Memorial Day. Then we went to Home Depot and jerry-rigged a replacement for the grommet, involving a longer bolt, some washers, and some nuts. The problem was that the washers we got were too small for the plastic piece that the grommet was attached to, and my friend had a genius idea of creating our own washer using a nickel. This was at like 9 pm, and it took us another 2ish hours to get all the charge pipes attached properly then reattaching the entire front end of the car, including those stupid fender/bumper bolts. Took it out for a quick test run, nothing felt off, got back, checked to ensure no leaks, and that was that.
Old and Busted...New Hotness 2
Today I tackled the intake on my own, and compared to the intercooler it was a wonderfully relaxing experience. The entire thing was about 2.5 hours, removing the stock system was very straightforward, both of the biggest issues I had were related to the Injen heat shield. That shield is secured by 2 bolts, both of which have nuts on the underside of the shield, which are very awkward to get to, even with a manual wrench, let along a ratcheting wrench. The other problem was the shield was secured by 12 mm nuts, and there was a rusted nut stuck in the end of the only 12 mm wrench I had, and it took a little while to free that. Other than that, everything was pretty smooth sailing, even installing the 16-19 evap harness fix, which was the part I was the least sure about what I was doing.
Old and Busted...New Hotness 3
Driving Impressions: Living in Southern California, we are spoiled for choice when it comes to great driving roads, and the Fiesta ST is such a capable platform for all different types. As previously mentioned, the gas pedal spacer is my favorite mod affecting driving, but I think the intercooler and intake combination may overtake that in time. The pair have only been on the car for a few hours and a few miles, but already I can feel an increased throttle response and slightly more aggressive engine tone over 5k RPM. Hopefully better cooling is part of the equation as well, next time I'm driving spiritedly on Angeles Crest Hwy (ACH), I'm really hoping I won't have to blast my heater. The wheels are a 50/50 split on aesthetic vs performance mod, they look absolutely phenomenal in my opinion, and with the 5 mm smaller offset from stock, give it a subtly more aggressive profile for all angles than the stock wheels do. However, I did intentionally go a size smaller, trying to 1) make them less expensive than stock size, 2) make them lighter than stock size, and 3) take advantage of a taller sidewall tire for a little bit better road comfort on bumps. The Firehawk Indy 500s have been impressive. The stock Potenza RE050A is an AWESOME tire, definitely on the edge of street and track tire in terms of grip. however, you pay OEM and track pricing for them, and Indy 500s came highly reviewed for being the MUCH cheaper alternative with 90-95% of the grip and better road manners. I've taken them up to ACH multiple times this year, and a nearly track prepped Miata with R888Rs and a McLaren 570s were both very impressed with how well the FiST stuck with them.
What's next?
Performance - Accessport to take advantage of being Stage 2, Thermal R&D catback exhaust, and maybe a Velossa Tech Big Mouth or a blow off valve. The Cobb intake performs extremely well, but the Injen one was way louder, and I kinda miss it already.
Cosmetic - tint, LED mirror turn signals from Whoosh, Velossa Tech diffuser fins, lowering springs (most likely Mountune). I put springs in the cosmetic category because I love the way the car handles right now, I don't need the last word in cornering ability given that Magnus is my daily and only car, I just want him to be at MAX an inch lower, so his stance is the way I want.
Interior - Nothing in particular sticks out. Maybe a Ford performance carbon shift knob if I can get a really good deal on it.
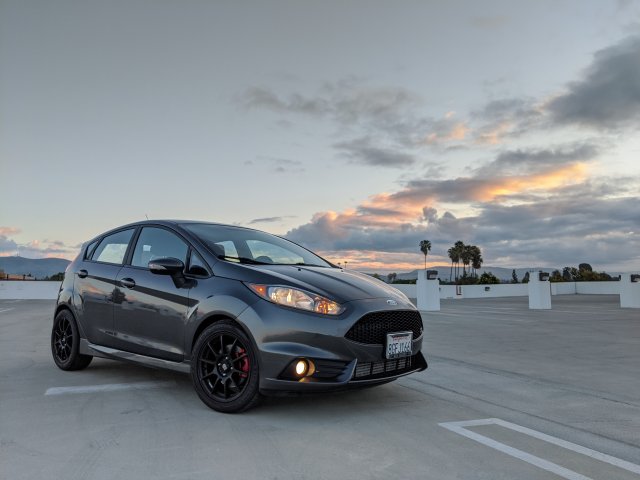
This pic was taken pre-intercooler and intake install, although there would obviously be no visible difference with the intake and very little change with the intercooler. It's just my favorite pic for showing how Magnus looks cosmetically.
The background: I got Magnus brand new back in October 2018, stepping up from my parents' '05 Corolla S. My first car I've owned, first car I've paid insurance for, and first manual car I spent any substantive amount of time with. Also, my attainable dream car, a title it has continued to deserve ever since, every single time I clutch in, start it up and jiggle the gear stick in homage to the manual gods. For the Corolla that I drove previously, the extent of my modifications and 'wrenching' was affixing a pair of questionable black hub caps and putting a couple new screws into the spring mechanism attached to the center armrest storage cubby. With Magnus, I hoped to be a bit more involved than that. Keep in mind, Magnus is my daily driver and only car, so I don't want (nor do I have the budget
Old and Busted...New Hotness
Previous mods done: The first thing I did, following the sage wisdom of you lot, was putting on a Cobb rear motor mount (RMM hereafter). This happened just over 2000 miles into ownership, and WOW!, I felt ZERO difference. My biggest annoyance with the car, and what I thought this would fix, was how slow(smooth) you have to be on the 1-->2 gearshift. I didn't understand about rev hang or wheel hop or any of that stuff yet, I just had seen person after person after person putting RMM at the top of the 'first mods' list. Since that time, I have gained a bit more knowledge, and can imagine how much engine movement there would be if I drove the car the way I do now with the stock RMM. 2 months after the RMM install, I did the next thing, which I think is my favorite overall mod in terms of actual effect on the driving experience. I put on a No Pistons 3/8" gas pedal lift spacer. I'm 6'4" with long legs but with small, skinny feet, and the stock pedal placement made it nearly impossible to rev match unless I was stomping on the brakes. The spacer raised it up a noticeable amount and allows me to comfortably rev match using the left side of my foot on the brake and right side on the throttle. Only about 2 weeks after that, I got an Injen intake installed. My boss at the time had connections at Injen, and they used my car as a test to see if their old intake system (14-15) would fit the updated (16-19) Fiestas. The full system didn't fit, due to the different evap wiring, but I got a free cone filter and heat shield out of it to replace the stock airbox and filter. The next thing done happened in the beginning of this year, where I bent my 3rd wheel and busted a tire hitting a piece of wood on the freeway at around 80 mph, and I replace the stock wheels and tires with a set of 16x7 et 42 Sparco Assetto Gara wheels wrapped in 205/50 Firehawk Indy 500s. Oh yeah, and sometime recently I popped out that horizontal grille that covers the intercooler. I have more bent than straight intercooler fins now but man does it look cool haha
The last 2 days: And now we've caught up to the present. In the last 36 hours, I took on (with a friend) the challenge of installing the Cobb intercooler and first-gen intake that I scored at an absolutely obscene deal from my work ($350 for everything, including hot and cold charge pipes and all intake piping to the turbo). I'm gonna start with the tale of the intercooler and me learning some valuable lessons about taking your time, notating where everything was originally, and above all, NOT OVER-TORQUING YOUR BOLTS. I'll set the scene: I arrived at my friend's house at 11:30, full of excitement - not so much for seeing how the car would perform with the new parts, but mainly just the fact of working on the car myself. I had tried and failed before to even remove the headlights, because I couldn't figure out how to get the little Phillips-head retainer screws out (don't look under my hood, the plastic around those fasteners is so scratched it looks like a tiny crazed weasel got stuck under there). Anyway, we get to work, start removing everything to take the headlights, bumper and lower air dam out.
SIDE NOTE: my original plan was to ideally get the intercooler and intake installed on the same day. We got hung up a bit on the stupid bolts that hold the bumper to the fender, those things are a PITA to get at.
Quick thing to note, followed by what may be a tip. The note is that I was referencing this video as the guide, and it only mentions three 8 mm bolts on each side holding the bumper on, but my friend and I had to remove an additional two 10 mm bolts on each side to get it off...When putting it back on, it appears they can be fastened in such a way that they are only attached to the fender, and just slip through holes when you pull the bumper off after detaching the three 8 mm bolts, so I'm not sure if we even needed to take them off, and they caused no shortage of confusion at the end of the install. The tip is the same as the video that I linked says, a flexible bit driver is basically a MUST for removing those bolts connecting the bumper and the fender, especially on the driver's side where there's even less room due to the washer fluid reservoir. Now back to your regularly scheduled programming. We got the front of the car pulled off, exposing the horribly undersized stock intercooler. The removal of that was super simple, just a few bolts off and clamps to loosen and voila. I knew the Cobb intercooler was 50% larger than stock, but I didn't realize just how trash the stock one was until I compared the weight difference of the 2. The stock one feels like a 5 lb dumbbell after you've been curling with 30s for a couple reps. And by curling I mean the upper arm exercise, not the winter Olympic sport, because I know you all were confused on that one. The install problems started when we tried to attach the intercooler first before the new charge pipes. At this stage, with the new intercooler seated what I thought was properly, we realized that we definitely had to get the pipes installed before the intercooler, so we took the intercooler back off, installed the pipes and went to put the intercooler back on.
This is where things got frustrating. I had over tightened the bolt that screwed into this grommet, which is 1 of only 2 mounting points for the intercooler, and had stripped out the bolt badly. We went to an Ace hardware to get a bolt to replace it, though at that point we didn't know that the grommet itself was screwed up. The threading inside was wrecked, and the rubber gasket around it had broken off at the top, so anything attempting to screw into it would just spin in place. We discovered this when we got back, put the intercooler in place and tried the new bolt which promptly got stuck and would not go either in or out. After like 30 mins of trying to remove it, we were finally successful, using a spare piece of rubber to provide enough friction that the new bolt would actually come out. But then we had to figure out how to mount the intercooler, as I was understandably not comfortable only having it attached by 1 bolt. We went to the nearest Ford dealer to see if they happened to have a replacement in the parts department, but they were closed for Memorial Day. Then we went to Home Depot and jerry-rigged a replacement for the grommet, involving a longer bolt, some washers, and some nuts. The problem was that the washers we got were too small for the plastic piece that the grommet was attached to, and my friend had a genius idea of creating our own washer using a nickel. This was at like 9 pm, and it took us another 2ish hours to get all the charge pipes attached properly then reattaching the entire front end of the car, including those stupid fender/bumper bolts. Took it out for a quick test run, nothing felt off, got back, checked to ensure no leaks, and that was that.
Old and Busted...New Hotness 2
Today I tackled the intake on my own, and compared to the intercooler it was a wonderfully relaxing experience. The entire thing was about 2.5 hours, removing the stock system was very straightforward, both of the biggest issues I had were related to the Injen heat shield. That shield is secured by 2 bolts, both of which have nuts on the underside of the shield, which are very awkward to get to, even with a manual wrench, let along a ratcheting wrench. The other problem was the shield was secured by 12 mm nuts, and there was a rusted nut stuck in the end of the only 12 mm wrench I had, and it took a little while to free that. Other than that, everything was pretty smooth sailing, even installing the 16-19 evap harness fix, which was the part I was the least sure about what I was doing.
Old and Busted...New Hotness 3
Driving Impressions: Living in Southern California, we are spoiled for choice when it comes to great driving roads, and the Fiesta ST is such a capable platform for all different types. As previously mentioned, the gas pedal spacer is my favorite mod affecting driving, but I think the intercooler and intake combination may overtake that in time. The pair have only been on the car for a few hours and a few miles, but already I can feel an increased throttle response and slightly more aggressive engine tone over 5k RPM. Hopefully better cooling is part of the equation as well, next time I'm driving spiritedly on Angeles Crest Hwy (ACH), I'm really hoping I won't have to blast my heater. The wheels are a 50/50 split on aesthetic vs performance mod, they look absolutely phenomenal in my opinion, and with the 5 mm smaller offset from stock, give it a subtly more aggressive profile for all angles than the stock wheels do. However, I did intentionally go a size smaller, trying to 1) make them less expensive than stock size, 2) make them lighter than stock size, and 3) take advantage of a taller sidewall tire for a little bit better road comfort on bumps. The Firehawk Indy 500s have been impressive. The stock Potenza RE050A is an AWESOME tire, definitely on the edge of street and track tire in terms of grip. however, you pay OEM and track pricing for them, and Indy 500s came highly reviewed for being the MUCH cheaper alternative with 90-95% of the grip and better road manners. I've taken them up to ACH multiple times this year, and a nearly track prepped Miata with R888Rs and a McLaren 570s were both very impressed with how well the FiST stuck with them.
What's next?
Performance - Accessport to take advantage of being Stage 2, Thermal R&D catback exhaust, and maybe a Velossa Tech Big Mouth or a blow off valve. The Cobb intake performs extremely well, but the Injen one was way louder, and I kinda miss it already.
Cosmetic - tint, LED mirror turn signals from Whoosh, Velossa Tech diffuser fins, lowering springs (most likely Mountune). I put springs in the cosmetic category because I love the way the car handles right now, I don't need the last word in cornering ability given that Magnus is my daily and only car, I just want him to be at MAX an inch lower, so his stance is the way I want.
Interior - Nothing in particular sticks out. Maybe a Ford performance carbon shift knob if I can get a really good deal on it.
This pic was taken pre-intercooler and intake install, although there would obviously be no visible difference with the intake and very little change with the intercooler. It's just my favorite pic for showing how Magnus looks cosmetically.