The stock radiator is asked to cool the water and oil and on hot days, especially higher powered cars, it simply cannot do the job. Disconnecting and even better removing the stock oil to water cooler frees up the radiator to do it's job better and a remote oil cooler is more effective than the stock setup.
For those with the very costly 2-J radiator or willing to DIY a bigger than stock radiator this mod may not need to be done, results may vary. I am going all out but will have big power on road race tracks in hot weather so just doing all I can as many years experienced at what it takes to keep a car drivable on track.
I have ran the car on two track days on moderately tuned Cyborg setup, 75 degrees, highest temp logged during a 25 minute session really going all out was around 205 degrees oil temp and one spike of 230 on water temp but the rest of the weekend the highest water temp was below 220 if I recall. I will look through the hundred+ logs I have to see if I can find the info, which I have posted here likely somewhere before.
-------
NOTE:
This is a thread in progress, I just sent this info to a member and after spending the time on it decided to make a thread specifically for it, I have posted some of this before but wanted to have once concise place to find the info.
If you have links, pics, results of your mods, recommendations, questions, corrections, etc.. please post")
I will add pictures as I take a few more.
------------------------
To removed the stock cooler you need a 12mm allen socket that is long enough to reach the mounting part used to hold on the cooler. I had to buy one as my regular allens socket set was not long enough, I think it was 2.5 " total length.
*Picture to follow
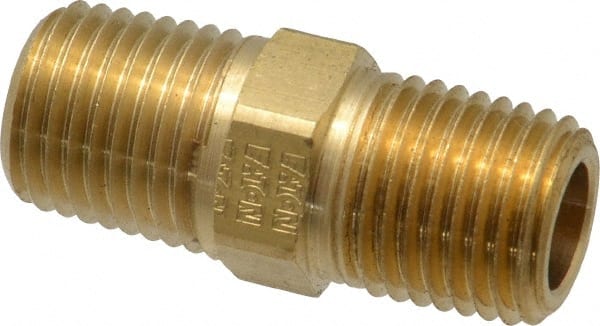
Then you need a nipple to screw into the block to hold on the Mocal(or other brand) plate, make sure it has a thermostat.
I used a brass one I found, same threads on both ends as the oil filter so you can use a filter to test the threads, but I found one with a hex drive flange in the middle so I could use a socket to tighten it against the Mocal unit. That part was at my local hardware store, I can look again to get specs off it.
UPDATE: I was at the hardware store, it is called a 3/4" Hex coupler.

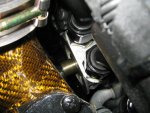
As you can see, much tighter space to work with leaving the stock oil to water cooler in place, only the stock size oil filter fits and a bit hard to change oil and not make a mess. It was very low cost and pretty easy to remove it.
I will post a better set of pictures if I find them.

Note: I prefer push on hoses instead of braided as much less weight, less cost, less abrasion easier to work with and they are still race grade. I had a hose blow off at high speed once due to miss matching hose and fittings as different brands are not exactly the same, now I use SS crimps for added insurance, low weight, low cost, they are for sprinkler installs and easy to use and not hard to removed if needed, problem solved or prevented.
Note:
The thread on the other side is what you screw the filter onto though I wish it had a couple of more turns on the threads it was all I could find but seems to be just fine as the hoses and fittings keep it from moving anyway but I am looking for something longer if I can find it. I think it is standard pipe thread here and I might use a brass nipple that is a bit longer and silver solder and flange to it to tighten it with if I cannot find a better solution.
*Will post a picture the next time I change my oil
If enough people wanted one I could draw one up and have stainless steel ones made but they would be quite costly.
-------------------
Here is a way to save a bit more weight, the hose and fluid inside it and clean up the area a bit, more room to get to the filter, etc.....
*I have pictures I can post and or take more precise ones
The water from the overflow tank and passenger compartment are met at a tee between the alternator and throttle body.
The one leaving to the right from the front looking at the car feeds to the oil to water cooler and from there to a connector on the right side of the engine to go to the heater through the firewall.
I pulled out the T and removed a little alignment tab and put it back in place flipped over and attached the hose from the overflow tank to it. Then I cut off the outlet hose a couple of inches as it tapered down, slide in a brass thin wall barbed fitting and used clamps and a section of heater hose to match the new outlet side and ran it to the connection at the right side of the engine. I heat wrapped the hose where it passed the throttle body as well.
*Alignment tab is easy to see when part is removed, clip holds this part on, O-Ring sealed.
I did not weigh the parts or estimate the fluid weight as I do many parts but it will save at least 1lb and it all adds up, cost was minimal, effort as well, looks much cleaner, more room to work, worth it to me to do these extra steps.
The oil cooler was chosen for the biggest one to fit where I needed it and fitting on the same end, dual pass, to keep housed out of the air flow. It was mounted to the left as far as possible so at least 1/3 of the air does not hit the AC condenser/radiator area and I opened up the radiator support behind it to allow air to flow through that section better. I also used ABS sheet to block air from leaving the area unless it went through the coolers.
This is a bit more extreme than some may want to do but the overall principle is the same, at leat you can clean up the air flow with using some of the ideas here. Drill holes in the crash beam and vertical section, cooler lines not blocking airflow, etc....

At first I drilled holes in the hugely over sized and very none aerodynamic crash sensor mount beam to all out more air flow but later made a much smaller new unit to be even less restrictive and welded on tabs for the oil cooler mounts. It was much lower in weight and about 30% less restrictive than the stock beam.
I also drilled holes in the vertical support between the ribs for more flow, the one in front of the AC/radiator cores.
I then drilled holes, step bit works best, into the middle of the ribs on the lower section of the radiator support to allow much more air out the back of the IC to make it much more effective.
And made ABS seals for everything.
*Pics to follow
The oil warms up quite quickly with this setup even on cold days, it may not not be as fast as the stock setup but fast enough as I did not check since my car was only stock for 293 miles which I put on less than 20 of them when I did this mod.
As for oil filter I use NAPA branded Wix Gold Gold part number 1355 as superb and low cost and approx twice the size of the stock filter but I could fit an even bigger one and may the next time. I have done this for many many years on pure race cars, street and race, etc, a barely more cost than stock size filters for a gain in capacity and filtering.

For those with the very costly 2-J radiator or willing to DIY a bigger than stock radiator this mod may not need to be done, results may vary. I am going all out but will have big power on road race tracks in hot weather so just doing all I can as many years experienced at what it takes to keep a car drivable on track.
I have ran the car on two track days on moderately tuned Cyborg setup, 75 degrees, highest temp logged during a 25 minute session really going all out was around 205 degrees oil temp and one spike of 230 on water temp but the rest of the weekend the highest water temp was below 220 if I recall. I will look through the hundred+ logs I have to see if I can find the info, which I have posted here likely somewhere before.
-------
NOTE:
This is a thread in progress, I just sent this info to a member and after spending the time on it decided to make a thread specifically for it, I have posted some of this before but wanted to have once concise place to find the info.
If you have links, pics, results of your mods, recommendations, questions, corrections, etc.. please post
I will add pictures as I take a few more.
------------------------
To removed the stock cooler you need a 12mm allen socket that is long enough to reach the mounting part used to hold on the cooler. I had to buy one as my regular allens socket set was not long enough, I think it was 2.5 " total length.
*Picture to follow
Then you need a nipple to screw into the block to hold on the Mocal(or other brand) plate, make sure it has a thermostat.
I used a brass one I found, same threads on both ends as the oil filter so you can use a filter to test the threads, but I found one with a hex drive flange in the middle so I could use a socket to tighten it against the Mocal unit. That part was at my local hardware store, I can look again to get specs off it.
UPDATE: I was at the hardware store, it is called a 3/4" Hex coupler.
As you can see, much tighter space to work with leaving the stock oil to water cooler in place, only the stock size oil filter fits and a bit hard to change oil and not make a mess. It was very low cost and pretty easy to remove it.
I will post a better set of pictures if I find them.
Note: I prefer push on hoses instead of braided as much less weight, less cost, less abrasion easier to work with and they are still race grade. I had a hose blow off at high speed once due to miss matching hose and fittings as different brands are not exactly the same, now I use SS crimps for added insurance, low weight, low cost, they are for sprinkler installs and easy to use and not hard to removed if needed, problem solved or prevented.
Note:
The thread on the other side is what you screw the filter onto though I wish it had a couple of more turns on the threads it was all I could find but seems to be just fine as the hoses and fittings keep it from moving anyway but I am looking for something longer if I can find it. I think it is standard pipe thread here and I might use a brass nipple that is a bit longer and silver solder and flange to it to tighten it with if I cannot find a better solution.
*Will post a picture the next time I change my oil
If enough people wanted one I could draw one up and have stainless steel ones made but they would be quite costly.
-------------------
Here is a way to save a bit more weight, the hose and fluid inside it and clean up the area a bit, more room to get to the filter, etc.....
*I have pictures I can post and or take more precise ones
The water from the overflow tank and passenger compartment are met at a tee between the alternator and throttle body.
The one leaving to the right from the front looking at the car feeds to the oil to water cooler and from there to a connector on the right side of the engine to go to the heater through the firewall.
I pulled out the T and removed a little alignment tab and put it back in place flipped over and attached the hose from the overflow tank to it. Then I cut off the outlet hose a couple of inches as it tapered down, slide in a brass thin wall barbed fitting and used clamps and a section of heater hose to match the new outlet side and ran it to the connection at the right side of the engine. I heat wrapped the hose where it passed the throttle body as well.
*Alignment tab is easy to see when part is removed, clip holds this part on, O-Ring sealed.
I did not weigh the parts or estimate the fluid weight as I do many parts but it will save at least 1lb and it all adds up, cost was minimal, effort as well, looks much cleaner, more room to work, worth it to me to do these extra steps.
The oil cooler was chosen for the biggest one to fit where I needed it and fitting on the same end, dual pass, to keep housed out of the air flow. It was mounted to the left as far as possible so at least 1/3 of the air does not hit the AC condenser/radiator area and I opened up the radiator support behind it to allow air to flow through that section better. I also used ABS sheet to block air from leaving the area unless it went through the coolers.
This is a bit more extreme than some may want to do but the overall principle is the same, at leat you can clean up the air flow with using some of the ideas here. Drill holes in the crash beam and vertical section, cooler lines not blocking airflow, etc....
At first I drilled holes in the hugely over sized and very none aerodynamic crash sensor mount beam to all out more air flow but later made a much smaller new unit to be even less restrictive and welded on tabs for the oil cooler mounts. It was much lower in weight and about 30% less restrictive than the stock beam.
I also drilled holes in the vertical support between the ribs for more flow, the one in front of the AC/radiator cores.
I then drilled holes, step bit works best, into the middle of the ribs on the lower section of the radiator support to allow much more air out the back of the IC to make it much more effective.
And made ABS seals for everything.
*Pics to follow
The oil warms up quite quickly with this setup even on cold days, it may not not be as fast as the stock setup but fast enough as I did not check since my car was only stock for 293 miles which I put on less than 20 of them when I did this mod.
As for oil filter I use NAPA branded Wix Gold Gold part number 1355 as superb and low cost and approx twice the size of the stock filter but I could fit an even bigger one and may the next time. I have done this for many many years on pure race cars, street and race, etc, a barely more cost than stock size filters for a gain in capacity and filtering.