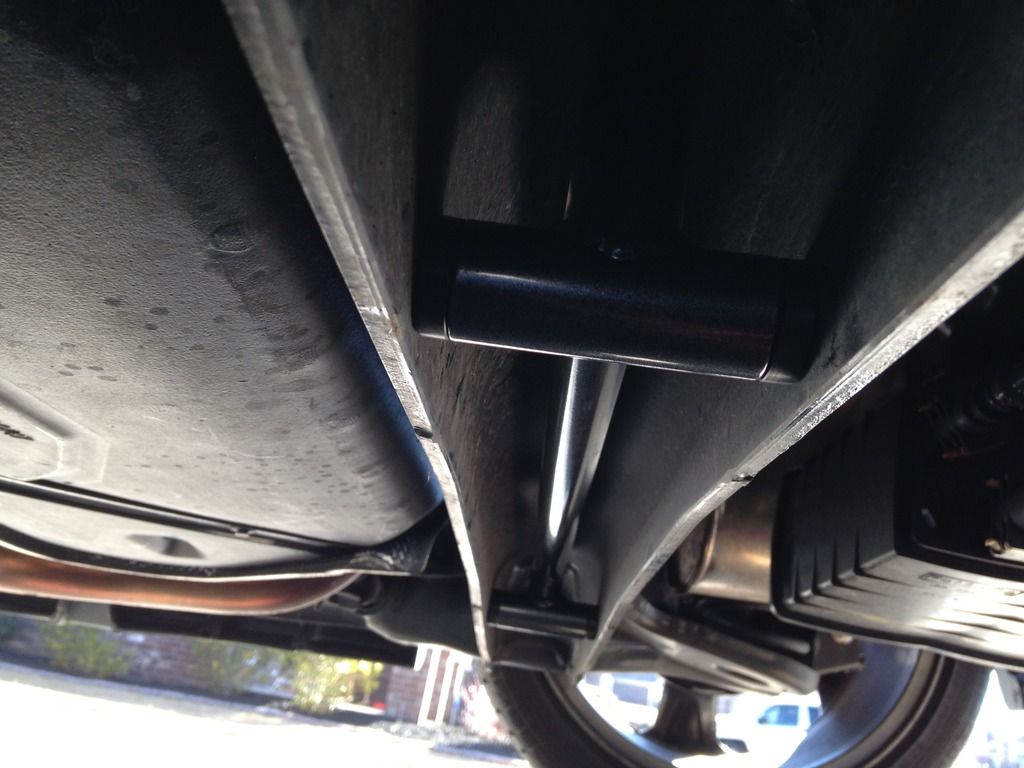
Pierce Motorsports torsion bar

Member ID
#3328
Messages
405
Likes
123
#1
Just finished installing the rear torsion bar with my girlfriend. I have to say the bar quite literally keeps the rear composed from harshness somehow. Also uneven pavement issues...not even a problem anymore.

Question for ppl who have installed specifically the pierce bar. Did anyone else find the bar a bit difficult to set in and thread it?? I was only able to get one side up to install the bar. Might that pose a problem for seating the bar properly?


D1JL

7000 Post Club
Staff Member
Premium Account
Member ID
#1011
Messages
7,928
Likes
4,188
#2
The tolerance is tight however, that is part of why it works well.
The best way I found to install is to not push the bar up on either side until both side threads have been started.
Then tighten equally until the bar is seated.


Dave


OP
D
Member ID
#3328
Messages
405
Likes
123
Thread Starter #3
With the lock washers installed I had to hammer the bar into place just so the bolt could catch the threads. Don't get me wrong there is a reason it's in there snugged.


D1JL

7000 Post Club
Staff Member
Premium Account
Member ID
#1011
Messages
7,928
Likes
4,188
#4
Sorry I forgot about the lock washers.
I first installed without the lock washers.
Then after the bar was in place I removed the bolts, one at a time to install the lock washer.


Dave


OP
D
Member ID
#3328
Messages
405
Likes
123
Thread Starter #5
Dammit why didn't I think of that.


OP
D
Member ID
#3328
Messages
405
Likes
123
Thread Starter #6
My device side is barely tightened.


Kip2MyLou

2000 Post Club
Member ID
#568
Messages
2,819
Likes
168
#7
I'll be installing mine shortly so any tips for install are definitely appreciated. I've only heard great things about the part though. I'll be putting that on along with the upper front strut brace.


OP
D
Member ID
#3328
Messages
405
Likes
123
Thread Starter #8
Eyeball it the best you can and tighten both sides simultaneously slowly.


D1JL

7000 Post Club
Staff Member
Premium Account
Member ID
#1011
Messages
7,928
Likes
4,188
#10
Dammit why didn't I think of that.
During testing, I had this bar on and off the car many times.
This was the best way I found.
I didn't use the lock washers until the final install.


Dave


Member ID
#2224
Messages
326
Likes
50
#11
Would there be a big benefit switching from the TBPerformance bar to this one? I know that the pierce stuff is really high quality, I have pretty much everything else available from them on my car and my brother just put his street kit on his veloster turbo.


D1JL

7000 Post Club
Staff Member
Premium Account
Member ID
#1011
Messages
7,928
Likes
4,188
#12
Would there be a big benefit switching from the TBPerformance bar to this one? I know that the pierce stuff is really high quality, I have pretty much everything else available from them on my car and my brother just put his street kit on his veloster turbo.
Not wanting to say that TBP parts are bad as that is not true.
However, in this case, over time with constant twisting of the beam the TBP bar will loose it's effectiveness.
This is the purpose of the additional cross tubes on the PM bar.
The cross tubes hold the bar ridged within the beam, preventing the bolts from warring or just elongating the mounting holes.


Dave


OP
D
Member ID
#3328
Messages
405
Likes
123
Thread Starter #13
Exactly one of the reasons I chose pierce for this specific part.


Member ID
#2224
Messages
326
Likes
50
#14
Not wanting to say that TBP parts are bad as that is not true.
However, in this case, over time with constant twisting of the beam the TBP bar will loose it's effectiveness.
This is the purpose of the additional cross tubes on the PM bar.
The cross tubes hold the bar ridged within the beam, preventing the bolts from warring or just elongating the mounting holes.


Dave
That's good info, thanks! This bar may be in my future.


Member ID
#3809
Messages
154
Likes
49
#15
Mine did not come with any washers, I scrounged up a pair of flat washers and used some Loctite blue to bolt it up and torqued it down. Went in easy, held the bar up in place, started one bolt a couple of threads, then went to the other side and started the other. Finger tightened both sides down, then went back and forth with a ratchet to snug them: up a couple turns each side till they bottomed out, then broke out the torque wrench.


Member ID
#3809
Messages
154
Likes
49
#16
Followup to this one: if you order the Pierce bar make sure they include the lock washers. Mine recently began making popping sounds with hitting bumps, any surface that twists the rear axle. Contacting Pierce they tell me that of course lock washers are required, and they should have been in the bag with the bolts. Then they tell me the washers are standard 1/2" size and should be cheap for me to pick up on my own.

Of course I just took a new assignment up to Pittsburgh, am staying in lodging while looking for an apartment, and have no tools or garage... hell I am not sure there is a jack in the car. So that reply just gave me all kinds of warm fuzzies. If you see a disgruntled looking guy in ABUs driving around PA in a popping FiST, that'd be me.

TLDR: Make sure there are washers in your kit and installed on your car. Don't expect Pierce to send missing parts. Don't move till absolutely sure there are no issues with your new shiny toys.


jeff

2000 Post Club
Member ID
#3723
Messages
2,310
Likes
3,238
#17
I received this yesterday and installed today. It literally took 5 minutes. The only thing of any consequence to consider here is as others have mentioned: put the bar in place, then get each bolt threaded a few turns, then tighten each side a few turns at a time until it's all the way tight.

I haven't driven the car much but did zip around the neighborhood to make sure nothing felt/sounded strange. I'll drive all day tomorrow and report back. Taking a few 90 degree turns at 20 mph I did notice a change - the back end feels more planted and it's as if the seats are hugging you a bit tighter than before. Very good quality piece.


Member ID
#10195
Messages
53
Likes
23
#18
I spent about 30 minutes yesterday trying to install mine...one side will bolt in easy but the other side is off a millimeter or 2. I ran out of time so gave up. I figured it was because I was on ramps and maybe the beam was slightly twisted? Other than that I cant figure out while it's so difficult. I'm going to try Jack stands next time when I have a chance.

Sent from my SM-N960U1 using Tapatalk


D1JL

7000 Post Club
Staff Member
Premium Account
Member ID
#1011
Messages
7,928
Likes
4,188
#19
I spent about 30 minutes yesterday trying to install mine...one side will bolt in easy but the other side is off a millimeter or 2. I ran out of time so gave up. I figured it was because I was on ramps and maybe the beam was slightly twisted? Other than that I cant figure out while it's so difficult. I'm going to try Jack stands next time when I have a chance.

Sent from my SM-N960U1 using Tapatalk

Try just starting the threads on one side then start the other side before you tighten it into the twist beam.
If that doesn't work, you can file the holes in the beam, a little (in or out) without comsequnce.


dmb

Active member
Member ID
#8381
Messages
554
Likes
213
#20
try jacking the beam in the center, maybe the small amount of droop might get you there.


Top