
I don't normally do writeups on things so I will have bad visuals and probably bad writing, so here's my apology in advance  If you have questions and want to get to me fastest, @pizza_st_ on Instagram is your best bet!
I absolutely had to give a writeup of this to potentially help some people out, because I had a horrible time trying to find ANY information whatsoever on how to do this. Finding a hub took far too long and wiring was a huge pain, especially since I hadn't done something like this before. Hopefully this helps someone who was on the fence about doing a project like this!
Before I start, I want to clarify that I am not encouraging people remove airbags from their cars. You will lose your steering wheel airbag installing any quick release aftermarket wheel. In my car, I have a harness bar + seats + 4pt harnesses installed. The safety concerns of a project like this are for your discretion to figure out whether it's worth it. Do your safety research!
I'm (obviously) not responsible for anything you damage doing something like this, either.
With that out of the way, here's a parts list for the setup I created:
Steering wheel hub: NRG SRK-193 hub (https://www.ebay.com/itm/124785811583)
- Unless someone finds a better option, this is the ONLY wheel hub I could find that had adequate space for cables and allowed use of the factory clock spring.
Cruise control mount: DND 350Z Cruise Control Kit (https://www.dndperformanceinterior....-control-kit/products/350z-cruise-control-kit)
- You could probably find a different mount if you wanted, but I find this mount to look good for this install.
Steering wheel: DND Leather Touring Wheel (red stitching) (https://www.dndperformanceinterior.com/collections/leather/products/leathertouringwheel)
- You can use any 6x70mm bolt pattern steering wheel, but I find this wheel to be a good balance between inexpensive but not garbage.
Quick release: NRG SRK-200BK Quick Release (https://www.amazon.com/gp/product/B007ZG6TUC/ref=ppx_yo_dt_b_asin_title_o04_s01?ie=UTF8&psc=1)
- There are many options out there. These releases are good for a decent amount of time, just don't do the stupid spinning you see on TikTok and these are fine. You can use any 6x70mm quick release that has the contacts for a horn button (or not, if you don't care about the horn).
Turn signal extension:(https://www.amazon.com/gp/product/B07MFDRJGH)
- Because of the extra distance this setup adds between the wheel stalks and the new steering wheel, you'll need a turn signal extension to be able to reach/activate your turn signals without taking your hand off of the wheel. I used this one because it was cheap, but many options are out there. This specific one works well for me, though I will note I can only FLASH my high beams; it prevents the stalk from clicking to the second position. This is made more clear in one of my post photos. You may need a different extension if that's a deal breaker, but I don't use HBs often and it's $12.
In my case, the cost of these is $145, $50, $155, $80, and $12. So for a similar setup, you can expect to spend ~$450.
First step is unplugging the battery from your car. Just remove the negative terminal and let it sit for however long you feel necessary. Most people agree 30 minutes is plenty.
Second is taking off the wheel. If you want a video to follow, this one (
View: https://www.youtube.com/watch?v=j8MuPb8kmzU
) is a decent video. Straighten your steering wheel, and get a long metal device like a long ~3mm hex wrench/key. There are 3 points on the back of the steering wheel that release clips you need to push, using it. These release the airbag unit from the wheel.
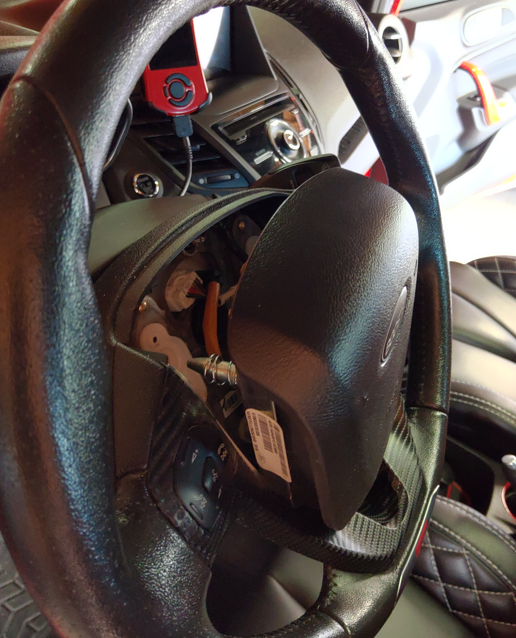
After these clips are released, move the airbag up and release the two clips and one wire from the back. From there, you can take a 24mm socket to remove the OEM wheel. Again, make sure the wheel is straight during this (you'll need it to be straight for installing the hub). I recommend taking this 24mm bolt only halfway off, so you can jerk the steering wheel loose without it potentially smacking you in the face. After you have it loose, remove the bolt the rest of the way and carefully take the wheel off, feeding the airbag wiring through its designated hole. Be careful with the clock spring behind it; you want to avoid having it move/rotate as much as possible so you don't accidently damage it.
Now we remove the wiring harness and cruise control "pod" from the wheel. Take your OEM wheel and find the two T10 torx screws on the back that hold the buttons and trim onto the wheel. Unscrew these, and take it off. Now, there are 3 T8 torx screws that hold each button pod on; in this case I'm just taking the cruise control one off. You could do both if you care that much about your media controls, but seeing as how they're all on the radio I figured I'd be fine without them. Now find the 4(?) thick cable ties that hold the wiring to the steering wheel, and carefully snip 'em. There's one philips-head screw holding a ground point to the wheel, so unscrew that and then the whole wiring harness of the OEM wheel can be removed.
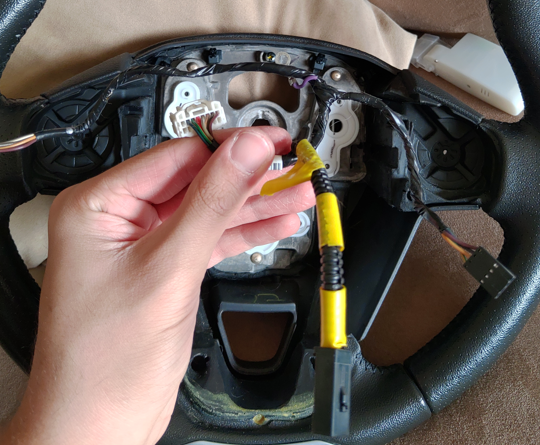
For reference throughout the rest of this guide, in case it's helpful, here's what these wires are for:
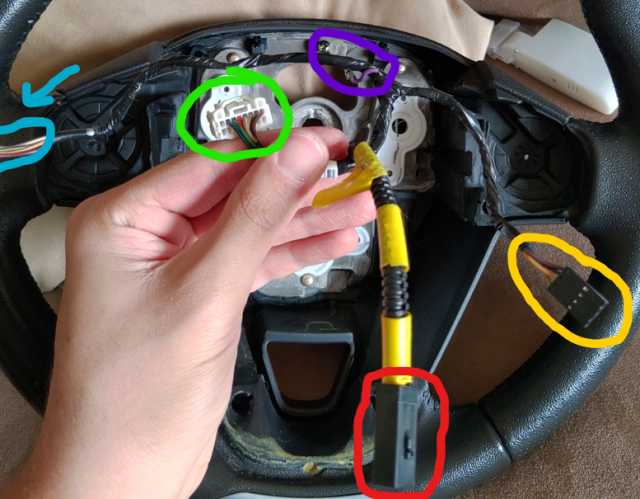
Purple is the ground point. Green is the main connector that goes to the clock spring. Blue (mostly off-image) is for the media controls. Yellow is for the cruise control. Red is actually a positive wire for the horn, which would've gone to the OEM airbag unit.
With the harness removed, we work on installing the hub. Plug the harness from the OEM wheel into the clock spring (again, be careful with it and avoid rotating it as much as possible), then take your hub (with the logo and small white dot-label on top) and slide it onto the steering column, carefully feeding the wires for the airbag and wheel functions through the large space in the top of the hub. Keep the wiring out of the way and reinstall and tighten the 24mm bolt that'll hold the hub to the column. NOTE: A non-permanent threadlocker (ex. blue loctite) should be used on this bolt, and if you want to go to spec, the torque spec I found for this bolt is 30ft/lbs.
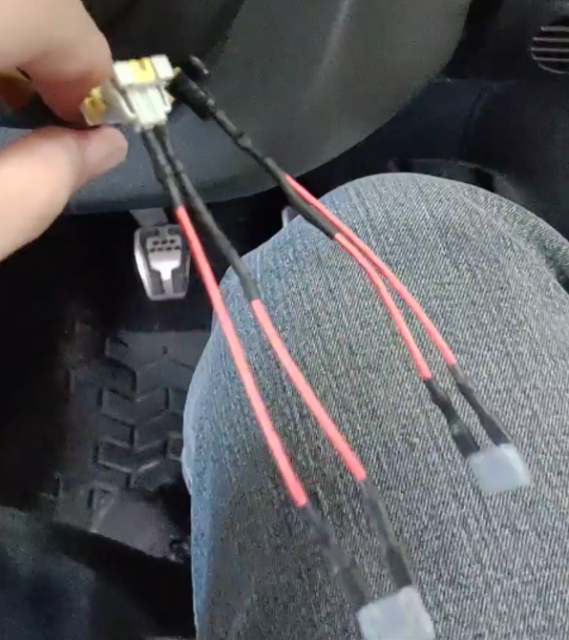
Now, all the wiring.. yay. Take some electrical tape and cover up the connector for the media control button pod (labeled blue in the reference image above); it won't be used here (unless you want to, in which case you'll have to duplicate all the steps involving the cruise control pod in this writeup). Take the philips screw holding the grounding wire to the hub and unscrew it. Now re-add that screw with that grounding wire, but underneath it add the purple wire (labeled purple in the reference image above) that was being used as a grounding point previously on the OEM wheel. Now, there are two connectors (with two wires each) that go to the back of the OEM wheel's airbag. Find the two 2A (at least, that's what they were labeled in mine) resistors/fuses in the box for your steering wheel hub (the SRK-193H). Plug the two ends of each resistor/fuse into each connector. To specify, DO NOT bridge across the two different airbag connectors with these! Simply plug the two ends of the resistor/fuse into the two ends of one connector, and repeat for the other (as shown in this below reference image).
Now secure them how you see fit; I just wrapped each one up with some electrical tape. Now, all that's left for new connections to make is the two (positive and negative) for the horn. Read the rest of this paragraph before following it; you need to run some wires through the cruise control mount or you'll have to do it twice. Go get your quick release (the side that goes to the car; not the side that attaches to your new steering wheel) and connect its positive lead to the positive horn connector (labeled in red in the earlier reference image) in some way; you might have to get an extra piece of wire and figure something out to securely connect this. Secure it with electrical tape or something else. Now take the other (negative) lead from your quick release, and connect it to the wire that's coming off of the hub as a ground point. Both of these wires will have to be routed through the middle of the cruise control bracket.
Now, the "fun" and fumbly part. You need to manage the earlier wiring that isn't going to the cruise control or the horn, and manage it into the hub. Best of luck. Now, keep the cruise control connector (and as much wiring from it as you can) sticking out from in-between the hub and the quick release where the cruise control bracket makes a hole for that wire. Take the screws that are used to mount the quick release to your hub, and put them on most of the way so that the quick release is held in place, but nothing is tight and you can move the cruise control wire (that's dangling out) around. You need to drill a single hole through the cruise control bracket; I don't have an exact position to tell you; line up the cruise control pod to the mount and figure out a good spot. You are reusing the factory T10 screw that used to hold the pod to the OEM wheel for this. Once you've drilled your hole, it's time to mount the cruise control pod. IMPORTANT: If you are reusing the screw that used to hold the pod in, you WILL need a few mm's worth of washers. If you don't do this, the screw will be too long and penetrate the back of the housing, likely breaking your cruise control pod. I had to crack mine open to fix this mistake, so don't do the same. Once it's mounted to the bracket, click the connector in. You can now tighten the 6 quick release screws, being cautious of the cruise control wire (making sure it stays in the gap the cruise control bracket adds). Do your tightening in a star pattern like you're putting on wheels, for equal pressure.
Now take a sigh of release, because most of the work is done!
Take your new steering wheel and bolt it to the wheel-side of the quick release. Take the horn that's included with the steering wheel (assuming you're using the same one), and connect its contacts to the two wires coming off of the quick release. Don't worry much about getting it wrong; if you get it wrong, then you'll know because you'll put the steering wheel on and it'll immediately sound the horn and the horn will stay on until you remove the wheel. Once you've checked that it's the correct polarity/orientation, press the button into its spot.
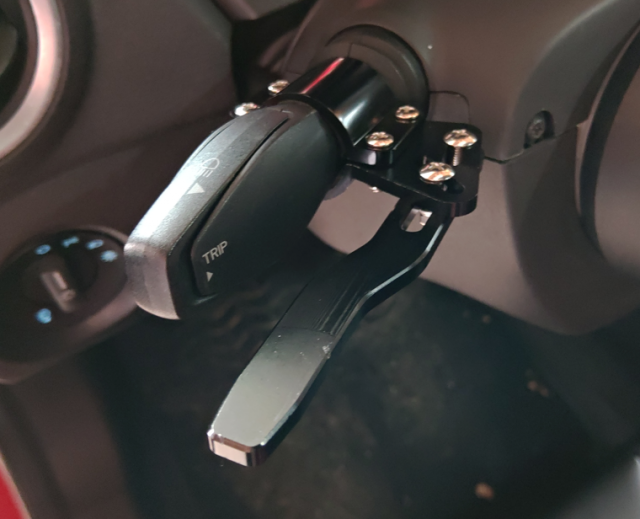
Assuming you're using a turn signal extension, you can add this now. The one I listed has two sizes of foam pads it comes with (and longer screws, which I needed) so that you can avoid crushing the plastic of the turn signal. It's pretty sturdy and feels nice.
If you have further questions, like I mentioned earlier, I'll be fastest to reply if you send them directly to me @pizza_st_ on Instagram. Otherwise, feel free to reply here!
EDIT: I should note that this moves the steering wheel significantly closer to you. I'm 5'11" and find it slightly closer than I'd like, but it's fine for me. If you have the seat further forward, you will have less room. Don't use a deeper dish wheel, and if you want it significantly further back you might have to ditch using a quick release.
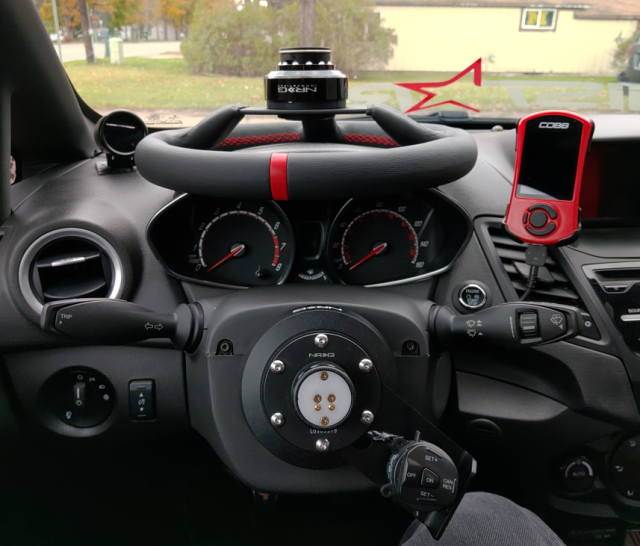
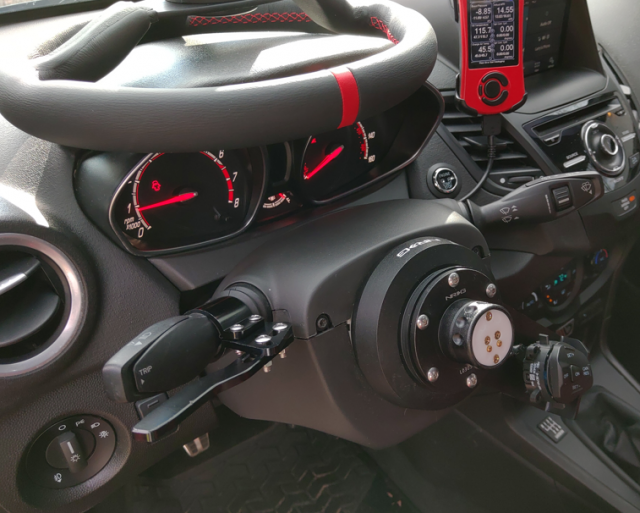
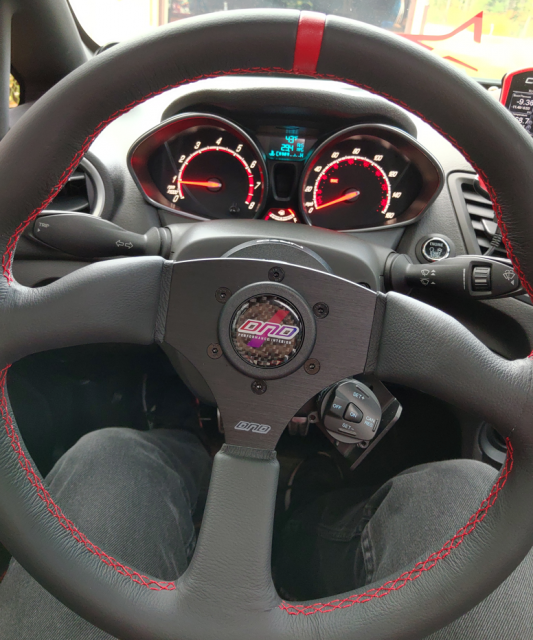
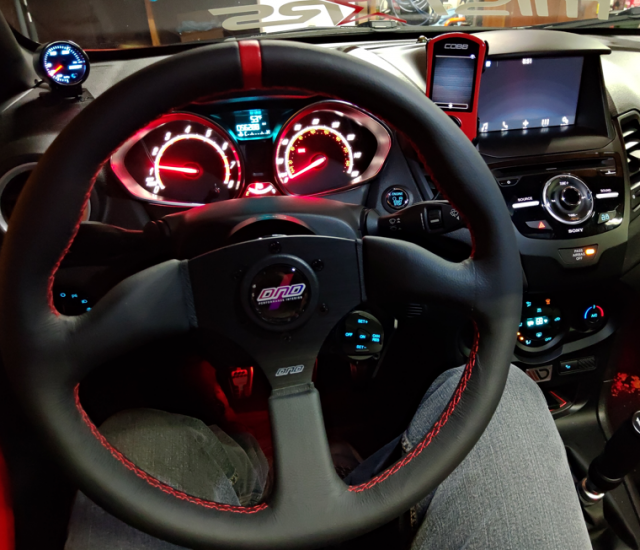
Here's various pictures of the finished install (some were taken before my turn signal extension arrived):
If you have questions and want to get to me fastest, @pizza_st_ on Instagram is your best bet!I absolutely had to give a writeup of this to potentially help some people out, because I had a horrible time trying to find ANY information whatsoever on how to do this. Finding a hub took far too long and wiring was a huge pain, especially since I hadn't done something like this before. Hopefully this helps someone who was on the fence about doing a project like this!
Before I start, I want to clarify that I am not encouraging people remove airbags from their cars. You will lose your steering wheel airbag installing any quick release aftermarket wheel. In my car, I have a harness bar + seats + 4pt harnesses installed. The safety concerns of a project like this are for your discretion to figure out whether it's worth it. Do your safety research!
I'm (obviously) not responsible for anything you damage doing something like this, either.
With that out of the way, here's a parts list for the setup I created:
Steering wheel hub: NRG SRK-193 hub (https://www.ebay.com/itm/124785811583)
- Unless someone finds a better option, this is the ONLY wheel hub I could find that had adequate space for cables and allowed use of the factory clock spring.
Cruise control mount: DND 350Z Cruise Control Kit (https://www.dndperformanceinterior....-control-kit/products/350z-cruise-control-kit)
- You could probably find a different mount if you wanted, but I find this mount to look good for this install.
Steering wheel: DND Leather Touring Wheel (red stitching) (https://www.dndperformanceinterior.com/collections/leather/products/leathertouringwheel)
- You can use any 6x70mm bolt pattern steering wheel, but I find this wheel to be a good balance between inexpensive but not garbage.
Quick release: NRG SRK-200BK Quick Release (https://www.amazon.com/gp/product/B007ZG6TUC/ref=ppx_yo_dt_b_asin_title_o04_s01?ie=UTF8&psc=1)
- There are many options out there. These releases are good for a decent amount of time, just don't do the stupid spinning you see on TikTok and these are fine. You can use any 6x70mm quick release that has the contacts for a horn button (or not, if you don't care about the horn).
Turn signal extension:(https://www.amazon.com/gp/product/B07MFDRJGH)
- Because of the extra distance this setup adds between the wheel stalks and the new steering wheel, you'll need a turn signal extension to be able to reach/activate your turn signals without taking your hand off of the wheel. I used this one because it was cheap, but many options are out there. This specific one works well for me, though I will note I can only FLASH my high beams; it prevents the stalk from clicking to the second position. This is made more clear in one of my post photos. You may need a different extension if that's a deal breaker, but I don't use HBs often and it's $12.
In my case, the cost of these is $145, $50, $155, $80, and $12. So for a similar setup, you can expect to spend ~$450.
First step is unplugging the battery from your car. Just remove the negative terminal and let it sit for however long you feel necessary. Most people agree 30 minutes is plenty.
Second is taking off the wheel. If you want a video to follow, this one (
) is a decent video. Straighten your steering wheel, and get a long metal device like a long ~3mm hex wrench/key. There are 3 points on the back of the steering wheel that release clips you need to push, using it. These release the airbag unit from the wheel.
After these clips are released, move the airbag up and release the two clips and one wire from the back. From there, you can take a 24mm socket to remove the OEM wheel. Again, make sure the wheel is straight during this (you'll need it to be straight for installing the hub). I recommend taking this 24mm bolt only halfway off, so you can jerk the steering wheel loose without it potentially smacking you in the face. After you have it loose, remove the bolt the rest of the way and carefully take the wheel off, feeding the airbag wiring through its designated hole. Be careful with the clock spring behind it; you want to avoid having it move/rotate as much as possible so you don't accidently damage it.
Now we remove the wiring harness and cruise control "pod" from the wheel. Take your OEM wheel and find the two T10 torx screws on the back that hold the buttons and trim onto the wheel. Unscrew these, and take it off. Now, there are 3 T8 torx screws that hold each button pod on; in this case I'm just taking the cruise control one off. You could do both if you care that much about your media controls, but seeing as how they're all on the radio I figured I'd be fine without them. Now find the 4(?) thick cable ties that hold the wiring to the steering wheel, and carefully snip 'em. There's one philips-head screw holding a ground point to the wheel, so unscrew that and then the whole wiring harness of the OEM wheel can be removed.
For reference throughout the rest of this guide, in case it's helpful, here's what these wires are for:
Purple is the ground point. Green is the main connector that goes to the clock spring. Blue (mostly off-image) is for the media controls. Yellow is for the cruise control. Red is actually a positive wire for the horn, which would've gone to the OEM airbag unit.
With the harness removed, we work on installing the hub. Plug the harness from the OEM wheel into the clock spring (again, be careful with it and avoid rotating it as much as possible), then take your hub (with the logo and small white dot-label on top) and slide it onto the steering column, carefully feeding the wires for the airbag and wheel functions through the large space in the top of the hub. Keep the wiring out of the way and reinstall and tighten the 24mm bolt that'll hold the hub to the column. NOTE: A non-permanent threadlocker (ex. blue loctite) should be used on this bolt, and if you want to go to spec, the torque spec I found for this bolt is 30ft/lbs.
Now, all the wiring.. yay. Take some electrical tape and cover up the connector for the media control button pod (labeled blue in the reference image above); it won't be used here (unless you want to, in which case you'll have to duplicate all the steps involving the cruise control pod in this writeup). Take the philips screw holding the grounding wire to the hub and unscrew it. Now re-add that screw with that grounding wire, but underneath it add the purple wire (labeled purple in the reference image above) that was being used as a grounding point previously on the OEM wheel. Now, there are two connectors (with two wires each) that go to the back of the OEM wheel's airbag. Find the two 2A (at least, that's what they were labeled in mine) resistors/fuses in the box for your steering wheel hub (the SRK-193H). Plug the two ends of each resistor/fuse into each connector. To specify, DO NOT bridge across the two different airbag connectors with these! Simply plug the two ends of the resistor/fuse into the two ends of one connector, and repeat for the other (as shown in this below reference image).
Now secure them how you see fit; I just wrapped each one up with some electrical tape. Now, all that's left for new connections to make is the two (positive and negative) for the horn. Read the rest of this paragraph before following it; you need to run some wires through the cruise control mount or you'll have to do it twice. Go get your quick release (the side that goes to the car; not the side that attaches to your new steering wheel) and connect its positive lead to the positive horn connector (labeled in red in the earlier reference image) in some way; you might have to get an extra piece of wire and figure something out to securely connect this. Secure it with electrical tape or something else. Now take the other (negative) lead from your quick release, and connect it to the wire that's coming off of the hub as a ground point. Both of these wires will have to be routed through the middle of the cruise control bracket.
Now, the "fun" and fumbly part. You need to manage the earlier wiring that isn't going to the cruise control or the horn, and manage it into the hub. Best of luck. Now, keep the cruise control connector (and as much wiring from it as you can) sticking out from in-between the hub and the quick release where the cruise control bracket makes a hole for that wire. Take the screws that are used to mount the quick release to your hub, and put them on most of the way so that the quick release is held in place, but nothing is tight and you can move the cruise control wire (that's dangling out) around. You need to drill a single hole through the cruise control bracket; I don't have an exact position to tell you; line up the cruise control pod to the mount and figure out a good spot. You are reusing the factory T10 screw that used to hold the pod to the OEM wheel for this. Once you've drilled your hole, it's time to mount the cruise control pod. IMPORTANT: If you are reusing the screw that used to hold the pod in, you WILL need a few mm's worth of washers. If you don't do this, the screw will be too long and penetrate the back of the housing, likely breaking your cruise control pod. I had to crack mine open to fix this mistake, so don't do the same. Once it's mounted to the bracket, click the connector in. You can now tighten the 6 quick release screws, being cautious of the cruise control wire (making sure it stays in the gap the cruise control bracket adds). Do your tightening in a star pattern like you're putting on wheels, for equal pressure.
Now take a sigh of release, because most of the work is done!
Take your new steering wheel and bolt it to the wheel-side of the quick release. Take the horn that's included with the steering wheel (assuming you're using the same one), and connect its contacts to the two wires coming off of the quick release. Don't worry much about getting it wrong; if you get it wrong, then you'll know because you'll put the steering wheel on and it'll immediately sound the horn and the horn will stay on until you remove the wheel. Once you've checked that it's the correct polarity/orientation, press the button into its spot.
Assuming you're using a turn signal extension, you can add this now. The one I listed has two sizes of foam pads it comes with (and longer screws, which I needed) so that you can avoid crushing the plastic of the turn signal. It's pretty sturdy and feels nice.
If you have further questions, like I mentioned earlier, I'll be fastest to reply if you send them directly to me @pizza_st_ on Instagram. Otherwise, feel free to reply here!
EDIT: I should note that this moves the steering wheel significantly closer to you. I'm 5'11" and find it slightly closer than I'd like, but it's fine for me. If you have the seat further forward, you will have less room. Don't use a deeper dish wheel, and if you want it significantly further back you might have to ditch using a quick release.
Here's various pictures of the finished install (some were taken before my turn signal extension arrived):
Last edited:
![[:(]](/images/smilies/frown.png "Frown [:(]")