
Recently I found an offer on eBay for a European rear bumper from a 2013 (same as US 2014) Fiesta Zetec S 1.0L Ecoboost. GBP (UK Pounds) 80 plus GBP 360 shipping, GBP 420 total. Ite ven had the lower valance, rear fog an reflectors. Try parting this out new and you'll see why GBP 420 is such a huge bargain! They even threw in the european crash bar for free (note: if you do this, you MUST also get the european crash bar, as you'll see why).
The bumper arrived today via FedEx, packaged as well as it could be for such a large part:

Euro Bumper Replacement by dirtyblueshirt, on Flickr
Before I get started, here's what a stock US bumper looks like:

Euro Bumper Replacement by dirtyblueshirt, on Flickr

Euro Bumper Replacement by dirtyblueshirt, on Flickr

Euro Bumper Replacement by dirtyblueshirt, on Flickr
I unpackaged the bumper, did some quick cleaning, and removed the wrecker's paint pen markings with some rubbing alcohol:

Euro Bumper Replacement by dirtyblueshirt, on Flickr
Then I removed the bumper. There's two pop clips and an 8mm screw in each wheel well, and two torx screws in the hatch lip. The rest of the bumper uses clips on the seam between the wheel well and the tail lights. Take care when removing, the tabs can be easy to break. The tabs are on a piece of plastic attached to the car, and f you break too many, the part shouldn't be too costly at your local dealer. There are also two pop clips on the underside of the bumper to remove.

Euro Bumper Replacement by dirtyblueshirt, on Flickr
There will be two pieces to remove after you get the cover off. The crash bar, and the plastic 'egg crate' filler piece. The crash bar comes out with 4 13mm nuts on either side. The egg crate is riveted in, and you will need to drill out 4 rivets. If you have keyless ignition, you will also see an antenna module attached to the egg crate. this is the proximity antenna that allows you to open the hatch with the fob in your pocket. We'll reposition this later.

Euro Bumper Replacement by dirtyblueshirt, on Flickr
Some fabrication will be required to get the european crash bar in place. The US bar uses 4 bolts on either side, the Euro version uses only 3. The bottom two bolts will line up perfectly. the top-outer bolt does not line up, and the top-inner bolt does not have a hole at all. Using your US crash bar as a guide, line up the bottom holes, then mark and drill holes for the top-inner bolt. The top-outer bolt sits to far to the edge to make a proper hole, so you can notch it out. I used a hacksaw to make two parallel lines, then with a pare of vise grips, bent the tab 90? one way, then the other and it came off cleanly.
ere you can see the difference in US & EU crash standards, and the modifications required to the EU crash bar:

Euro Bumper Replacement by dirtyblueshirt, on Flickr

Euro Bumper Replacement by dirtyblueshirt, on Flickr

Euro Bumper Replacement by dirtyblueshirt, on Flickr

Euro Bumper Replacement by dirtyblueshirt, on Flickr

Euro Bumper Replacement by dirtyblueshirt, on Flickr
After removing the plastic egg crate filler, I drilled two holes into the body, then re-attached the antenna module:

Euro Bumper Replacement by dirtyblueshirt, on Flickr
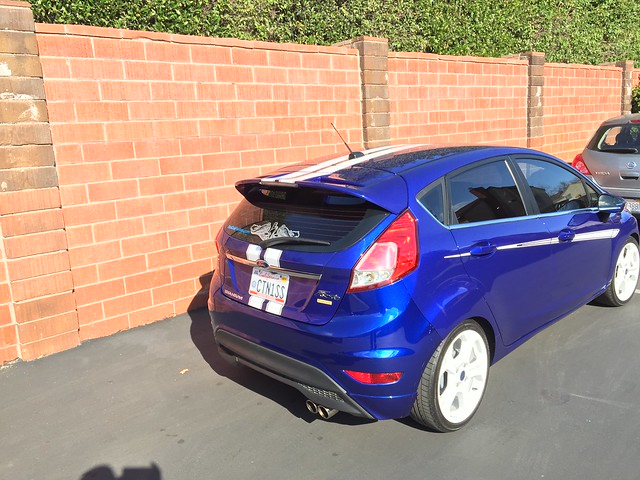
I then reattached the bumper, did a quick polish, and admired my handiwork:

Euro Bumper Replacement by dirtyblueshirt, on Flickr

Euro Bumper Replacement by dirtyblueshirt, on Flickr

Euro Bumper Replacement by dirtyblueshirt, on Flickr

Euro Bumper Replacement by dirtyblueshirt, on Flickr
Euro Bumper Replacement by dirtyblueshirt, on Flickr

Euro Bumper Replacement by dirtyblueshirt, on Flickr
EPILOGUE:
I still have a few things left. First, I need to mark and drill the holes needed for my rear parking sensors. Second, the dual-tip Mountune exhaust sits offset to the exhaust notch in the lower valance for the Zetec S. I'll need to fix that somehow, haven't decided yet. Will need to do soon as the valance is sitting directly on an exhaust tip now. Finally, I learned after purchase that non-ST Fiestas after 2013 get "Deep Impact Blue" instead of "Spirit Blue", aka "Performance Blue" (we likely get Performance blue on both here because the colors are nearly identical, and less expensive to just use the single hue stateside). You can just barely make out the difference in the photos. Instead of a full respray, I'm going to price out a blend, since the colors are so close together. The other reason for this is that there are some scuffs on the left side to be taken out as well.

Euro Bumper Replacement by dirtyblueshirt, on Flickr
The bumper arrived today via FedEx, packaged as well as it could be for such a large part:
Euro Bumper Replacement by dirtyblueshirt, on Flickr
Before I get started, here's what a stock US bumper looks like:
Euro Bumper Replacement by dirtyblueshirt, on Flickr
Euro Bumper Replacement by dirtyblueshirt, on Flickr
Euro Bumper Replacement by dirtyblueshirt, on Flickr
I unpackaged the bumper, did some quick cleaning, and removed the wrecker's paint pen markings with some rubbing alcohol:
Euro Bumper Replacement by dirtyblueshirt, on Flickr
Then I removed the bumper. There's two pop clips and an 8mm screw in each wheel well, and two torx screws in the hatch lip. The rest of the bumper uses clips on the seam between the wheel well and the tail lights. Take care when removing, the tabs can be easy to break. The tabs are on a piece of plastic attached to the car, and f you break too many, the part shouldn't be too costly at your local dealer. There are also two pop clips on the underside of the bumper to remove.
Euro Bumper Replacement by dirtyblueshirt, on Flickr
There will be two pieces to remove after you get the cover off. The crash bar, and the plastic 'egg crate' filler piece. The crash bar comes out with 4 13mm nuts on either side. The egg crate is riveted in, and you will need to drill out 4 rivets. If you have keyless ignition, you will also see an antenna module attached to the egg crate. this is the proximity antenna that allows you to open the hatch with the fob in your pocket. We'll reposition this later.
Euro Bumper Replacement by dirtyblueshirt, on Flickr
Some fabrication will be required to get the european crash bar in place. The US bar uses 4 bolts on either side, the Euro version uses only 3. The bottom two bolts will line up perfectly. the top-outer bolt does not line up, and the top-inner bolt does not have a hole at all. Using your US crash bar as a guide, line up the bottom holes, then mark and drill holes for the top-inner bolt. The top-outer bolt sits to far to the edge to make a proper hole, so you can notch it out. I used a hacksaw to make two parallel lines, then with a pare of vise grips, bent the tab 90? one way, then the other and it came off cleanly.
ere you can see the difference in US & EU crash standards, and the modifications required to the EU crash bar:
Euro Bumper Replacement by dirtyblueshirt, on Flickr
Euro Bumper Replacement by dirtyblueshirt, on Flickr
Euro Bumper Replacement by dirtyblueshirt, on Flickr
Euro Bumper Replacement by dirtyblueshirt, on Flickr
Euro Bumper Replacement by dirtyblueshirt, on Flickr
After removing the plastic egg crate filler, I drilled two holes into the body, then re-attached the antenna module:
Euro Bumper Replacement by dirtyblueshirt, on Flickr
I then reattached the bumper, did a quick polish, and admired my handiwork:
Euro Bumper Replacement by dirtyblueshirt, on Flickr
Euro Bumper Replacement by dirtyblueshirt, on Flickr
Euro Bumper Replacement by dirtyblueshirt, on Flickr
Euro Bumper Replacement by dirtyblueshirt, on Flickr
Euro Bumper Replacement by dirtyblueshirt, on Flickr
Euro Bumper Replacement by dirtyblueshirt, on Flickr
EPILOGUE:
I still have a few things left. First, I need to mark and drill the holes needed for my rear parking sensors. Second, the dual-tip Mountune exhaust sits offset to the exhaust notch in the lower valance for the Zetec S. I'll need to fix that somehow, haven't decided yet. Will need to do soon as the valance is sitting directly on an exhaust tip now. Finally, I learned after purchase that non-ST Fiestas after 2013 get "Deep Impact Blue" instead of "Spirit Blue", aka "Performance Blue" (we likely get Performance blue on both here because the colors are nearly identical, and less expensive to just use the single hue stateside). You can just barely make out the difference in the photos. Instead of a full respray, I'm going to price out a blend, since the colors are so close together. The other reason for this is that there are some scuffs on the left side to be taken out as well.
Euro Bumper Replacement by dirtyblueshirt, on Flickr
")


