Thread Starter
#21
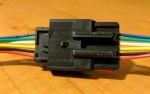
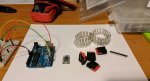
Hello again, time for a little update! Since the code is done I've been focusing on the physical side of things for the past week or so. First, got some new stuff in the mail I'm really exited about! Check out the size of the new board next to the Arduino Uno, such small! That will fit behind the dash much easier. I have a handful of those I'll use for testing and packaging a few different physical enclosures. And check out the OEM connectors I sourced, same exact part number and all! They will come from the board and connect to the OEM button. These are a bit expensive so I'll look for a more cost effective solution but it's nice to have options.
Factory connector:
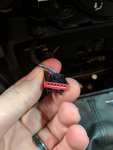
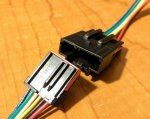
I attempted to find a power source to tap from a location in the center console, but none worked out. The factory ESC button only works when the ignition is on start/run but the existing USB / Cigar lighter sources are either always on or on prior to start/run. I did find a few sources at the fuse box behind the glove box that I think may work so I'm going to investigate that a little more. Also, still need to find a way to interface the factory wiring into the device. Thinking of 3D printing a case that has the female end integrated into the casing, similar to the factory ESC OFF button but just for prototyping. May end up injection molding a final product if I get that far.
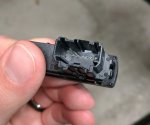
ESC button factory connection molded into body:
Still very motivated working on this project and I'm excited that there is a fair amount of interest! At this point I'm not 100% certain I will make/sell a final product, but if I do, it will be a retail quality device as opposed to a hacked together project. I definitely want to make this accessible so if I can make a professional product, I'll sell them, otherwise I'll just release the code and schematics so you can build your own. Then again, some of the parts I'm buying are sold in bulk only may have to be custom manufactured so perhaps a kit would be easier... or all three! Anyhow, I finally got another shipment of components today so I should have everything I need to hook it up this weekend. Stay tuned for an update on Sunday![[cool]](/images/smilies/icon_smile_cool.gif "Cool [cool]")
Factory connector:
I attempted to find a power source to tap from a location in the center console, but none worked out. The factory ESC button only works when the ignition is on start/run but the existing USB / Cigar lighter sources are either always on or on prior to start/run. I did find a few sources at the fuse box behind the glove box that I think may work so I'm going to investigate that a little more. Also, still need to find a way to interface the factory wiring into the device. Thinking of 3D printing a case that has the female end integrated into the casing, similar to the factory ESC OFF button but just for prototyping. May end up injection molding a final product if I get that far.
ESC button factory connection molded into body:
Still very motivated working on this project and I'm excited that there is a fair amount of interest! At this point I'm not 100% certain I will make/sell a final product, but if I do, it will be a retail quality device as opposed to a hacked together project. I definitely want to make this accessible so if I can make a professional product, I'll sell them, otherwise I'll just release the code and schematics so you can build your own. Then again, some of the parts I'm buying are sold in bulk only may have to be custom manufactured so perhaps a kit would be easier... or all three! Anyhow, I finally got another shipment of components today so I should have everything I need to hook it up this weekend. Stay tuned for an update on Sunday
")