Boomba Racing Intake Manifold and Throttle Body Spacers

Trader history for Boomba Racing (0)

rodmoe

5000 Post Club
Member ID
#342
Messages
5,810
Likes
585
Sounds about right guys thanks I had my Manifold out so the TB spacer was easy though it did take a lil conversation to get the tb bolts started .. when they say the clamp on the crank case vent tube wont fit they are not kidding lol
and yes ickky looking valves I tried to take pics but they all came out to dark or out of focus to be worth anything..


JPGC

2000 Post Club
Member ID
#1170
Messages
2,011
Likes
215
Installed, and very enjoyed already!

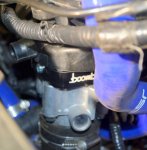
I am not as far along the modification list as some of you but I did notice the difference. I have a Cobb CBE, RMM, Panel Filter, & AccessPort running the Stage 1 93 octane tune, stock rubber on 15.5 lb lightweight wheels, and the Boomba BOV spacer.

2J-Racing Cowl Intake & Race Downpipe on order. FMIC upgrade after that.

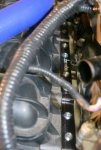
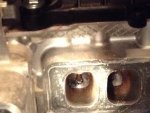
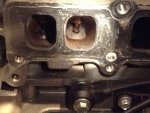
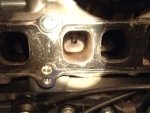
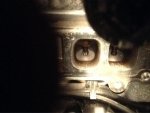
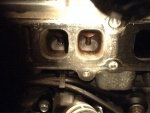
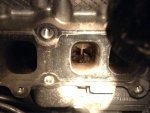
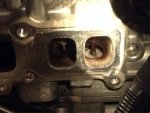
The install was long and, at times, extremely tedious. My advice to you all... set aside plenty of time, have a friend available at times, and make sure you have the right tools to complete the job. It took me about 4 1/2 hours. My hands are all kinds of cut up from the extremely tight spaces and sharp edges. There are also a couple of misprints in the Boomba Install Manual. My FiST is a 2015 so the bolt sizes may be different than theirs, but the intake manifold removal section (#24 on the pdf) says the bolts are M6 & M8. I found they are M8 & M10. Additionally, the vent clips for me were just squeeze-released, unlike their instructions to rotate it to the left then pull it out. One suggestion I will make is before you reinstall the intake manifold, go ahead and attach the throttle body spacer first. It's not in a very convenient location to hold and feed screws into. Let alone the next part (which is attaching the throttle body to the spacer, which took me to the limits of my already waning sanity); for whatever reason, I couldn't get the bolts to initially grab. Eventually I fed them in from the bottom, using three extension pieces and a twerking video's worth of wobble. But hey, it worked.

Hope this helps, and I'd be glad to answer any questions you guys have!


Thanks for the review the battle scars are just temporary, lol. Do have any or any potential clearance issues anywhere?


rodmoe

5000 Post Club
Member ID
#342
Messages
5,810
Likes
585
MAKE SURE YOU KEEP THE ALT WIRE CLEAR OF THE TBODY (They tell you that in the video and directions) That is about the only pinch point other than that crank casr vent being blocked by the manifild bolt somewhat it still fits but no clamp will have to get safety wire and pliers from work and give that a try...


Member ID
#1247
Messages
189
Likes
30
No clearance problems and the wire harnesses are within my comfort level regarding the slack they have. I don't know what I did right or wrong, but I didn't have any issues with clamps barely holding on as stated in the instructions. Rodmoe, is that crankcase vent tube the one underneath the intake manifold? If so, I didn't remove the lower connection of that one.


Member ID
#1709
Messages
28
Likes
10
Sounds about right guys thanks I had my Manifold out so the TB spacer was easy though it did take a lil conversation to get the tb bolts started .. when they say the clamp on the crank case vent tube wont fit they are not kidding lol
and yes ickky looking valves I tried to take pics but they all came out to dark or out of focus to be worth anything..
Wow I totally spaced out on that one. Guess I was just too exhausted at that point to read ahead. I was just going through reconnecting everything and when I got to that hose and that mothertruckin' clamp I kept smashing my head against the wall until it fit. I can honestly say that if you spend 45 minutes on it, with two people and every tool imaginable, it will fit. But don't do what I did. I live in Regret City.


Member ID
#1709
Messages
28
Likes
10
No clearance problems and the wire harnesses are within my comfort level regarding the slack they have. I don't know what I did right or wrong, but I didn't have any issues with clamps barely holding on as stated in the instructions. Rodmoe, is that crankcase vent tube the one underneath the intake manifold? If so, I didn't remove the lower connection of that one.
Rejeme here had an awesome suggestion when he said to leave that bottom connection on. It's not necessary to take off and it will avoid a massive headache!!


Sourskittle

4000 Post Club
Member ID
#864
Messages
4,567
Likes
862
You guys should all def try to post some valve/intake port pics with mileage. The pics I posted were from an 11k mile engine. I'd like to see what a 30k mile modded engine intake looks like.


rodmoe

5000 Post Club
Member ID
#342
Messages
5,810
Likes
585
No clearance problems and the wire harnesses are within my comfort level regarding the slack they have. I don't know what I did right or wrong, but I didn't have any issues with clamps barely holding on as stated in the instructions. Rodmoe, is that crankcase vent tube the one underneath the intake manifold? If so, I didn't remove the lower connection of that one.
Also I am running the JS silcone hoses so they may be thicker than stock if I recall so that is why I had more of a issue..
Yes Great Idea leaving it clamped ...


MOFiST

Active member
Member ID
#661
Messages
724
Likes
74
You guys should all def try to post some valve/intake port pics with mileage. The pics I posted were from an 11k mile engine. I'd like to see what a 30k mile modded engine intake looks like.
This ^ please [emoji4]


JPGC

2000 Post Club
Member ID
#1170
Messages
2,011
Likes
215
Mines at 16k miles so I will get a picture of them when I do mine this weekend...with plenty of lighting. I should note that I've been running a air/ oil separator for roughly half of those miles


HaveBlue83

Active member
Member ID
#1072
Messages
574
Likes
168
When i eventually do this mod, i will be walnut blasting my intake valves and doing a catch can. This install looks FUNNNN lol.


MOFiST

Active member
Member ID
#661
Messages
724
Likes
74
When i eventually do this mod, i will be walnut blasting my intake valves and doing a catch can. This install looks FUNNNN lol.
I'd like to see your method for the blast.
I know a good one from a mazdaspeed forum but that may need to be tweaked for this car. Hopefully it'll be a relativity painless exercise with the small amount of build up.


JPGC

2000 Post Club
Member ID
#1170
Messages
2,011
Likes
215
Getting Knuckles ready for the outpatient surgery, lol!
ImageUploadedByTapatalk1426285320.168428.jpg


rodmoe

5000 Post Club
Member ID
#342
Messages
5,810
Likes
585
Those look better than mine I guess it is the warm weather you have..


JPGC

2000 Post Club
Member ID
#1170
Messages
2,011
Likes
215
Those look better than mine I guess it is the warm weather you have..
They are not too bad. The one on cyl 1 and cyl 4 are a little worse, but still not bad. Did you get pics of yours?


Similar threads


Top