
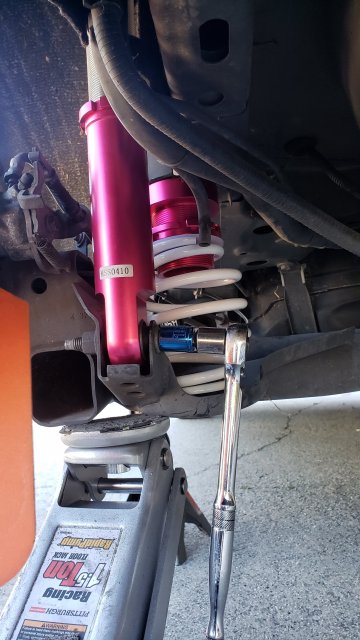
Just finished up installing coilovers from godspeed. They are one of the cheapest options for the fiST that still have dampening adjustability.
It took me 3 hours with no power tools and some minor hiccups. If you have power tools I'd plan for about 2 hours.
Tools Needed:
Ratchet
Ratchet Extension
Breaker Bar(Makes life easier)
5mm Allen
15mm Socket
14mm Socket
18mm Deep socket
10mm Socket
Flathead screwdriver
Pliers(Makes life easier)
Jack and stands
I did the fronts first then rears, thought its personal preference. The rears have to be done simultaneously.
1) Loosen your lugnuts then jack up the car
2) Remove the 10mm brake line support
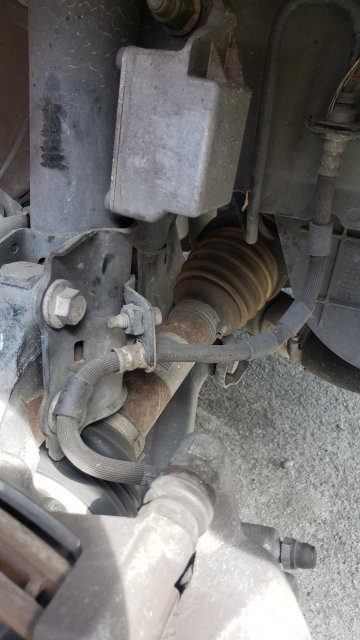
3) Remove the Sway bar endlink nut with the 5mm allen and 15mm wrench (top left of image 2)
4) Remove rubber abs sensor wire clip (middle left of image 2)
4.5) Use pliers or a flathead to pry the plastic clip holding the abs sensor wire. The godspeed coilovers have a hole for you to zip tie the wire to but no hole for the clip.
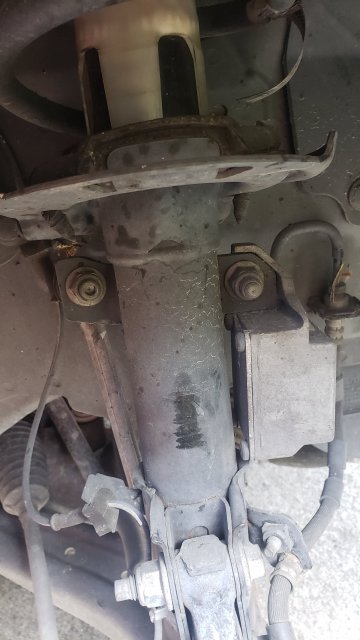
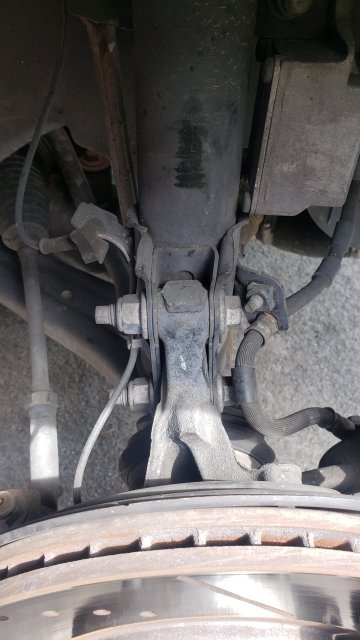
5) Remove the 2 bolts holding the knuckle on to the coilover assembly with the 18mm socket and 15mm wrench (see image 3)
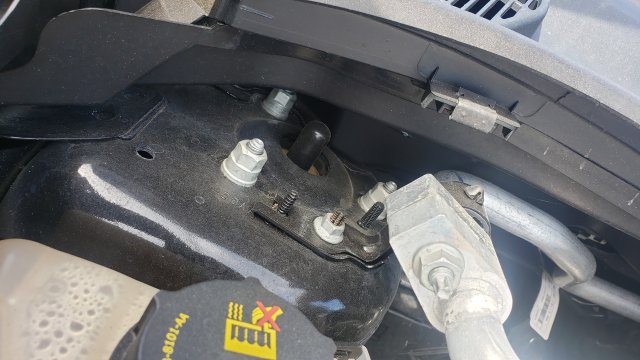
6) In the engine bay remove the 3 nuts holding the top of the coilover with a 12mm wrench. On the driver side there is the brake/clutch fill reservoir in the way. remove the 2 nuts with a 10mm wrench. (see image 4)
7) Pull out the stock coilover and install the new coilover in the reverse order.
Now for the rears - I've only worked on cars with coilovers in the rear so I forgot to take some pics while I was fumbling through the process. Apologies!
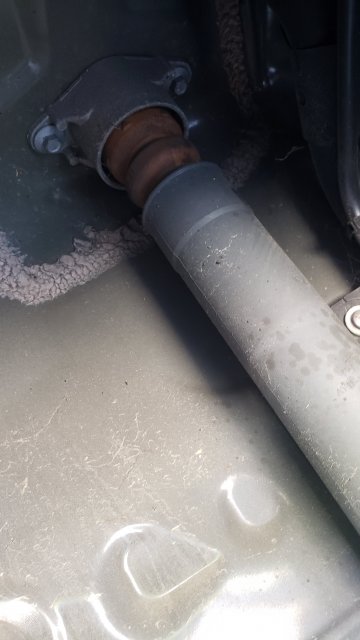
8) Remove the bolt holding the lower end of the shock on both sides with a 15mm socket (see image 5) You need to have both sides removed so the (torsion bar?) will drop down enough to remove the old springs. (I fumbled with that a bit at first)
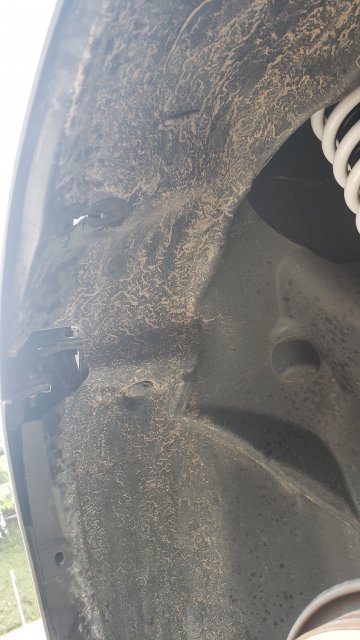
9) In the wheelwell remove all 7 of the circular spoked clips to remove the fabric inner wheelwell thing(no picture sorry!). This will allow you access to the the last 2 bolts you need to remove the shocks. Use a 10mm socket with extension. (see image 6) I had so many spiderwebs in there
10) Drop out the old shocks and bolt up the new ones with those 2 bolt holes. Leave the bottom bolt out for now.
11) Use the jack to start jacking up the (torsion bar?) to get the bolt holes close to lining up with the bottom of the shocks. Leave some space to be able to wiggle the springs in place so they dont fall out. Now you can put the springs in, Rubber side down with the Aluminum perches on top. Jack it up the rest of the way to get the bold through the bottom of the shocks (see image 5)
12) Reinstall the fabric liner and start adjusting the heights to your preference!
Some issues I had while installing mine:
The brake line bracket slot on the fronts were too small to allow the brake line clip to fit inside. I had to bend them out.
The slots that accept the knuckle on the fronts were far too open - I had to crank the living shit out the bolts to "clamp" it up to the sides of the knuckle.
The powder coating is thick, I had to tap the knuckle bolts through the holes to get them through.
The rear shocks thread up and down inside the bottom section, one of them was seized and I spent about 15 min wrestling with it. I have a feeling some powder coat made its way inside with the threads.
Some Notes:
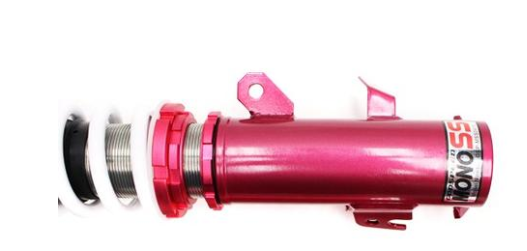
Update - they go much higher than I thought. You can extend the entire front coilover length by unscrewing the shock and spring assembly from the base.
Front damper adjust is easy to access, however the rears would require removing the fabric liner because its up at the top near the 2 10mm bolts. (That kinda sucks for anyone who wants to dial for autocross/track day like me)
Final verdict on build quality:
The build quality is good overall, the machining on the aluminum parts is average (I'm a machinist so these are the things I look at lol) The anodize, while a strange color choice, is good. 90% of my issues were due to some thick ass powder coat.
For 684$ shipped I can't see anyone else making better coilovers. I can't recommend YET as I have under a mile on them. But that initial test drive felt good, really good. I'm going for a canyon session tomorrow morning and with update after. Hope this has some useful info for anyone in the market!
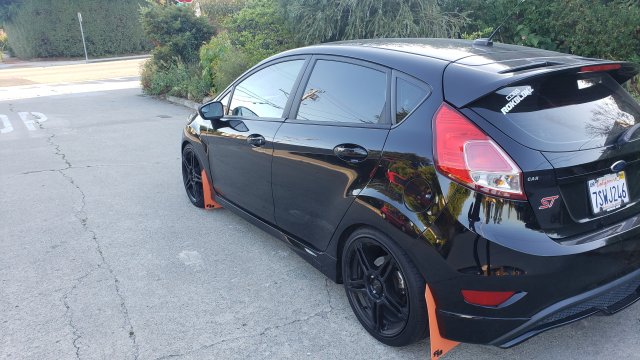
Oh and here is where it sits with the fronts maxed and the rear at about 50% height
It took me 3 hours with no power tools and some minor hiccups. If you have power tools I'd plan for about 2 hours.
Tools Needed:
Ratchet
Ratchet Extension
Breaker Bar(Makes life easier)
5mm Allen
15mm Socket
14mm Socket
18mm Deep socket
10mm Socket
Flathead screwdriver
Pliers(Makes life easier)
Jack and stands
I did the fronts first then rears, thought its personal preference. The rears have to be done simultaneously.
1) Loosen your lugnuts then jack up the car
2) Remove the 10mm brake line support
3) Remove the Sway bar endlink nut with the 5mm allen and 15mm wrench (top left of image 2)
4) Remove rubber abs sensor wire clip (middle left of image 2)
4.5) Use pliers or a flathead to pry the plastic clip holding the abs sensor wire. The godspeed coilovers have a hole for you to zip tie the wire to but no hole for the clip.
5) Remove the 2 bolts holding the knuckle on to the coilover assembly with the 18mm socket and 15mm wrench (see image 3)
6) In the engine bay remove the 3 nuts holding the top of the coilover with a 12mm wrench. On the driver side there is the brake/clutch fill reservoir in the way. remove the 2 nuts with a 10mm wrench. (see image 4)
7) Pull out the stock coilover and install the new coilover in the reverse order.
Now for the rears - I've only worked on cars with coilovers in the rear so I forgot to take some pics while I was fumbling through the process. Apologies!
8) Remove the bolt holding the lower end of the shock on both sides with a 15mm socket (see image 5) You need to have both sides removed so the (torsion bar?) will drop down enough to remove the old springs. (I fumbled with that a bit at first)
9) In the wheelwell remove all 7 of the circular spoked clips to remove the fabric inner wheelwell thing(no picture sorry!). This will allow you access to the the last 2 bolts you need to remove the shocks. Use a 10mm socket with extension. (see image 6) I had so many spiderwebs in there
10) Drop out the old shocks and bolt up the new ones with those 2 bolt holes. Leave the bottom bolt out for now.
11) Use the jack to start jacking up the (torsion bar?) to get the bolt holes close to lining up with the bottom of the shocks. Leave some space to be able to wiggle the springs in place so they dont fall out. Now you can put the springs in, Rubber side down with the Aluminum perches on top. Jack it up the rest of the way to get the bold through the bottom of the shocks (see image 5)
12) Reinstall the fabric liner and start adjusting the heights to your preference!
Some issues I had while installing mine:
The brake line bracket slot on the fronts were too small to allow the brake line clip to fit inside. I had to bend them out.
The slots that accept the knuckle on the fronts were far too open - I had to crank the living shit out the bolts to "clamp" it up to the sides of the knuckle.
The powder coating is thick, I had to tap the knuckle bolts through the holes to get them through.
The rear shocks thread up and down inside the bottom section, one of them was seized and I spent about 15 min wrestling with it. I have a feeling some powder coat made its way inside with the threads.
Some Notes:
Update - they go much higher than I thought. You can extend the entire front coilover length by unscrewing the shock and spring assembly from the base.
Front damper adjust is easy to access, however the rears would require removing the fabric liner because its up at the top near the 2 10mm bolts. (That kinda sucks for anyone who wants to dial for autocross/track day like me)
Final verdict on build quality:
The build quality is good overall, the machining on the aluminum parts is average (I'm a machinist so these are the things I look at lol) The anodize, while a strange color choice, is good. 90% of my issues were due to some thick ass powder coat.
For 684$ shipped I can't see anyone else making better coilovers. I can't recommend YET as I have under a mile on them. But that initial test drive felt good, really good. I'm going for a canyon session tomorrow morning and with update after. Hope this has some useful info for anyone in the market!
Oh and here is where it sits with the fronts maxed and the rear at about 50% height
Last edited:
")
