-
Sign Up! To view all forums and unlock additional cool features
Welcome to the #1 Fiesta ST Forum and Fiesta ST community dedicated to Fiesta ST owners and enthusiasts. Register for an account, it's free and it's easy, so don't hesitate to join the Fiesta ST Forum today!
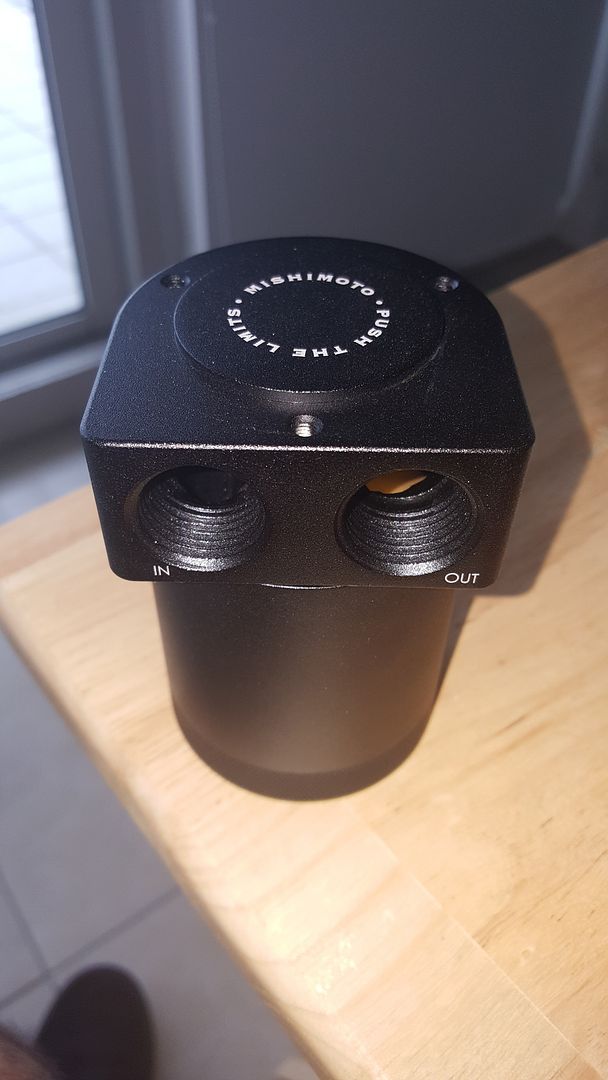
Mishimoto OCC Arrived!
- Thread starter CaptainSlow
- Start date
Thread Starter
#26
Installed it last night. Looks awesome installed and super clean! Props to Sara and the Mishimoto team for an awesome product and being responsive! New product launches are not easy. Hopefully other users can get their orders fixed quickly.
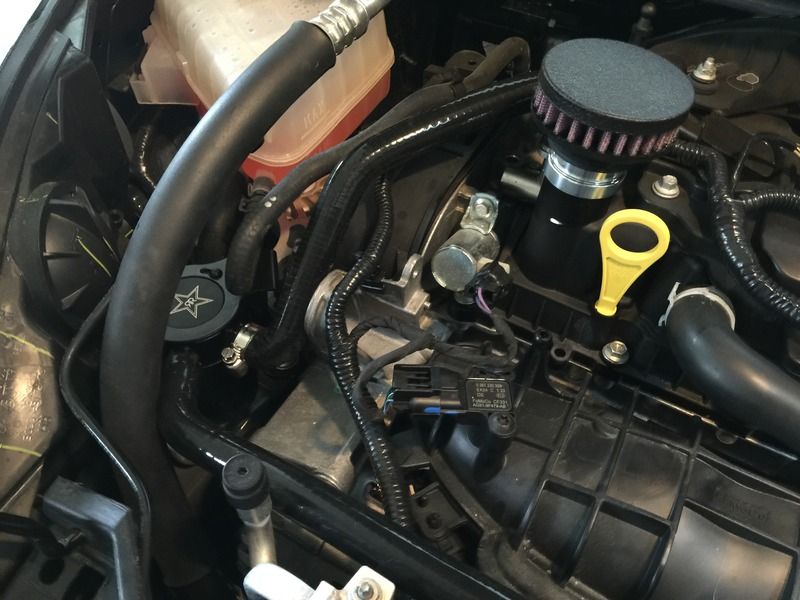
Took less than an hour to install. All the problems I had during install were not related to OCC/Mishimoto design, but a failing of myself (torque wrench busted, difficulty removing the tie holding the OEM hose, bike repair tools to secure the OCC to the bracket). The only concern I have is that the hose running to the inlet hits the side of a bracket (see below). Going to keep an eye on this long term, but I'm assuming it's not going to be an issue.
It's definitely near impossible to get your hand in the right position to apply enough torque to remove the bottom of the OCC. I didn't attempt to loosen since the engine bay was still a bit warm at the time of install. I don't know if I would suggest the drain kit because the belt is right next to where it drops down. Removal of the entire system shouldn't be too bad though because of the QD connections supplied (awwesssoommee). I've never had an OCC before, but to me this is definitely a super clean install because of the included hoses.
If you're like me and worry too much about your own ability to install, it should be easy to put the OEM hose in temporarily and leave the OCC in place as a temporary solution.
AGREED! (Though I still think it would look a little better if they ran the same direction relative to the hose ![Tongue [tongue] [tongue]](/images/smilies/icon_smile_tongue.gif) )
)
Everyone likes pictures, so here's a dump with some before/after
Stock engine bay:

Space where the OCC sits:

OCC Bracket mounting location (without nuts, mine came off and left the stud in place):

Out of focus OEM hose:

Port to the OCC inlet:

Port to the OCC outlet:

I had to remove this wire (looks like it goes to a motor of sorts, anyone know what it is?). Make sure to reinstall it when it all goes back togeter:

Installed:

OCC installed with my hand to show how tight it is:

Close up of hose hitting a bracket of some sort:

Installed with cover replaced:

Fancy pictures (showing Sara's point):


Took less than an hour to install. All the problems I had during install were not related to OCC/Mishimoto design, but a failing of myself (torque wrench busted, difficulty removing the tie holding the OEM hose, bike repair tools to secure the OCC to the bracket). The only concern I have is that the hose running to the inlet hits the side of a bracket (see below). Going to keep an eye on this long term, but I'm assuming it's not going to be an issue.
It's definitely near impossible to get your hand in the right position to apply enough torque to remove the bottom of the OCC. I didn't attempt to loosen since the engine bay was still a bit warm at the time of install. I don't know if I would suggest the drain kit because the belt is right next to where it drops down. Removal of the entire system shouldn't be too bad though because of the QD connections supplied (awwesssoommee). I've never had an OCC before, but to me this is definitely a super clean install because of the included hoses.
If you're like me and worry too much about your own ability to install, it should be easy to put the OEM hose in temporarily and leave the OCC in place as a temporary solution.
Hi there,
As for the orientation on the hoses, this was an intentional design that should look a bit better once installed on your Fiesta.
-Sara
As for the orientation on the hoses, this was an intentional design that should look a bit better once installed on your Fiesta.
-Sara
Everyone likes pictures, so here's a dump with some before/after
Stock engine bay:

Space where the OCC sits:

OCC Bracket mounting location (without nuts, mine came off and left the stud in place):

Out of focus OEM hose:

Port to the OCC inlet:

Port to the OCC outlet:

I had to remove this wire (looks like it goes to a motor of sorts, anyone know what it is?). Make sure to reinstall it when it all goes back togeter:

Installed:

OCC installed with my hand to show how tight it is:

Close up of hose hitting a bracket of some sort:

Installed with cover replaced:

Fancy pictures (showing Sara's point):


No worries Sara. The quality looks to be superb and I was planning to add your drain kit anyway.
Installed mine yesterday. Simple and neat. Love the quality of whole kit. Draining will be tough but its very simple to remove the OCC completely and empty it out - 2 bolts and 2 quick release connectors. Thanks Sara!
What else is in the pipeline? I want that FMIC asap
What else is in the pipeline? I want that FMIC asap
Installed it last night. Looks awesome installed and super clean! Props to Sara and the Mishimoto team for an awesome product and being responsive! New product launches are not easy. Hopefully other users can get their orders fixed quickly.
Took less than an hour to install. All the problems I had during install were not related to OCC/Mishimoto design, but a failing of myself (torque wrench busted, difficulty removing the tie holding the OEM hose, bike repair tools to secure the OCC to the bracket). The only concern I have is that the hose running to the inlet hits the side of a bracket (see below). Going to keep an eye on this long term, but I'm assuming it's not going to be an issue.
It's definitely near impossible to get your hand in the right position to apply enough torque to remove the bottom of the OCC. I didn't attempt to loosen since the engine bay was still a bit warm at the time of install. I don't know if I would suggest the drain kit because the belt is right next to where it drops down. Removal of the entire system shouldn't be too bad though because of the QD connections supplied (awwesssoommee). I've never had an OCC before, but to me this is definitely a super clean install because of the included hoses.
If you're like me and worry too much about your own ability to install, it should be easy to put the OEM hose in temporarily and leave the OCC in place as a temporary solution.
AGREED! (Though I still think it would look a little better if they ran the same direction relative to the hose![Tongue [tongue] [tongue]](/images/smilies/icon_smile_tongue.gif) )
)
Everyone likes pictures, so here's a dump with some before/after
Took less than an hour to install. All the problems I had during install were not related to OCC/Mishimoto design, but a failing of myself (torque wrench busted, difficulty removing the tie holding the OEM hose, bike repair tools to secure the OCC to the bracket). The only concern I have is that the hose running to the inlet hits the side of a bracket (see below). Going to keep an eye on this long term, but I'm assuming it's not going to be an issue.
It's definitely near impossible to get your hand in the right position to apply enough torque to remove the bottom of the OCC. I didn't attempt to loosen since the engine bay was still a bit warm at the time of install. I don't know if I would suggest the drain kit because the belt is right next to where it drops down. Removal of the entire system shouldn't be too bad though because of the QD connections supplied (awwesssoommee). I've never had an OCC before, but to me this is definitely a super clean install because of the included hoses.
If you're like me and worry too much about your own ability to install, it should be easy to put the OEM hose in temporarily and leave the OCC in place as a temporary solution.
AGREED! (Though I still think it would look a little better if they ran the same direction relative to the hose
Everyone likes pictures, so here's a dump with some before/after
-Sara
My OCC shipped a week ago and still hasn't arrived because UPS can't get their $#% together. Long story short, I drove to their depot since I can't sit around at home from 8 to 5 to wait for delivery. Got to the depot to find out its still on a UPS truck for delivery even though I had phoned and requested them to leave it at the depot. So I gave up on that and supplied my relatives address since they are home during the day. UPS was told to change the delivery address. Twice now they attempted to deliver to my house even though I changed the destination... Both times another notice left on my door. To add insult they are charging a $12 processing fee on top of shipping.
Mishimoto, please offer other shipping options besides UPS. I will never use UPS again.
Mishimoto, please offer other shipping options besides UPS. I will never use UPS again.

Installed, but kit was also missing a worm clamp, so minus that. Mine also has the star graphic on the lid that looks like a Tula Armament Works die mark on a Kalashnikov, but I think it is an energy drink logo. Would have like to seen 3 bolts holding can to the bracket. May upgrade the 2 button screws with either stainless or titanium just to prevent the corrosion inside the Allan head that might cause it to strip years down the road when you want to remove it cleaning. Even if the thought process is wrong; for $2 you can boast your car contains titanium components.
My OCC shipped a week ago and still hasn't arrived because UPS can't get their $#% together. Long story short, I drove to their depot since I can't sit around at home from 8 to 5 to wait for delivery. Got to the depot to find out its still on a UPS truck for delivery even though I had phoned and requested them to leave it at the depot. So I gave up on that and supplied my relatives address since they are home during the day. UPS was told to change the delivery address. Twice now they attempted to deliver to my house even though I changed the destination... Both times another notice left on my door. To add insult they are charging a $12 processing fee on top of shipping.
Mishimoto, please offer other shipping options besides UPS. I will never use UPS again.
Mishimoto, please offer other shipping options besides UPS. I will never use UPS again.

Installed, but kit was also missing a worm clamp, so minus that. Mine also has the star graphic on the lid that looks like a Tula Armament Works die mark on a Kalashnikov, but I think it is an energy drink logo. Would have like to seen 3 bolts holding can to the bracket. May upgrade the 2 button screws with either stainless or titanium just to prevent the corrosion inside the Allan head that might cause it to strip years down the road when you want to remove it cleaning. Even if the thought process is wrong; for $2 you can boast your car contains titanium components.
-Sara
Similar threads
-
-
-
-
-
-
FS NJ: Mishimoto Silicone Intake Hose w/ Mountune panel filter
- Started by LilPartyBox
- Replies: 5
-
-
-
-


