
Disclaimer: If you can find a reasonably priced replacement wing in a matching color, just do that and save yourself the time and effort… I couldn’t, and didn’t want to be rocking a black or silver ST wing or even worse, a mismatched standard Fiesta wing, so repair was my best option.
Tools/parts needed:
I’m assuming your wing is already removed (plenty of guides/videos out there). Hopefully your guide pins and clips didn’t explode like mine did and fall down into the hatch door… rattle rattle
If your car is going to be sitting outside while you repair the wing and there is a chance of rain, put tape over the pins/clips/screw holes in the hatch.
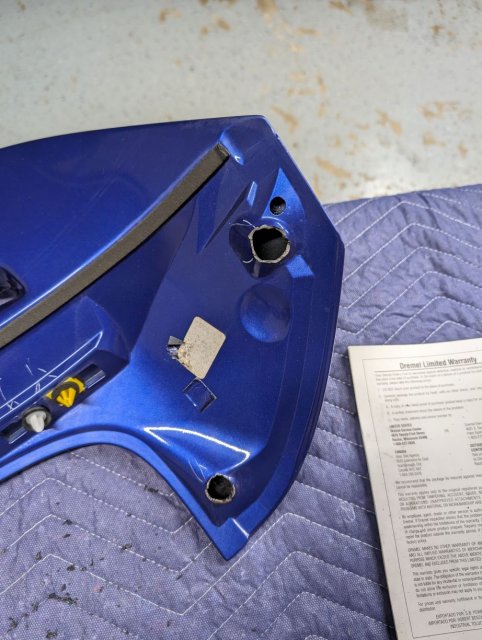
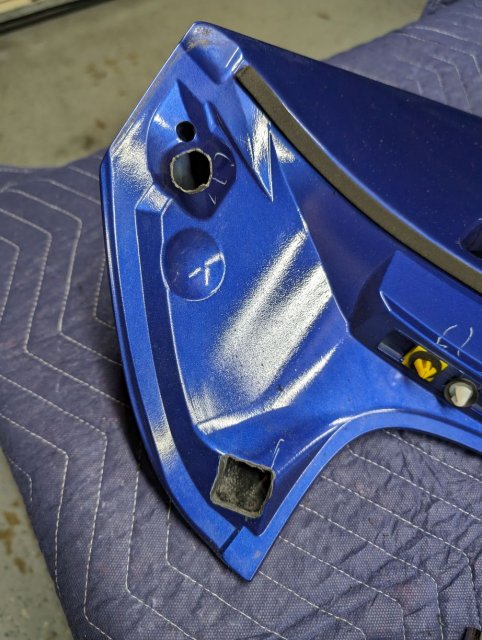
Wing before any repair:
Cut off the square ends off the ABS cleanout plugs, keeping them as long as possible.
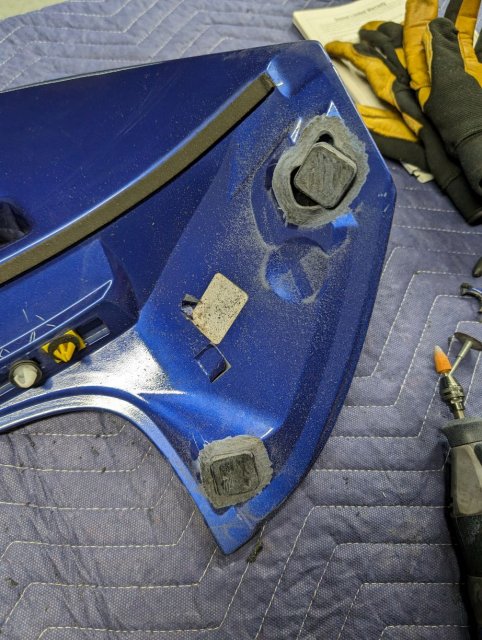
Use a Dremel cutoff wheel to cut a square hole in the wing where the broken screw mounts are (refer to photos for proper orientation). Make sure to cut the hole smaller than the ABS cleanout plug.
Carefully use the Dremel grinding stone to shape the hole until it is a press-fit for the ABS cleanout plug, then press in the ABS plug. You will need to trim/shape the cut end of the ABS plug that is inside the wing until it sits flush with the top of the old mounting hole in the wing. This will require you to remove the plug, trim the back of the plug, rinse, and repeat several times. It may help to drill a small hole in the ABS plug and put a screw into it to make removal/insertion easier.
Now use the grinding stone to remove the paint on the wing around the ABS plug to create a ~½” border. Also lightly grind the exposed end of the ABS plug. This will help the PlasticWeld epoxy bond better and create a stronger mount.
Repeat the previous 2 steps for each broken mount.
Clean the exposed wing and plug ABS plastic with Isopropyl alcohol.
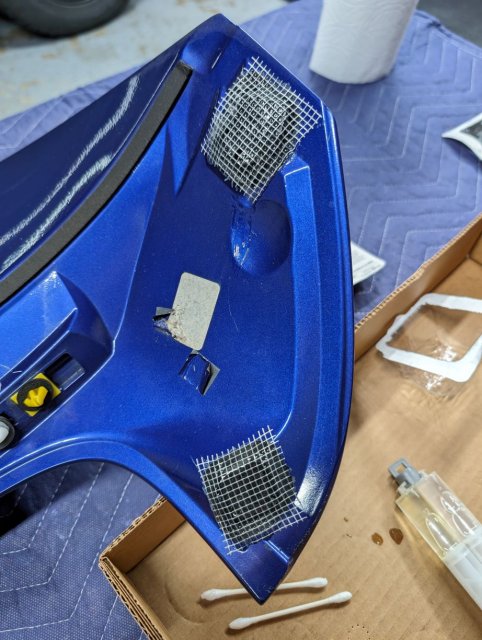
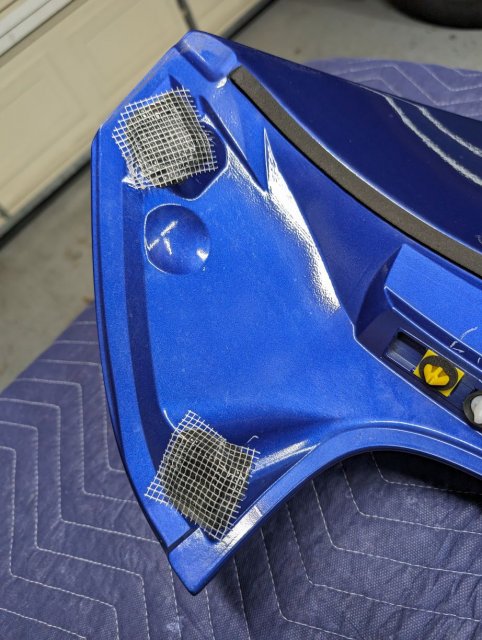
Cut a piece of FibaTape and place over all the exposed ABS surface, overlapping the painted area of the wing slightly (you can trim later). Press the tape down firmly to match the contour of the repaired area. This tape will provide reinforcement for the epoxy, creating a stronger mount.
Squeeze out a small amount of PlasticWeld epoxy into the supplied container (it tacks up fast, don’t bite off more than you can chew), mix up the epoxy according to the instructions, and dab it onto the repair area. Less is more and the epoxy will run if you apply too much. The FibaTape might lift off the repair surface slightly, but once the epoxy tacks up enough you can use a toothpick to press the FibaTape back down.
Wait an hour between coats of epoxy. I ended up using about ⅔ of the tube of PlasticWeld for 3 or 4 coats of epoxy. PlasticWeld says full cure time is 1 hour, but in my cold garage it was still slightly tacky the next morning, so I brought it inside and gave it a couple days since I wasn’t in a rush and it was raining. I would allow at least 24 hours at 70 degrees for peace of mind.
Trim any unglued FibaTape at the edge of the repair as your OCD dictates, or just leave it…
Replace the clips/pins in the wing if any of yours are broken, remove tape from hatch if you taped over any holes, then test fit the wing with the clips and install the 2 center wing bolts to hold it in place. Assuming everything looks good, carefully drill a small pilot hole through the hatch screw hole into your repair plug with a 3/32” drill bit. Do this for each repaired area, then remove the wing.
Clean old tape residue from the 2 center bolt surfaces on the wing. Now apply a 1” x 1” piece of double-sided foam tape centered over each center bolt hole. Cut a hole in the tape where the bolt goes through. Sorry, I forgot to take a photo of this step.
Apply a 1” x 1” piece of double-sided foam tape centered over each repair area plug, cut a hole in the tape where the screw goes through. Again, sorry for the lack of a photo.
Install your wing, install 2 center bolts and rubber plugs over the holes. Install the 4 side screws by hand, and be very careful not to overtighten them. Remind yourself that you don’t want to do this all over again by overtightening. Squeeze the wing and hatch lid together with one hand, then tighten each of the 4 side screws with your other hand until the screw washer just makes contact with the hatch surface.
Check the side wing mounting screws again in a week or so and make sure the washer is still in contact with the hatch lid when you give it a squeeze, slightly tighten only if needed.
This repair has held up through some wild storm cross winds while driving at 80mph, bumpy roads, triple digit speed bursts, and a wife that LOVES slamming the hatch closed.
Tools/parts needed:
- Dremel + cut off wheel + conical grinding stone (Dremel 952 or similar)
- Drill and 3/32” drill bit
- $15 - 1x ABS 1-½” Cleanout Plug per broken mount (typically in stock at Home Depot) - link
- $12 - JB PlasticWeld 25mL (typically in stock at AutoZone) - link
- $10 - 1” wide double-sided tape (3M, Gorilla, or similar)
- $10 - FibaTape (Fiberglass mesh drywall tape) - link
- Q-tips and/or toothpicks for PlasticWeld epoxy application
- Isopropyl Alcohol for cleaning before PlasticWeld application
- Optional, if your guide pins broke: $10 Ford W716352S300 or similar from Amazon - link
- Optional, if your clips broke: $18 Auveco #25096 - link
- Time and patience
I’m assuming your wing is already removed (plenty of guides/videos out there). Hopefully your guide pins and clips didn’t explode like mine did and fall down into the hatch door… rattle rattle
If your car is going to be sitting outside while you repair the wing and there is a chance of rain, put tape over the pins/clips/screw holes in the hatch.
Wing before any repair:
Cut off the square ends off the ABS cleanout plugs, keeping them as long as possible.
Use a Dremel cutoff wheel to cut a square hole in the wing where the broken screw mounts are (refer to photos for proper orientation). Make sure to cut the hole smaller than the ABS cleanout plug.
Carefully use the Dremel grinding stone to shape the hole until it is a press-fit for the ABS cleanout plug, then press in the ABS plug. You will need to trim/shape the cut end of the ABS plug that is inside the wing until it sits flush with the top of the old mounting hole in the wing. This will require you to remove the plug, trim the back of the plug, rinse, and repeat several times. It may help to drill a small hole in the ABS plug and put a screw into it to make removal/insertion easier.
Now use the grinding stone to remove the paint on the wing around the ABS plug to create a ~½” border. Also lightly grind the exposed end of the ABS plug. This will help the PlasticWeld epoxy bond better and create a stronger mount.
Repeat the previous 2 steps for each broken mount.
Clean the exposed wing and plug ABS plastic with Isopropyl alcohol.
Cut a piece of FibaTape and place over all the exposed ABS surface, overlapping the painted area of the wing slightly (you can trim later). Press the tape down firmly to match the contour of the repaired area. This tape will provide reinforcement for the epoxy, creating a stronger mount.
Squeeze out a small amount of PlasticWeld epoxy into the supplied container (it tacks up fast, don’t bite off more than you can chew), mix up the epoxy according to the instructions, and dab it onto the repair area. Less is more and the epoxy will run if you apply too much. The FibaTape might lift off the repair surface slightly, but once the epoxy tacks up enough you can use a toothpick to press the FibaTape back down.
Wait an hour between coats of epoxy. I ended up using about ⅔ of the tube of PlasticWeld for 3 or 4 coats of epoxy. PlasticWeld says full cure time is 1 hour, but in my cold garage it was still slightly tacky the next morning, so I brought it inside and gave it a couple days since I wasn’t in a rush and it was raining. I would allow at least 24 hours at 70 degrees for peace of mind.
Trim any unglued FibaTape at the edge of the repair as your OCD dictates, or just leave it…
Replace the clips/pins in the wing if any of yours are broken, remove tape from hatch if you taped over any holes, then test fit the wing with the clips and install the 2 center wing bolts to hold it in place. Assuming everything looks good, carefully drill a small pilot hole through the hatch screw hole into your repair plug with a 3/32” drill bit. Do this for each repaired area, then remove the wing.
Clean old tape residue from the 2 center bolt surfaces on the wing. Now apply a 1” x 1” piece of double-sided foam tape centered over each center bolt hole. Cut a hole in the tape where the bolt goes through. Sorry, I forgot to take a photo of this step.
Apply a 1” x 1” piece of double-sided foam tape centered over each repair area plug, cut a hole in the tape where the screw goes through. Again, sorry for the lack of a photo.
Install your wing, install 2 center bolts and rubber plugs over the holes. Install the 4 side screws by hand, and be very careful not to overtighten them. Remind yourself that you don’t want to do this all over again by overtightening. Squeeze the wing and hatch lid together with one hand, then tighten each of the 4 side screws with your other hand until the screw washer just makes contact with the hatch surface.
Check the side wing mounting screws again in a week or so and make sure the washer is still in contact with the hatch lid when you give it a squeeze, slightly tighten only if needed.
This repair has held up through some wild storm cross winds while driving at 80mph, bumpy roads, triple digit speed bursts, and a wife that LOVES slamming the hatch closed.