• Sign Up! To view all forums and unlock additional cool features

    Welcome to the #1 Fiesta ST Forum and Fiesta ST community dedicated to Fiesta ST owners and enthusiasts. Register for an account, it's free and it's easy, so don't hesitate to join the Fiesta ST Forum today!


Alignment and Adjustable Strut Top Mounts/hats

Messages
100
Likes
72
Location
Maui
#1
There was a thread on this topic that was very helpful, but it disappeared.
Based on what I learned, I bought CompBrake adjustable top hats and will re-install my stock camber bolts. I'm looking for about 2.25 degrees negative, and based on tire tread temps and wear, I'll adjust from there.

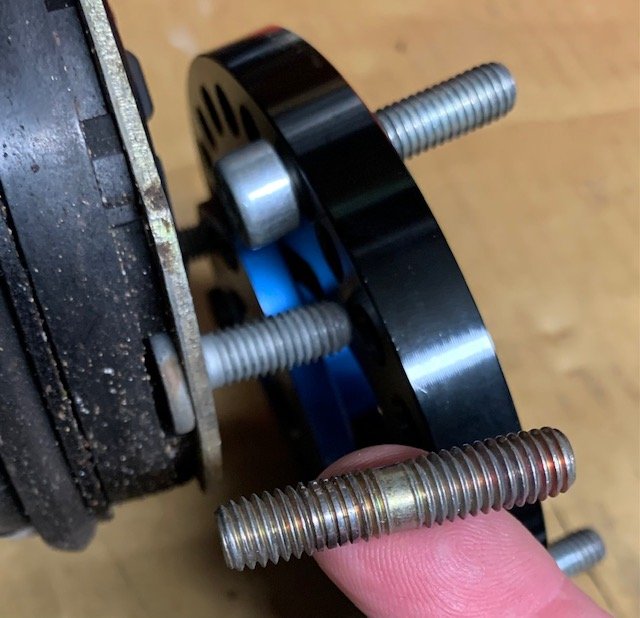
Can anyone provide some basic instructions on installing the top hats? The CompBrake universal diagram doesn't really help. It may be more obvious when I remove the struts.

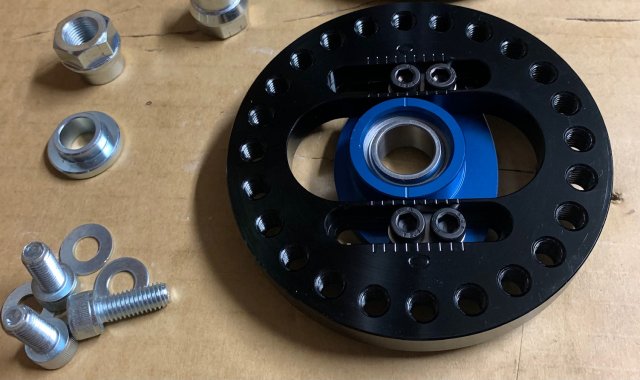
Right now, I can see how to install the center bushing and spacers, but not the three existing top studs that go through the strut tower.

Also, I can see that the top hats should be oriented so the top of the strut moves side-to-side (not front to back), but which should be the inner and outer sides of the blue siding part? It seems like I'd want the most adjustment to be inward.

Any help would be greatly appreciated.


top hats.jpg


Messages
491
Likes
550
Location
Camden, NJ, USA
#3
Curious why you didn't go with camber bolts instead?
i'm going compbrake top hat for front camber as well.

for me it's because i want a "set it and forget it" suspension setup and think this is a more bulletproof approach to front camber.


OP
MauiRoads
Messages
100
Likes
72
Location
Maui
Thread Starter #4
Same reasons here. Enough folks had problems with camber bolts slipping. Also, you can make smaller, precise adjustments.

I guess the main installation question is whether the three small bolts are used from the top of the strut tower, down into the top hat, which is below the strut tower. That would make sense, but they are A LOT smaller than the stock studs that come up through the tower.

It looks like I just remove the stock top hat, install the new spacer, new top hat and new top hat nut; push the strut up against the bottom of the tower, and then rotate the strut until three of the threaded holes in the new top hat line up with the three holes in the tower, and thread-in the three small bolts with washers.
Does anyone know if I have that right?


kevinatfms

Senior Member
Messages
873
Likes
923
Location
Germantown
#5
That style hat allows you to set the full negative camber AND full positive caster. So angle it with the blue plate inward and backward(toward rear of front fender).

They should get you at or over -3.0 degrees of negative camber if they are the same adjustment range as the DNA top hats or most coilover tops. Caster can be up to and over 4.5 degrees with the adjustable hats.

Compbrake wants you to chop the tower out for mounting and adjustment. Per what i was told, install top hat into car THEN bolt in strut.

Id find studs that fit in lieu of the bolts. McMaster-Carr will have them. I had to buy replacements for my DNA top hats and they had the exact ones needed in the perfect length. Also in stainless steel.


OP
MauiRoads
Messages
100
Likes
72
Location
Maui
Thread Starter #6
Thank you, kevinatfms. I appreciate you taking the time to reply.

I was wondering if this was a chance to increase caster too (by angling the plate) but didn't want to complicate the question. My steering seems to have a strong return-to-center, so, I may not add much caster.

I'm hoping to not chop the tower. I'm willing to estimate the camber on the initial install, and then do a remove/adjust/install to hopefully get it right. The chopping would only be to access the adjustment bolts, right?

Do you know why I should install the top hat into the tower and then install the strut? Doesn't the main top-of-strut nut compress the spring and hold the top hat down? If I install the top hat into the tower, and then the strut, do I then compress the spring/strut to get the main nut on?

I'm trying to get these in today...so, instead of studs, could I use bolts threaded through from the underside of the mount?


Messages
491
Likes
550
Location
Camden, NJ, USA
#7
Thank you, kevinatfms. I appreciate you taking the time to reply.

I was wondering if this was a chance to increase caster too (by angling the plate) but didn't want to complicate the question. My steering seems to have a strong return-to-center, so, I may not add much caster.

I'm hoping to not chop the tower. I'm willing to estimate the camber on the initial install, and then do a remove/adjust/install to hopefully get it right. The chopping would only be to access the adjustment bolts, right?

Do you know why I should install the top hat into the tower and then install the strut? Doesn't the main top-of-strut nut compress the spring and hold the top hat down? If I install the top hat into the tower, and then the strut, do I then compress the spring/strut to get the main nut on?

I'm trying to get these in today...so, instead of studs, could I use bolts threaded through from the underside of the mount?
For whatever it's worth (and please doublecheck as i'm not entirely sure and have just been told this), if you set -3 camber at the top hat, it will probably translate to -2.5ish camber at the tire

also @Jabbit forgot the another big point that @kevinatfms brings up. these top hats allow for camber *and* caster changes whereas camber bolts don't. i also am not knowledgeable enough to know the big benefits of changing positive caster on our cars but i know in general it's something drivers like to do


OP
MauiRoads
Messages
100
Likes
72
Location
Maui
Thread Starter #8
I'm in the middle of this job, and here's what I've learned.

The CompBrake large nut/bushing on top of the strut bumps up against the stock center-hole in the tower at only one index mark from 0. In order to get beyond one index mark of negative camber, I will have to oval or enlarge the hole.

The 3 bolts that come with the CompBrake kit are the same diameter as the stock strut top studs. I thought they were smaller.

It will be much easier to line-up and install the struts if I use studs on the top hat, rather than trying to use the supplied bolts from above.

Kevinatfms: when you referred to studs, what type did you mean? See photo of stock type press-in studs, screw-in studs, and a bolt. I'm guessing you mean the screw-in type. If I can't find those here (Maui has very limited options), and assuming there's no clearance problems, is there any reason I can't use a bolt through from the bottom of the top hat? To deal with the small gap from very short shoulder, I can use a washer, or slightly ream the bottom of the hole in the top hat.


Stud options.jpg


OP
MauiRoads
Messages
100
Likes
72
Location
Maui
Thread Starter #10
Thanks kevinatfms. Hope I can find some here. Otherwise, I'll use the supplied bolts (from above) for now, until I can find studs. I'm sure I'll have to pull the struts at least once more anyway, to get the camber where I want it.

Referring back to my first photo, you can see that the blue plate is not symmetrical in shape, and the center bushing is offset to the left within the blue plate. The center bushing also slides further to the left than to the right, so I'm assuming the left side would be for negative camber, and should be oriented inward. In the photo, I have oriented the top hat for what I think is the passenger side, looking forward from inside the car, with the slot running 9:00 (inward) to 3:00 (outward). For more caster, I think I should rotate it counter-clockwise, so the slot is at 8:00 (inward) and 2:00 (outward), so the top of the strut moves rearward (and inward). Is that right?

Thanks again!


kevinatfms

Senior Member
Messages
873
Likes
923
Location
Germantown
#11
Thanks kevinatfms. Hope I can find some here. Otherwise, I'll use the supplied bolts (from above) for now, until I can find studs. I'm sure I'll have to pull the struts at least once more anyway, to get the camber where I want it.

Referring back to my first photo, you can see that the blue plate is not symmetrical in shape, and the center bushing is offset to the left within the blue plate. The center bushing also slides further to the left than to the right, so I'm assuming the left side would be for negative camber, and should be oriented inward. In the photo, I have oriented the top hat for what I think is the passenger side, looking forward from inside the car, with the slot running 9:00 (inward) to 3:00 (outward). For more caster, I think I should rotate it counter-clockwise, so the slot is at 8:00 (inward) and 2:00 (outward), so the top of the strut moves rearward (and inward). Is that right?

Thanks again!
You can measure the stud and thread pitch and cross reference on McMaster. Very easy to do. They have every size available in both metric and standard.

Yes, inward for more negative camber(toward engine/transmission) and rearward(toward firewall) for more positive caster.


OP
MauiRoads
Messages
100
Likes
72
Location
Maui
Thread Starter #12
You can measure the stud and thread pitch and cross reference on McMaster. Very easy to do. They have every size available in both metric and standard.

Yes, inward for more negative camber(toward engine/transmission) and rearward(toward firewall) for more positive caster.
Thank you for the rapid reply and all the help. I can usually fumble my way through a lot of this stuff, but it sure helps to have input from someone who actually knows.


kevinatfms

Senior Member
Messages
873
Likes
923
Location
Germantown
#13
Thank you for the rapid reply and all the help. I can usually fumble my way through a lot of this stuff, but it sure helps to have input from someone who actually knows.
I had a set of DNA camber plates where i boogered up the studs from install/removal so many times so i was on the hunt to replace them when i needed to find a set. Also have used different plates on other car models over the years that have had the same issues with fitment and odd design.


OP
MauiRoads
Messages
100
Likes
72
Location
Maui
Thread Starter #14
The CompBrake top hats are in, and I did and alignment. My first try got me 2.25 and 2.30 negative camber up front. Sometimes we just luck out. I'll leave it like that until I get tire temps on a few runs, and check the inner shoulder wear. There was A LOT of toe-out, and I set it at a total of 1/16" toe-in. On a short run, the handling is really improved.

I haven't used spherical bearing top hats before, and there is some clatter, especially at lower speeds over speed bumps and road bumps. There's no noise when the suspension is working hard on smooth roads.

For anyone out there with spherical bearings in their ST, what kind of noises should I expect?

A few things to watch out for when installing:

The three bolts that insert from above, through the strut tower into the threaded holes in the perimeter of the black plate (see first photo above) have to line up with the three recesses in the stock plastic plate where the heads of the stock studs were (see second photo). If they don't, the three bolts will not be able to thread all the way in.

On Compbrake's big nut for the shock shaft, the lower part is a bushing (see upper left of first photo) and when installed, the threads of the shock shaft only appear to go about halfway into the nut. This is because the stock top hats are dished, and more of the shock shaft is exposed. But because the CompBrake nut's lower bushing segment is also threaded, the shaft is about 10 threads deep into the nut/bushing. Hopefully, that's enough. I used blue Loctite.

At 2.25 degrees negative camber, the two largest coils of the right spring were contacting the inner side of the strut tower. I used a long hardwood stick and a deadblow hammer to move the sheet metal slightly away from the coils.

You'll have to enlarge the hole in the strut tower, toward the inside. I angled it a little bit rearward too, because I oriented the top-hat so that the strut moves inward and slightly rearward, to gain a little caster.

To help install the struts into the towers: After installing the top hats onto the struts, I loosely installed some old studs into the top hats. I installed the struts into the towers, and then hand tightened some nuts onto the studs to hold the strut in position. Then, one-at-a-time, I replaced the studs with the CompBrakes bolts, using slightly larger washers. Without using the temporary studs, it was just too hard to try to line up the top hat strut holes with the tower holes and insert the bolts. I'll buy some stainless studs to insert permanently, next time I need to remove the struts!

Hope this helps anyone installing the CompBrake top hats.


Top