
-
Sign Up! To view all forums and unlock additional cool features
Welcome to the #1 Fiesta ST Forum and Fiesta ST community dedicated to Fiesta ST owners and enthusiasts. Register for an account, it's free and it's easy, so don't hesitate to join the Fiesta ST Forum today!
BIG MOUTH picture thread!
- Thread starter VelossaTech
- Start date
Trader history for VelossaTech (0)

I'll have mine Monday and I'll let you know what I come up with
Its not possible. It goes through the shroud to connect to the factory ram air. Which from the factory the ram air is actually block by the shroud
Yes I'm aware. We are talking about the extra cutting people have said must be done to get the cover piece back on. Maybe I called it the wrong thing. I'm aware it goes through the shroud to be installed. But the top air "duct" cover should be able to be reinstalled.

I installed 2 FiST BIG MOUTHs last week at the shop and none of them needed to have the stock duct piece cut. The only part that gets cut is the shroud under the bumper that is not visible (obviously this part needs to be cut or you cant install the intake).
Best,
- D
Thanks, I know it CAN be done. I guess the issue is why have multiple people had issues and resorted to cutting that stock duct piece off or hacking it up? Is there some trick or method people arent figuring via the instructions? Its obviously a great product, I just really want that clean OEM install that your saying it can/should be. Do you have any further recommendations or hints/tips for install not found on paper?
Hey yea no problem. I only know of one person that actually cut the stock upper duct piece. I have personally installed a few, and as long as you leave all the screws loose when you put the bumper on, you wont have a problem.
I think the issue is when you start tightening down screws as you insert them, it locks down certain parts of the bumper/shroud before you finish the install, and you are forced to yank on it, twist it, when you get to the top. And that may cause interference, this is just my guess. I took a few pictures of post install bumpers and none of the ones I did (2015 or 2016) had any issue going popping the stock duct back on.. The BIG MOUTH touches the stock duct, but it doesnt make it such that it can't be installed, you just need to line everything up (as with any bumper install) and make sure it sits right before tightening down.
best,
D
Thanks! I'll keep that in mind for install. Appreciate you getting back to me so quick and explaining it out. ![[wrenchin]](/images/smilies/icon_smile_wrenchin.gif "Wrenchin [wrenchin]")
Ok i understand what you are talking about now. It seems some cars may have issue with the top cover competely sitting flush. It could be the difference in tolerances on the top cover or possible tolerances the the big mouth. Maybe there will be a fix for it in the future.
Ok, now that I have it and have gone through the installation, let me give those who are curious some insight.
I applaud Velossa for their design. Unfortunately that is where the applause stops. The only way this can be installed without cutting the shroud would be to cut a hole in the shroud matching the inner diameter of the Velossa piece. Then cut the Velossa piece into two pieces, put one half on top and the other half on bottom.
That is not the bad part.
The curved cover that goes over the factory scoop, had to be removed. Now, I know there are others here that are going to say hogwash. Velossa also says in their instruction manual that fitment may or may not be a problem due to differences in manufacturing. Unfortunately that is the biggest load of malarkey I have ever heard. There is no way that there is that much difference between fiesta ST's where one of these would fit under the top cover and another would not. With the Velossa piece installed that curved piece will not go back down flush. YES I INSTALLED IT CORRECTLY. It also prevents the bumper cover from reinstalling correctly FROM THE FACTORY. The Velossa piece doesn't slope down quick enough or sharp enough to clear it probably because you need a smooth transition from top to bottom. Velossa Tech knows this because of their instructions telling you to put the plug back in the bumper cover on the right first. Nothing aligns back up correctly unless you cut the curved cover off. When you cut that off the bumper goes back on without a hitch. I am very picky about stuff like this and I am willing to say, it is installed, and I am happy about it. But this part is not ready for STOCK REPLACEMENT. I would consider saying a medium amount of modification is required for the bumper cover to reinstall correctly. I will post pictures to this post tomorrow but wanted to post an update.
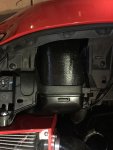
On a positive note, I think it looks pretty cool with the cover gone. You can look at the pictures tomorrow and be your own judge.
Much appreciated. While I also appreciate the design, fitment is big for me. I'm going to pass on this piece and move forward with my own DIY solution in order to retain the stock fitment of the cover etc. Your review is the same experience I've heard both locally and on here now. Maybe a revised piece will appear in the future, but for now I'm out. Good review ![[thumb]](/images/smilies/icon_smile_thumb.gif "Thumbs Up [thumb]")
Hey thanks for the input. I am glad you are happy with the intake.
I think that there may be an option in the future to constrict that area of the intake. But for now, I don't forsee that since I don't want to have to sacrifice airflow performance. In my experience, installing about a dozen of them, I didn't have to cut the duct cover. I had said earlier that there may be automotive tolerances that effect it, although am not 100% certain if the tolerances are off by that much from car to car (I would guess to say you are right and they aren't off by that much).
The cover that touches the big mouth will be close to flush but definitely not all the way flush, (I am sure you did it right from what I read). You don't absolutely have to cut the cover if you dont want to. The cover will still go back on and the clips should still pop back in. There will be touching between the stock duct cover and the intake, there is just no way around that since the intake is much larger than the stock duct hole, it lets the engine breath and it is a bigger opening than stock.
Just for reference I wanted to shed some light on the design.
The stock duct cover is a tiny opening, you can barely fit an open hand through it if you reach under there. The engine has to breath through this puny hole. When I designed the big mouth, I had to balance performance, aesthetics, manufacturing and tolerances. Since the FiST guys wanted performance (there are very few options for true performance intakes out now for this car); I focused on getting the duct to be aerodynamically most efficient while doing the best I could do fit it inside that tiny stock hole. If you want to cut the cover, you certainly can, but I don't feel that it should be cut (tomato tomatoe!). You can put the stock plugs back in their respective locations. Again, sorry for any inconvenience or if the instructions were not as clear as they need to be, I can revise them how you feel they need to be revised. Just let me know.
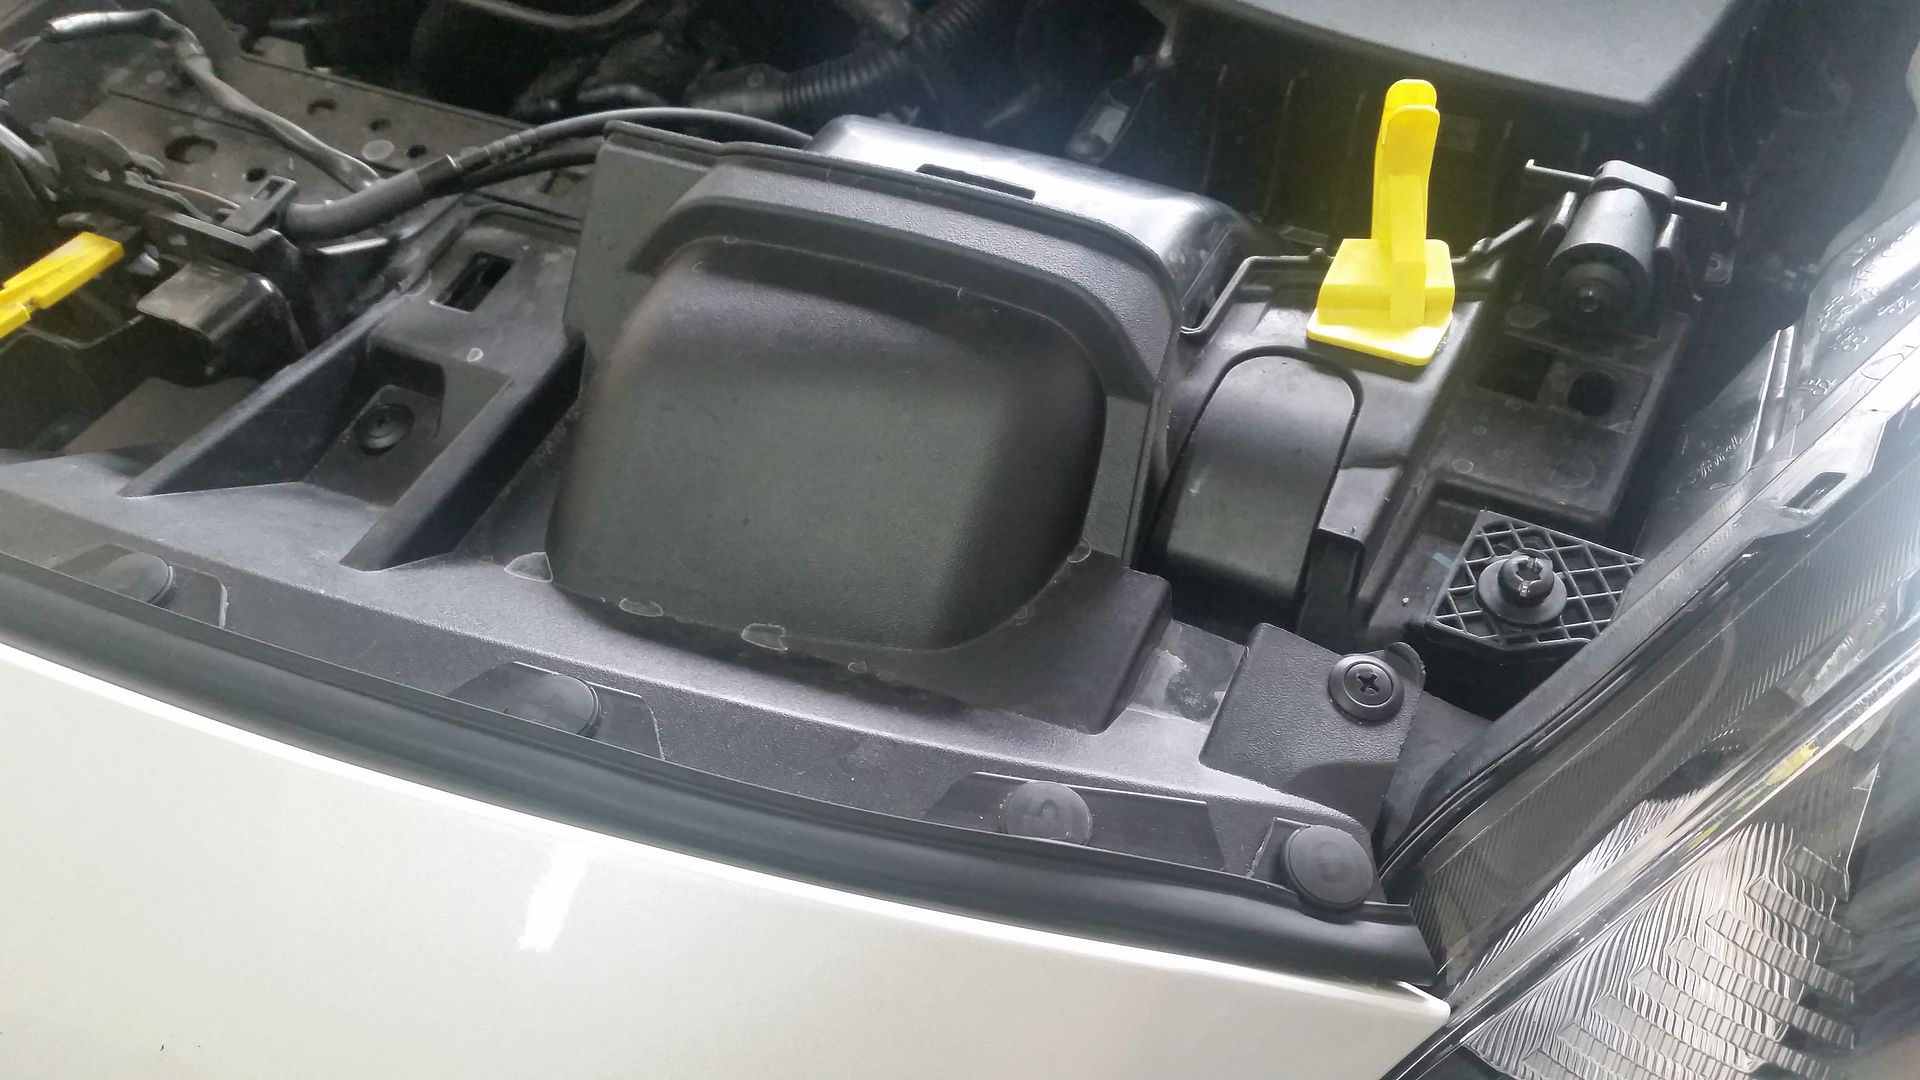
Here is a quick image of the stock duct cover on a 2016 I installed last week. There is a slight gap, but at least for me, the extra airflow, totally worth it.
Best,
D
you could sand down the underside, sure that would work too.
Having been a manufacturer myself, everything you said is true regarding the design. Where I think there is some discrepancy is in the implementation. Clearly there are no pictures on your website showing what I have included here and make no mistake I do not hole you accountable or to blame for it not fitting based on what is on your website, but if you or any other seller on this forum or other forum is going to peddle their product and I mean this in the nicest way possible, you need to be very clearly about the implementation and the consequences of buying your product or you need to go back to the drawing board. I have modified so many cars in so many ways, making this change was not a problem for me, but for anyone else who would be interested in your product they need to know that your product does not allow the cover or the bumper to back on the car in the exact factory location without force and even then it does not line up correctly with the headlights or bumper to fence line. It does not fit. Leaning up against the bumper to force it into place just so you can make it fit, means it does not fit. Using the excuse that not all tolerances are same between fiesta's I have never heard anything of the like. Please forgive me when I say, your not even close. When I install this product, I would expect to be able to lay the bumper cover or fascia back on the car and screw it in. I should not have to force anything.
With all of that said, It is a great design, the fact that you printed it, I give a grade A+. For all the reasons you state, performance over function. There is no disagreement here. But I will be willing to bet that 80% of your potential customer will not appreciate that it is not a direct fit over the stock unit. If I was looking at a redesign, the only thing that I can see that would make it fit is to make a sharper turn so that it clears the cover, but then you lose functionality, which in retrospect is probably why the factory piece is like it is. I may come up with a cover for it, I may not. Cutting the cover off made me feel better because it allowed me to reinstall the bumper as it was from the factory. I didn't have force anything.
You don't have to justify the design, but the message I want to make here for you and others that would want to build parts for cars, you need to clearly indicate on your website and for anyone who would ask you in an open forum, quit being vague about it, and quit using comments like "each car has different tolerances" that is a load of pine cones and you know it. Either your customer wants more air or they don't. If they want more air and don't care about making a couple of modifications, you make a great product and should very proud of what you have accomplished. It is stylish, has great function, and for the record I am not sure, it is a complete big deal that I had to cut cover. I was bigger deal that you were not as up front as you could have been.
You Said.......
"I think that there may be an option in the future to constrict that area of the intake. But for now, I don't forsee that since I don't want to have to sacrifice airflow performance."
DONT. The purpose of the product was more air flow. You just need to work on your delivery. Be completely honest and upfront. Customers feel so much better cutting up their car if they know up front. After you pay for a product, get it, and then it doesn't fit as expected, then you have a problem.
See pictures below

Yeah, that will be problem now, I cut it off.
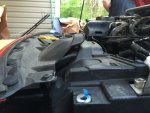
However, it is about half way down the BM from the top where the Cowl starts to curve. I could have just gone down the curve about 3-4 inches and cut out a swath 2.5 inches high and the width of the big mouth and that probably would have done it, maybe a little more maybe a little less. As you can see from the picture, I just cut he whole thing off which worked better for me. When I did that, the bumper cover literally laid right back into position. As I said in an earlier post, I may make a cover for it. I may not,
From the factory this curved cover in the picture lays flat.
Has there been people yet who installed and did NOT have to cut their shroud? I feel like perhaps there's sometjing missing instruction wise or a critical "trick" required for perfect fitment. I'm about to pull the trigger but I'd really like to see what's up fitment wise. Everyone I've seen here and the one local guy from our ST Group who has one also had to cut his shroud up. Anyone?
Has there been people yet who installed and did NOT have to cut their shroud? I feel like perhaps there's sometjing missing instruction wise or a critical "trick" required for perfect fitment. I'm about to pull the trigger but I'd really like to see what's up fitment wise. Everyone I've seen here and the one local guy from our ST Group who has one also had to cut his shroud up. Anyone?
Has there been people yet who installed and did NOT have to cut their shroud? I feel like perhaps there's sometjing missing instruction wise or a critical "trick" required for perfect fitment. I'm about to pull the trigger but I'd really like to see what's up fitment wise. Everyone I've seen here and the one local guy from our ST Group who has one also had to cut his shroud up. Anyone?
Its not possible. It goes through the shroud to connect to the factory ram air. Which from the factory the ram air is actually block by the shroud
OP
Thread Starter
#47
Thread Starter
#47
Yes I'm aware. We are talking about the extra cutting people have said must be done to get the cover piece back on. Maybe I called it the wrong thing. I'm aware it goes through the shroud to be installed. But the top air "duct" cover should be able to be reinstalled.
Best,
- D
I installed 2 FiST BIG MOUTHs last week at the shop and none of them needed to have the stock duct piece cut. The only part that gets cut is the shroud under the bumper that is not visible (obviously this part needs to be cut or you cant install the intake).
Best,
- D
Best,
- D
OP
Thread Starter
#49
Thread Starter
#49
Thanks, I know it CAN be done. I guess the issue is why have multiple people had issues and resorted to cutting that stock duct piece off or hacking it up? Is there some trick or method people arent figuring via the instructions? Its obviously a great product, I just really want that clean OEM install that your saying it can/should be. Do you have any further recommendations or hints/tips for install not found on paper?
I think the issue is when you start tightening down screws as you insert them, it locks down certain parts of the bumper/shroud before you finish the install, and you are forced to yank on it, twist it, when you get to the top. And that may cause interference, this is just my guess. I took a few pictures of post install bumpers and none of the ones I did (2015 or 2016) had any issue going popping the stock duct back on.. The BIG MOUTH touches the stock duct, but it doesnt make it such that it can't be installed, you just need to line everything up (as with any bumper install) and make sure it sits right before tightening down.
best,
D
Hey yea no problem. I only know of one person that actually cut the stock upper duct piece. I have personally installed a few, and as long as you leave all the screws loose when you put the bumper on, you wont have a problem.
I think the issue is when you start tightening down screws as you insert them, it locks down certain parts of the bumper/shroud before you finish the install, and you are forced to yank on it, twist it, when you get to the top. And that may cause interference, this is just my guess. I took a few pictures of post install bumpers and none of the ones I did (2015 or 2016) had any issue going popping the stock duct back on.. The BIG MOUTH touches the stock duct, but it doesnt make it such that it can't be installed, you just need to line everything up (as with any bumper install) and make sure it sits right before tightening down.
best,
D
Yes I'm aware. We are talking about the extra cutting people have said must be done to get the cover piece back on. Maybe I called it the wrong thing. I'm aware it goes through the shroud to be installed. But the top air "duct" cover should be able to be reinstalled.
Has there been people yet who installed and did NOT have to cut their shroud? I feel like perhaps there's sometjing missing instruction wise or a critical "trick" required for perfect fitment. I'm about to pull the trigger but I'd really like to see what's up fitment wise. Everyone I've seen here and the one local guy from our ST Group who has one also had to cut his shroud up. Anyone?
I applaud Velossa for their design. Unfortunately that is where the applause stops. The only way this can be installed without cutting the shroud would be to cut a hole in the shroud matching the inner diameter of the Velossa piece. Then cut the Velossa piece into two pieces, put one half on top and the other half on bottom.
That is not the bad part.
The curved cover that goes over the factory scoop, had to be removed. Now, I know there are others here that are going to say hogwash. Velossa also says in their instruction manual that fitment may or may not be a problem due to differences in manufacturing. Unfortunately that is the biggest load of malarkey I have ever heard. There is no way that there is that much difference between fiesta ST's where one of these would fit under the top cover and another would not. With the Velossa piece installed that curved piece will not go back down flush. YES I INSTALLED IT CORRECTLY. It also prevents the bumper cover from reinstalling correctly FROM THE FACTORY. The Velossa piece doesn't slope down quick enough or sharp enough to clear it probably because you need a smooth transition from top to bottom. Velossa Tech knows this because of their instructions telling you to put the plug back in the bumper cover on the right first. Nothing aligns back up correctly unless you cut the curved cover off. When you cut that off the bumper goes back on without a hitch. I am very picky about stuff like this and I am willing to say, it is installed, and I am happy about it. But this part is not ready for STOCK REPLACEMENT. I would consider saying a medium amount of modification is required for the bumper cover to reinstall correctly. I will post pictures to this post tomorrow but wanted to post an update.
On a positive note, I think it looks pretty cool with the cover gone. You can look at the pictures tomorrow and be your own judge.
Ok, now that I have it and have gone through the installation, let me give those who are curious some insight.
I applaud Velossa for their design. Unfortunately that is where the applause stops. The only way this can be installed without cutting the shroud would be to cut a hole in the shroud matching the inner diameter of the Velossa piece. Then cut the Velossa piece into two pieces, put one half on top and the other half on bottom.
That is not the bad part.
The curved cover that goes over the factory scoop, had to be removed. Now, I know there are others here that are going to say hogwash. Velossa also says in their instruction manual that fitment may or may not be a problem due to differences in manufacturing. Unfortunately that is the biggest load of malarkey I have ever heard. There is no way that there is that much difference between fiesta ST's where one of these would fit under the top cover and another would not. With the Velossa piece installed that curved piece will not go back down flush. YES I INSTALLED IT CORRECTLY. It also prevents the bumper cover from reinstalling correctly FROM THE FACTORY. The Velossa piece doesn't slope down quick enough or sharp enough to clear it probably because you need a smooth transition from top to bottom. Velossa Tech knows this because of their instructions telling you to put the plug back in the bumper cover on the right first. Nothing aligns back up correctly unless you cut the curved cover off. When you cut that off the bumper goes back on without a hitch. I am very picky about stuff like this and I am willing to say, it is installed, and I am happy about it. But this part is not ready for STOCK REPLACEMENT. I would consider saying a medium amount of modification is required for the bumper cover to reinstall correctly. I will post pictures to this post tomorrow but wanted to post an update.
On a positive note, I think it looks pretty cool with the cover gone. You can look at the pictures tomorrow and be your own judge.
OP
Thread Starter
#54
Thread Starter
#54
Ok, now that I have it and have gone through the installation, let me give those who are curious some insight.
I applaud Velossa for their design. Unfortunately that is where the applause stops. The only way this can be installed without cutting the shroud would be to cut a hole in the shroud matching the inner diameter of the Velossa piece. Then cut the Velossa piece into two pieces, put one half on top and the other half on bottom.
That is not the bad part.
The curved cover that goes over the factory scoop, had to be removed. Now, I know there are others here that are going to say hogwash. Velossa also says in their instruction manual that fitment may or may not be a problem due to differences in manufacturing. Unfortunately that is the biggest load of malarkey I have ever heard. There is no way that there is that much difference between fiesta ST's where one of these would fit under the top cover and another would not. With the Velossa piece installed that curved piece will not go back down flush. YES I INSTALLED IT CORRECTLY. It also prevents the bumper cover from reinstalling correctly FROM THE FACTORY. The Velossa piece doesn't slope down quick enough or sharp enough to clear it probably because you need a smooth transition from top to bottom. Velossa Tech knows this because of their instructions telling you to put the plug back in the bumper cover on the right first. Nothing aligns back up correctly unless you cut the curved cover off. When you cut that off the bumper goes back on without a hitch. I am very picky about stuff like this and I am willing to say, it is installed, and I am happy about it. But this part is not ready for STOCK REPLACEMENT. I would consider saying a medium amount of modification is required for the bumper cover to reinstall correctly. I will post pictures to this post tomorrow but wanted to post an update.
On a positive note, I think it looks pretty cool with the cover gone. You can look at the pictures tomorrow and be your own judge.
I applaud Velossa for their design. Unfortunately that is where the applause stops. The only way this can be installed without cutting the shroud would be to cut a hole in the shroud matching the inner diameter of the Velossa piece. Then cut the Velossa piece into two pieces, put one half on top and the other half on bottom.
That is not the bad part.
The curved cover that goes over the factory scoop, had to be removed. Now, I know there are others here that are going to say hogwash. Velossa also says in their instruction manual that fitment may or may not be a problem due to differences in manufacturing. Unfortunately that is the biggest load of malarkey I have ever heard. There is no way that there is that much difference between fiesta ST's where one of these would fit under the top cover and another would not. With the Velossa piece installed that curved piece will not go back down flush. YES I INSTALLED IT CORRECTLY. It also prevents the bumper cover from reinstalling correctly FROM THE FACTORY. The Velossa piece doesn't slope down quick enough or sharp enough to clear it probably because you need a smooth transition from top to bottom. Velossa Tech knows this because of their instructions telling you to put the plug back in the bumper cover on the right first. Nothing aligns back up correctly unless you cut the curved cover off. When you cut that off the bumper goes back on without a hitch. I am very picky about stuff like this and I am willing to say, it is installed, and I am happy about it. But this part is not ready for STOCK REPLACEMENT. I would consider saying a medium amount of modification is required for the bumper cover to reinstall correctly. I will post pictures to this post tomorrow but wanted to post an update.
On a positive note, I think it looks pretty cool with the cover gone. You can look at the pictures tomorrow and be your own judge.
I think that there may be an option in the future to constrict that area of the intake. But for now, I don't forsee that since I don't want to have to sacrifice airflow performance. In my experience, installing about a dozen of them, I didn't have to cut the duct cover. I had said earlier that there may be automotive tolerances that effect it, although am not 100% certain if the tolerances are off by that much from car to car (I would guess to say you are right and they aren't off by that much).
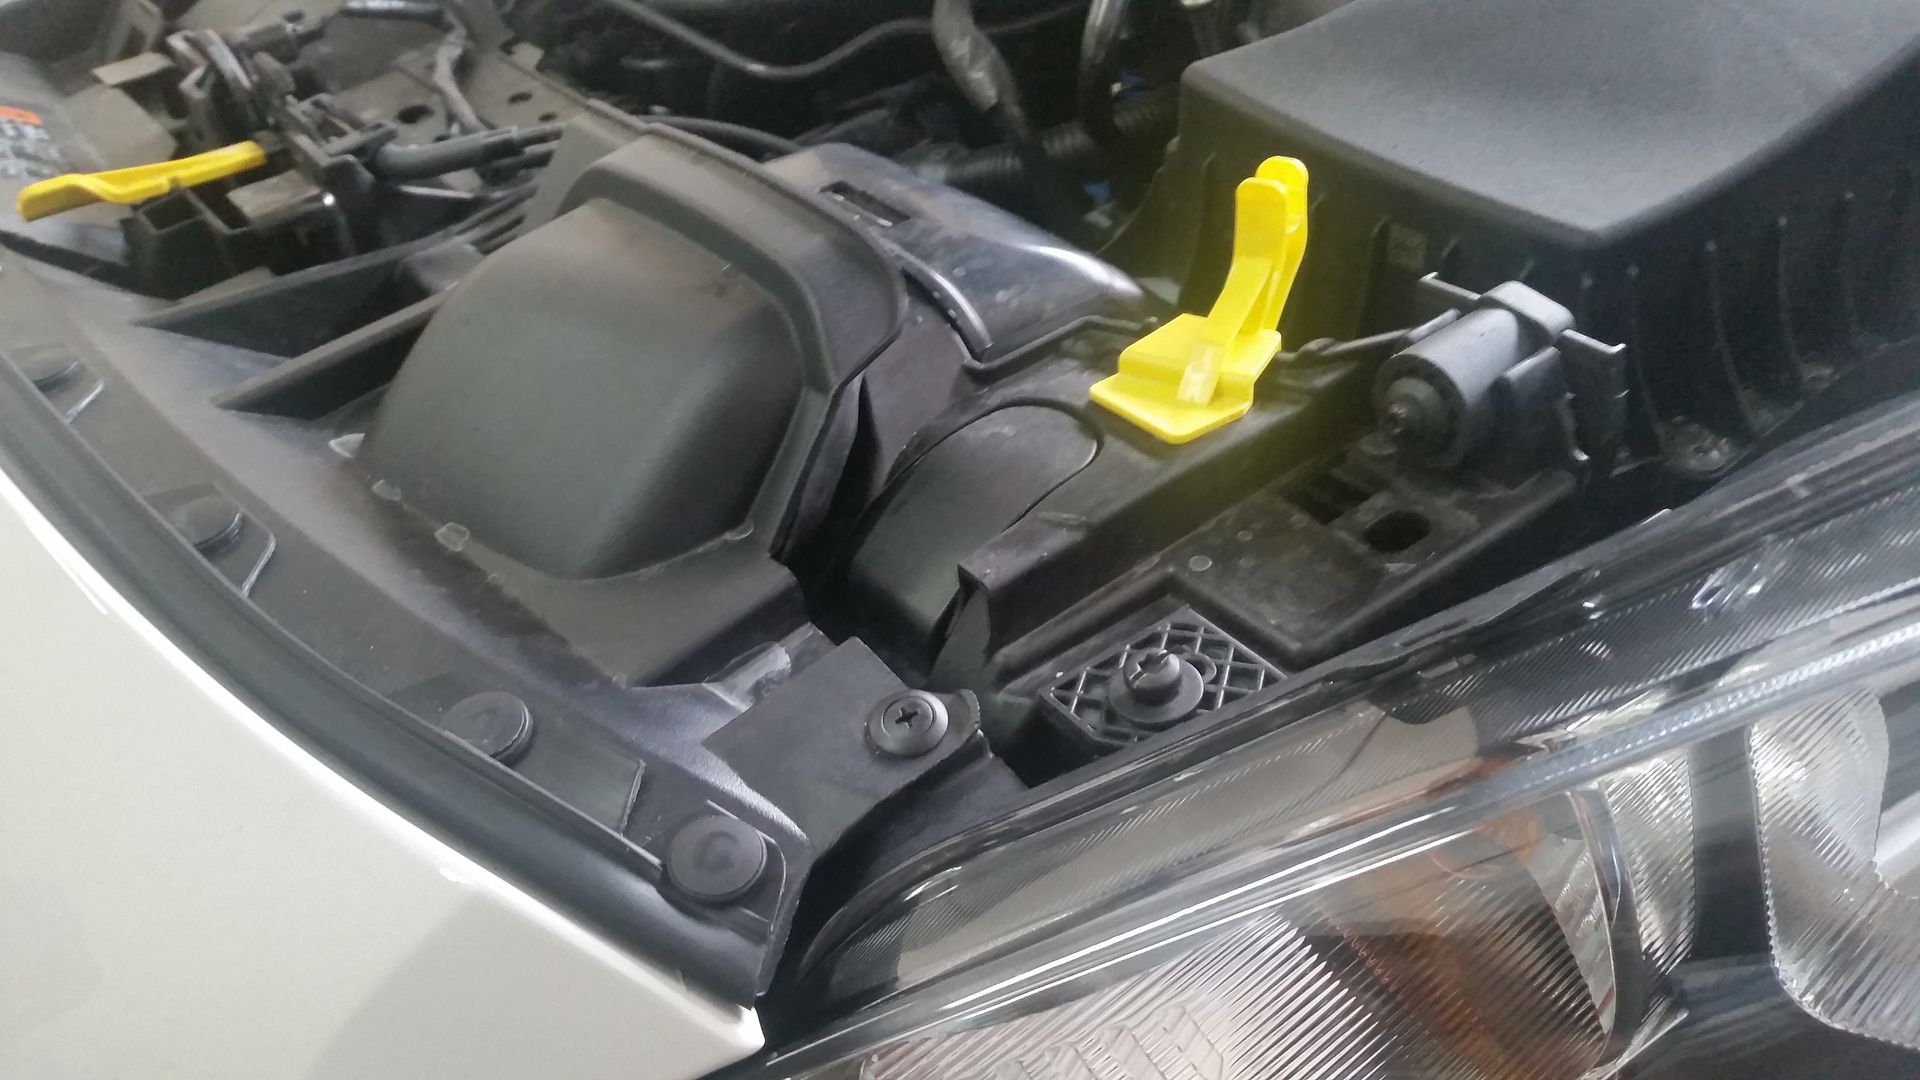
The cover that touches the big mouth will be close to flush but definitely not all the way flush, (I am sure you did it right from what I read). You don't absolutely have to cut the cover if you dont want to. The cover will still go back on and the clips should still pop back in. There will be touching between the stock duct cover and the intake, there is just no way around that since the intake is much larger than the stock duct hole, it lets the engine breath and it is a bigger opening than stock.
Just for reference I wanted to shed some light on the design.
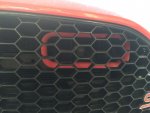
The stock duct cover is a tiny opening, you can barely fit an open hand through it if you reach under there. The engine has to breath through this puny hole. When I designed the big mouth, I had to balance performance, aesthetics, manufacturing and tolerances. Since the FiST guys wanted performance (there are very few options for true performance intakes out now for this car); I focused on getting the duct to be aerodynamically most efficient while doing the best I could do fit it inside that tiny stock hole. If you want to cut the cover, you certainly can, but I don't feel that it should be cut (tomato tomatoe!). You can put the stock plugs back in their respective locations. Again, sorry for any inconvenience or if the instructions were not as clear as they need to be, I can revise them how you feel they need to be revised. Just let me know.
Here is a quick image of the stock duct cover on a 2016 I installed last week. There is a slight gap, but at least for me, the extra airflow, totally worth it.


Best,
D
OP
Thread Starter
#56
Thread Starter
#56
Great info here. Looks pretty close to stock to me. Has anyone tried sanding down the underside of that top cover to allow for a bit more clearance?
Im looking forward to receiving mine, just placed an order a few days ago.
Im looking forward to receiving mine, just placed an order a few days ago.
It is nice to hear these updates because my install issues had me wondering if I had installed it incorrectly. I like antarctica was very careful and am meticulous about these things.
I posted fittment pictures elsewhere.
In my case I was not happy with the upper shroud/cowl looking warped so I did a little cutting and I am happy with the way it looks, 95% of people would not notice it has been modified.
I do think that the instructions have been a bit misleading and should be updated. But Dan aka VelossaTech is a great guy and makes great stuff and this small hitch is not reason to not buy his products.
Hey thanks for the input. I am glad you are happy with the intake.
I think that there may be an option in the future to constrict that area of the intake. But for now, I don't forsee that since I don't want to have to sacrifice airflow performance. In my experience, installing about a dozen of them, I didn't have to cut the duct cover. I had said earlier that there may be automotive tolerances that effect it, although am not 100% certain if the tolerances are off by that much from car to car (I would guess to say you are right and they aren't off by that much).
The cover that touches the big mouth will be close to flush but definitely not all the way flush, (I am sure you did it right from what I read). You don't absolutely have to cut the cover if you dont want to. The cover will still go back on and the clips should still pop back in. There will be touching between the stock duct cover and the intake, there is just no way around that since the intake is much larger than the stock duct hole, it lets the engine breath and it is a bigger opening than stock.
Just for reference I wanted to shed some light on the design.
The stock duct cover is a tiny opening, you can barely fit an open hand through it if you reach under there. The engine has to breath through this puny hole. When I designed the big mouth, I had to balance performance, aesthetics, manufacturing and tolerances. Since the FiST guys wanted performance (there are very few options for true performance intakes out now for this car); I focused on getting the duct to be aerodynamically most efficient while doing the best I could do fit it inside that tiny stock hole. If you want to cut the cover, you certainly can, but I don't feel that it should be cut (tomato tomatoe!). You can put the stock plugs back in their respective locations. Again, sorry for any inconvenience or if the instructions were not as clear as they need to be, I can revise them how you feel they need to be revised. Just let me know.
Here is a quick image of the stock duct cover on a 2016 I installed last week. There is a slight gap, but at least for me, the extra airflow, totally worth it.
Best,
D
Having been a manufacturer myself, everything you said is true regarding the design. Where I think there is some discrepancy is in the implementation. Clearly there are no pictures on your website showing what I have included here and make no mistake I do not hole you accountable or to blame for it not fitting based on what is on your website, but if you or any other seller on this forum or other forum is going to peddle their product and I mean this in the nicest way possible, you need to be very clearly about the implementation and the consequences of buying your product or you need to go back to the drawing board. I have modified so many cars in so many ways, making this change was not a problem for me, but for anyone else who would be interested in your product they need to know that your product does not allow the cover or the bumper to back on the car in the exact factory location without force and even then it does not line up correctly with the headlights or bumper to fence line. It does not fit. Leaning up against the bumper to force it into place just so you can make it fit, means it does not fit. Using the excuse that not all tolerances are same between fiesta's I have never heard anything of the like. Please forgive me when I say, your not even close. When I install this product, I would expect to be able to lay the bumper cover or fascia back on the car and screw it in. I should not have to force anything.
With all of that said, It is a great design, the fact that you printed it, I give a grade A+. For all the reasons you state, performance over function. There is no disagreement here. But I will be willing to bet that 80% of your potential customer will not appreciate that it is not a direct fit over the stock unit. If I was looking at a redesign, the only thing that I can see that would make it fit is to make a sharper turn so that it clears the cover, but then you lose functionality, which in retrospect is probably why the factory piece is like it is. I may come up with a cover for it, I may not. Cutting the cover off made me feel better because it allowed me to reinstall the bumper as it was from the factory. I didn't have force anything.
You don't have to justify the design, but the message I want to make here for you and others that would want to build parts for cars, you need to clearly indicate on your website and for anyone who would ask you in an open forum, quit being vague about it, and quit using comments like "each car has different tolerances" that is a load of pine cones and you know it. Either your customer wants more air or they don't. If they want more air and don't care about making a couple of modifications, you make a great product and should very proud of what you have accomplished. It is stylish, has great function, and for the record I am not sure, it is a complete big deal that I had to cut cover. I was bigger deal that you were not as up front as you could have been.
You Said.......
"I think that there may be an option in the future to constrict that area of the intake. But for now, I don't forsee that since I don't want to have to sacrifice airflow performance."
DONT. The purpose of the product was more air flow. You just need to work on your delivery. Be completely honest and upfront. Customers feel so much better cutting up their car if they know up front. After you pay for a product, get it, and then it doesn't fit as expected, then you have a problem.
See pictures below
[MENTION=929]antarctica24[/MENTION] can you take a picture camera in the engine bay pointing to the front? What I want to see is where the cowl touches the BM. is it the height, the width, etc... I really want one but I need the cowl to sit better without cutting. Looks like a 0.5" gap or more (pictures are deceiving)
[MENTION=929]antarctica24[/MENTION] can you take a picture camera in the engine bay pointing to the front? What I want to see is where the cowl touches the BM. is it the height, the width, etc... I really want one but I need the cowl to sit better without cutting. Looks like a 0.5" gap or more (pictures are deceiving)
However, it is about half way down the BM from the top where the Cowl starts to curve. I could have just gone down the curve about 3-4 inches and cut out a swath 2.5 inches high and the width of the big mouth and that probably would have done it, maybe a little more maybe a little less. As you can see from the picture, I just cut he whole thing off which worked better for me. When I did that, the bumper cover literally laid right back into position. As I said in an earlier post, I may make a cover for it. I may not,
From the factory this curved cover in the picture lays flat.
Similar threads
-

-

-
-

-

-
-
 FS Cobb Tuner, CF Shift Knob, Velossa Big Mouth and more
- Started by enigmaticdream
- Replies: 15
-
 Velossa Tech "lit kit" big mouth snorkels NOW AVAILABLE
- Started by ron@whoosh
- Replies: 8
-
