• Sign Up! To view all forums and unlock additional cool features

    Welcome to the #1 Fiesta ST Forum and Fiesta ST community dedicated to Fiesta ST owners and enthusiasts. Register for an account, it's free and it's easy, so don't hesitate to join the Fiesta ST Forum today!


BIG MOUTH picture thread!

Trader history for VelossaTech (0)

J2FoRS

Senior Member
Messages
819
Likes
186
Location
Central
So you're telling me that you did absolutely no cutting of the radiator shroud? I find that hard to believe. ...
I said I did no EXTRA cutting. Obviously you need to make the required cut to fit the body of the BigMouth through the shroud as per the instructions or it wouldn't be possible. The mouth sits below the shroud while the body connects to the factory snorkel intake. I'm not sure what your question or accusation is.

Some people had to cut that upper cowl cover shown in my pics above clear off or hack away part of it in order to put things back together. I did not have that issue was all I was implying. No extra cuts for fitment.

View the link and read the installation guide. The only cut required is the one that is in the instructions to make for fitment through the shroud. Alot of people already have this hole to allow air to enter the factory snorkel area as suggested by ModBargains DIY budget mod page and a few other companies. If you do not already have it, yes you need to cut it to fit the BigMouth upper body through it into the factory snorkel inlet.

http://www.velossatechdesign.com/product/2014-2015-fiesta-st-ram-air-big-mouth-intake/


Messages
42
Likes
12
Location
Louisville
I said I did no EXTRA cutting. Obviously you need to make the required cut to fit the body of the BigMouth through the shroud as per the instructions or it wouldn't be possible. The mouth sits below the shroud while the body connects to the factory snorkel intake. I'm not sure what your question or accusation is.

Some people had to cut that upper cowl cover shown in my pics above clear off or hack away part of it in order to put things back together. I did not have that issue was all I was implying. No extra cuts for fitment.

View the link and read the installation guide. The only cut required is the one that is in the instructions to make for fitment through the shroud. Alot of people already have this hole to allow air to enter the factory snorkel area as suggested by ModBargains DIY budget mod page and a few other companies. If you do not already have it, yes you need to cut it to fit the BigMouth upper body through it into the factory snorkel inlet.

http://www.velossatechdesign.com/product/2014-2015-fiesta-st-ram-air-big-mouth-intake/
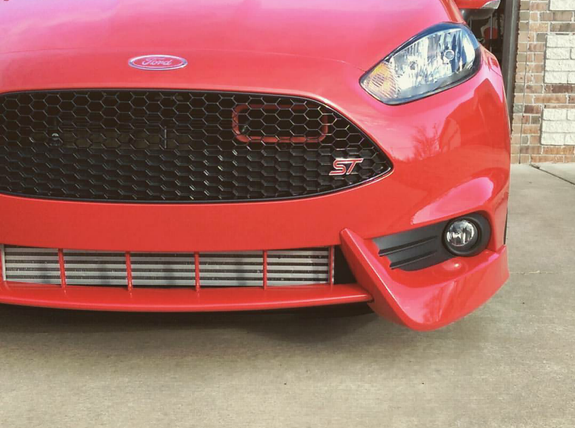
Just curious, but what other "bumper-off" mods did you install along with the big mouth?

Also, did you manage to make an big mouth install video, or just those great pics?


J2FoRS

Senior Member
Messages
819
Likes
186
Location
Central
Just curious, but what other "bumper-off" mods did you install along with the big mouth?

Also, did you manage to make an big mouth install video, or just those great pics?
I did FMIC, charge pipes, Turbosmart BOV and BigMouth all at once so I could do it in one bumper removal. And sorry no video. But it literally takes 10 minutes once you have bumper off.


TyphoonFiST

9000 Post Club
Premium Account
Messages
11,508
Likes
8,005
Location
Rich-fizzield
Yup neither did I. A weebit of heat and pressure on the shroud and it forms in place just like OEM. Just don't touch the hot plastic or it will mar it.

I'd like to see how you did it....when mine went back together it was real tight and required no heat gun use....I'm curious as to how and what you did....a video would be great for myself and others is what I was trying to get at we earlier in this thread...


Messages
407
Likes
75
Location
Wichita
I'd like to see how you did it....when mine went back together it was real tight and required no heat gun use....I'm curious as to how and what you did....a video would be great for myself and others is what I was trying to get at we earlier in this thread...
Agreed I'm going to install mine with my FMIC when it comes in and I don't want to bolx it up. Any pics or video would help


CanadianGuy

4000 Post Club
Messages
4,097
Likes
942
Location
Southern Ontario
Sorry I have nothing for a video, but I will try to mark up some pictures to show where the heat was applied and where to apply pressure.


J2FoRS

Senior Member
Messages
819
Likes
186
Location
Central
I'd like to see how you did it....when mine went back together it was real tight and required no heat gun use....I'm curious as to how and what you did....a video would be great for myself and others is what I was trying to get at we earlier in this thread...
Agreed I'm going to install mine with my FMIC when it comes in and I don't want to bolx it up. Any pics or video would help
Just made this video explaining what we are talking about a little bit. Hopefully clears up any confusion. Sorry for phone cam quality.

https://youtu.be/5XKNhSS9wWo

[MENTION=2253]CanadianGuy[/MENTION] basically same for you or?


OP
VelossaTech
Messages
413
Likes
227
Location
fort lauderdale
Thread Starter #112
[MENTION=3329]j2FiST[/MENTION] I love the video, thanks for taking the time to explain how you did it. Can I steal this video and use it on the web store for installation aid? I'll give you credit of course. Thanks again!!


J2FoRS

Senior Member
Messages
819
Likes
186
Location
Central
[MENTION=3329]j2FiST[/MENTION] I love the video, thanks for taking the time to explain how you did it. Can I steal this video and use it on the web store for installation aid? I'll give you credit of course. Thanks again!!
She's all yours bud!


CanadianGuy

4000 Post Club
Messages
4,097
Likes
942
Location
Southern Ontario
Just made this video explaining what we are talking about a little bit. Hopefully clears up any confusion. Sorry for phone cam quality.

https://youtu.be/5XKNhSS9wWo

[MENTION=2253]CanadianGuy[/MENTION] basically same for you or?
Exactly what I did but used a torch instead heat gun as that is all I had. You nailed it perfectly. Great job!

Eh with your credit how about a wing riser?


J2FoRS

Senior Member
Messages
819
Likes
186
Location
Central
Exactly what I did but used a torch instead heat gun as that is all I had. You nailed it perfectly. Great job!

Eh with your credit how about a wing riser?
I'm sure [MENTION=3407]VelossaTech[/MENTION] Dan is working on developing our wing risers as we speak seeing how he knows he will have a few customers to the North right away ;) eh eh


Messages
43
Likes
14
Location
Fort Myers
Just made this video explaining what we are talking about a little bit. Hopefully clears up any confusion. Sorry for phone cam quality.

https://youtu.be/5XKNhSS9wWo

[MENTION=2253]CanadianGuy[/MENTION] basically same for you or?

Your video will go along way and hopefully help out some people that where on the fence about purchasing one (myself included). Thanks again for the video j2Fist!


J2FoRS

Senior Member
Messages
819
Likes
186
Location
Central
Your video will go along way and hopefully help out some people that where on the fence about purchasing one (myself included). Thanks again for the video j2Fist!
No problem! Still loving mine. And makes that front end even sexier! You won't be disappointed.


Similar threads

Ford Community Posts


Top