
-
Sign Up! To view all forums and unlock additional cool features
Welcome to the #1 Fiesta ST Forum and Fiesta ST community dedicated to Fiesta ST owners and enthusiasts. Register for an account, it's free and it's easy, so don't hesitate to join the Fiesta ST Forum today!
BoostBumps RaceRed Build Thread
- Thread starter BoostBumps
- Start date
- Status
- Not open for further replies.
OP
Thread Starter
#223
Thread Starter
#223
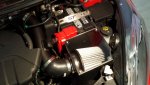
I'm curious to know more about this intake. Anymore news or details???
OP
Thread Starter
#225
Thread Starter
#225
No-Piston's Battery Tie-Down Installed
Forgot to add this to my build thread....
Thanks again to No-Piston's for another finely crafted product...
http://www.fiestastforum.com/forum/threads/1971-Custom-Stainless-Steel-Fiesta-ST-Battery-Tie-Down

Forgot to add this to my build thread....
Thanks again to No-Piston's for another finely crafted product...
http://www.fiestastforum.com/forum/threads/1971-Custom-Stainless-Steel-Fiesta-ST-Battery-Tie-Down
Great build. It was a nice read and gave me some ideas.
I was curious--any particular reason why you opted for recirculating the OCC back to the manifold rather than VTA? The breather cap is basically serving as VTA, so maybe it's not necessary to worry about venting the catch can to atmosphere, as well. Nevertheless, VTA OCC seems like the safest option from a carbon build up standpoint.
I was curious--any particular reason why you opted for recirculating the OCC back to the manifold rather than VTA? The breather cap is basically serving as VTA, so maybe it's not necessary to worry about venting the catch can to atmosphere, as well. Nevertheless, VTA OCC seems like the safest option from a carbon build up standpoint.
OP
Thread Starter
#227
Thread Starter
#227
Great build. It was a nice read and gave me some ideas.
I was curious--any particular reason why you opted for recirculating the OCC back to the manifold rather than VTA? The breather cap is basically serving as VTA, so maybe it's not necessary to worry about venting the catch can to atmosphere, as well. Nevertheless, VTA OCC seems like the safest option from a carbon build up standpoint.
I was curious--any particular reason why you opted for recirculating the OCC back to the manifold rather than VTA? The breather cap is basically serving as VTA, so maybe it's not necessary to worry about venting the catch can to atmosphere, as well. Nevertheless, VTA OCC seems like the safest option from a carbon build up standpoint.
Connecting the line from the IM to OCC provides much greater efficiency in "pulling" excess pressure from the VC under vacuum conditions...The breather CAP is just used as a redundancy which should help reduce pressure further...I installed the OCC moreso to provide for cleaner ignitions and not as much concerned with carbon buildup...
thank you...
Connecting the vacuum line from the IM to OCC provides much greater efficiency in "pulling" excess pressure from the VC...The breather CAP is just used as a redundancy which should help reduce pressure further...I installed the OCC moreso to provide for acleaner ignition and not as much concerned with carbon buildup...
Connecting the vacuum line from the IM to OCC provides much greater efficiency in "pulling" excess pressure from the VC...The breather CAP is just used as a redundancy which should help reduce pressure further...I installed the OCC moreso to provide for acleaner ignition and not as much concerned with carbon buildup...
OP
Thread Starter
#229
Thread Starter
#229
Interesting. I think that might actually be the ideal setup. Under throttle, the PCV is closed, but the breather cap is open, allowing the pressure from blow-by to escape. Off throttle, the PCV opens up and the breather cap closes, coupled with vacuum from IM you are actually sucking out from the CC into the catch can. Is that correct?
OP
Thread Starter
#232
Thread Starter
#232
Great build. Thanks for this thread and all the info and photos.
Very Nice Build. I like how you provided all the OEM - upgrade comparison photos in the original posts in this thread.
Always eager to share information, insights, and experiences as many other members have here on our forum...


Installed Rally Innovations new front splitter which now extends further than the previous version and also follows the front lines much better...
Easy Install...very pleased
View attachment 5944
View attachment 5945
View attachment 5946
View attachment 5947
View attachment 5948
Easy Install...very pleased
View attachment 5944
View attachment 5945
View attachment 5946
View attachment 5947
View attachment 5948
OP
Thread Starter
#235
Thread Starter
#235
Looks great man! Why'd you decide on this one? I thought I remember seeing you posting on a group buy for a carbon fiber splitter...
Its the same basic styling as the Bojix...This splitter is somewhat more durable which made of aluminum and powder coated and also its half the price....
Additionally Rally Innovations just modified the original design and this new one extends ~1" further and follows the "lines" much better than previous version..
thanks! I am very pleased...
Its the same basic styling as the Bojix...This splitter is somewhat more durable which made of aluminum and powder coated and also its half the price....
Additionally Rally Innovations just modified the original design and this new one extends ~1" further and follows the "lines" much better than previous version..
OP
Thread Starter
#237
Thread Starter
#237
Ah okay, cool! For the install, is it just self-tapping screws?
- Status
- Not open for further replies.