
Preface: Im sure i left some things out, please feel free to ask questions or suggest things. I can answer more elaborate stuff via PM, email, carrier pigeon etc.....
Its a ST201 intake cause I for sureeeeee did it one better
sarcasm and odd humor follows...
NO sh*t there I was, sitting around the house lurking on Fiestastforum.com, checking out all these rad intakes and whilst simultaneously being a penny pincher. Then I got to thinking; I can make one of these things.....with help.
TO AUTOZONE!!!!
We (friend and I) went in and found pretty much exactly what we needed. I found one of These, and This plus one of these things. Also scooped up some a Screen Repair kit (Home Depot) and two of thems. All in all, with out checking right now i spent like $46.
Then things got interesting.....
So, we pulled the stock intake box out and identified where we were going to A) route the hose and B) make a sweet hole C) curse
What we decided was to run the hose on the back left side of the intake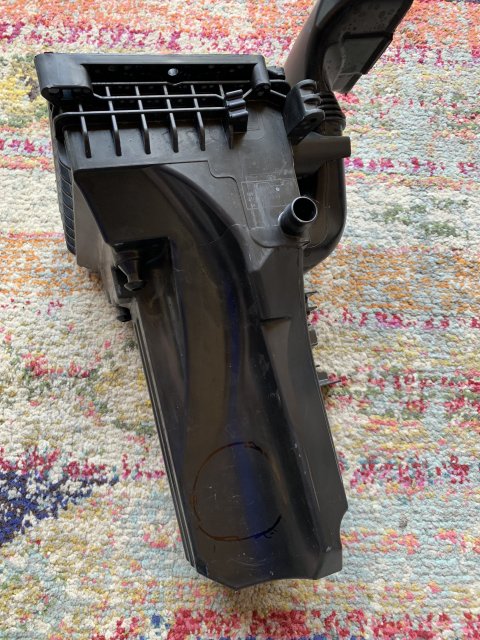
We followed this up with drilling a bunch of holes resembling a circle and smoothing it out. We used the 3" to 2.5" reducer here.
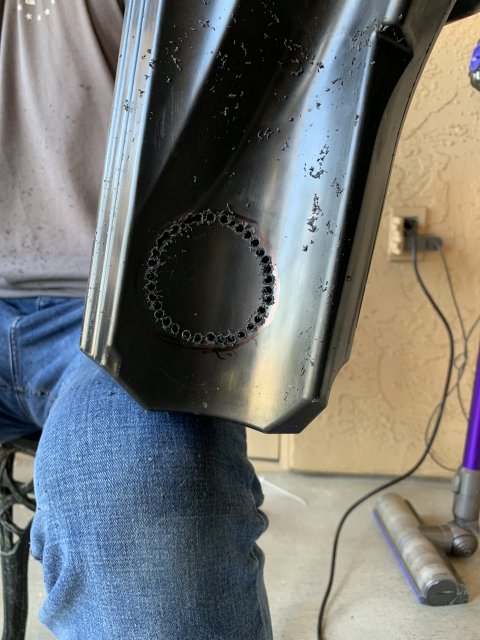
Sticking the 2.5" into the intake was relatively relieving, I was nervous that the shape of the intake box wouldn't work with what we were trying to accomplish. Nonetheless it fit well, and the reducer was flex-y(??) enough that it filled the imperfections in our professional work.
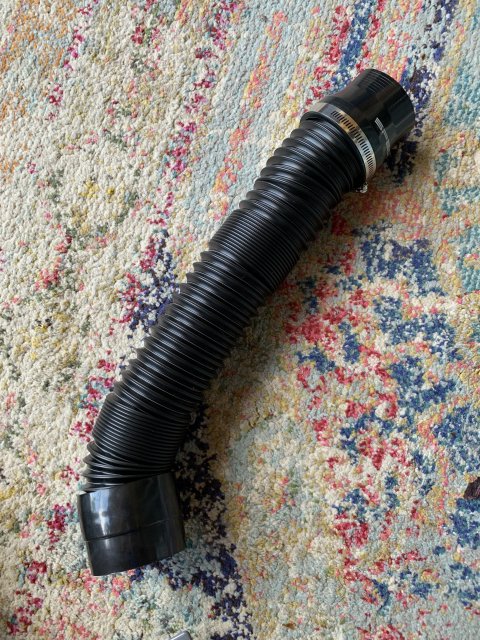
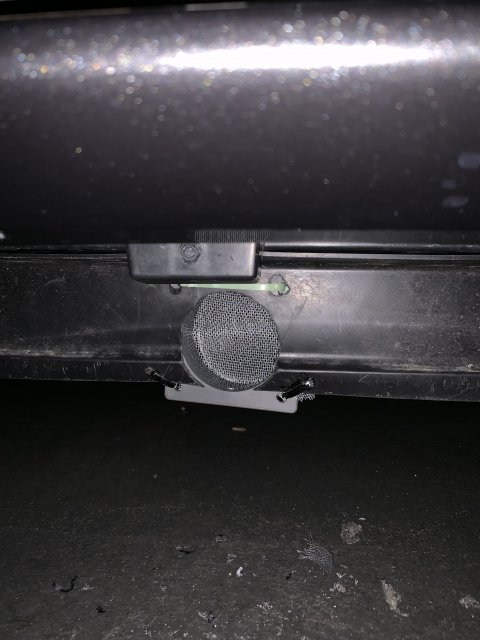
Added a screen betwixt the filter adapter and the intake hose to keep bugs, rocks, birds, cones etc from getting sucked up.

With the box mounted and the intake tubing routed down to the front of the car we were in business. The 3" tubing ran in front of the cold side pipe. It does not make contact with anything that gets hot which was also a relief.
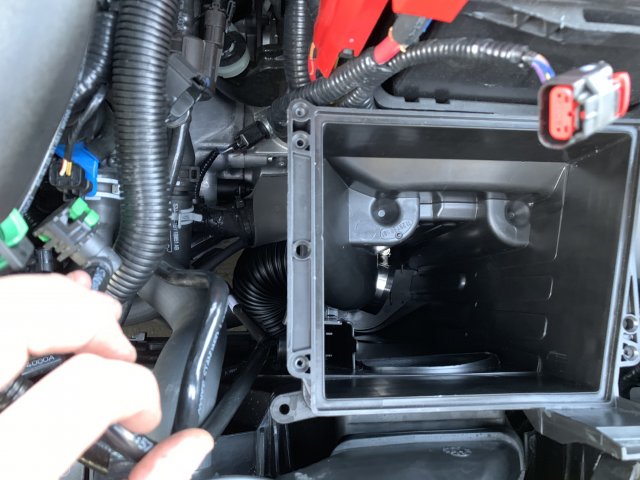
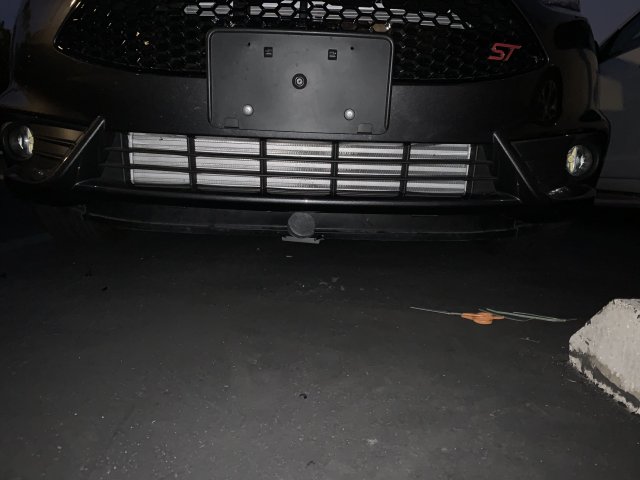
This is where it got dicey due to me really NOT wanting to carve up the front of the car. Measure twice, cut once. While we were talking about the placement of the intake hose i noticed that since we were already down here...why not mount it front mounted "ram air" style. I came all this way to make this thing so...full send.
We decided to trim out the a 3" circle from the front airdam, center line of the car. Funny thing, theres a popclip just off center on the air dam so we drilled a hole next to it and mounted it as such.
I know this looks like amateur hour from the photos but a few things: We did this with basic hand tools, no ramps, in my apartment parking space. The zipties are temporary, popclips are going to replace the top two. We are respraying the coupler black and going to trim it down to match the lip.
Driving impressions are awesome to be honest. More turbo sound for sure. I, like a genius, didn't get IAT before nor after.
Its a ST201 intake cause I for sureeeeee did it one better
sarcasm and odd humor follows...
NO sh*t there I was, sitting around the house lurking on Fiestastforum.com, checking out all these rad intakes and whilst simultaneously being a penny pincher. Then I got to thinking; I can make one of these things.....with help.
TO AUTOZONE!!!!
We (friend and I) went in and found pretty much exactly what we needed. I found one of These, and This plus one of these things. Also scooped up some a Screen Repair kit (Home Depot) and two of thems. All in all, with out checking right now i spent like $46.
Then things got interesting.....
So, we pulled the stock intake box out and identified where we were going to A) route the hose and B) make a sweet hole C) curse
What we decided was to run the hose on the back left side of the intake
We followed this up with drilling a bunch of holes resembling a circle and smoothing it out. We used the 3" to 2.5" reducer here.
Sticking the 2.5" into the intake was relatively relieving, I was nervous that the shape of the intake box wouldn't work with what we were trying to accomplish. Nonetheless it fit well, and the reducer was flex-y(??) enough that it filled the imperfections in our professional work.
Added a screen betwixt the filter adapter and the intake hose to keep bugs, rocks, birds, cones etc from getting sucked up.
With the box mounted and the intake tubing routed down to the front of the car we were in business. The 3" tubing ran in front of the cold side pipe. It does not make contact with anything that gets hot which was also a relief.
This is where it got dicey due to me really NOT wanting to carve up the front of the car. Measure twice, cut once. While we were talking about the placement of the intake hose i noticed that since we were already down here...why not mount it front mounted "ram air" style. I came all this way to make this thing so...full send.
We decided to trim out the a 3" circle from the front airdam, center line of the car. Funny thing, theres a popclip just off center on the air dam so we drilled a hole next to it and mounted it as such.
I know this looks like amateur hour from the photos but a few things: We did this with basic hand tools, no ramps, in my apartment parking space. The zipties are temporary, popclips are going to replace the top two. We are respraying the coupler black and going to trim it down to match the lip.
Driving impressions are awesome to be honest. More turbo sound for sure. I, like a genius, didn't get IAT before nor after.