I received the Standard EZLip in the mail this week and wanted to give a quick review for the product and installation process. First impression of the material quality was good, no discoloration, wrinkles or tears in the product upon arrival. The instructions for installation were very simple, requiring only scissors, alcohol wipe and optional heat gun. After giving my 2015 FiST a good clean, I unwrapped the EZLip and test-fit where I wanted to apply it, marking where to cut the excess. I then cut it to proper size with scissors, and used an isopropyl alcohol wipe to prepare the area where the adhesive would stick. I can't remember if the wipe came with the product or not, but any first aid kit should have some if you are in a pinch. The installation instructions recommends heating up the adhesive compound with a heat gun prior to installation if the ambient temperature is below 21 degrees C. As I had a nice warm day around 28, and was doing this right around noon on a clear day, I decided not to use a heat gun.
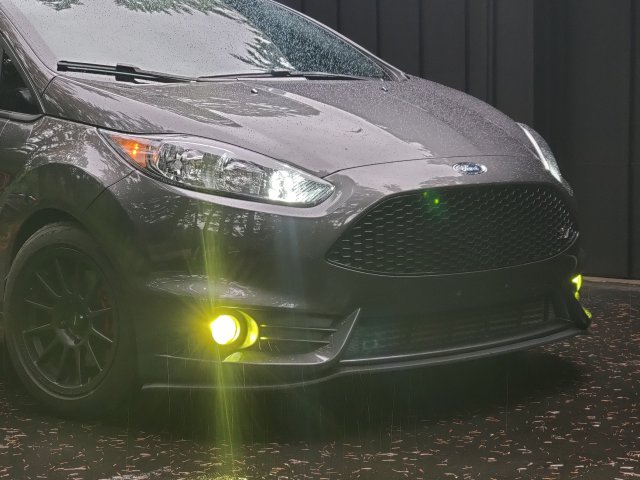
With everything prepared, I layed the EZLip infront of my car and peeled the first 12 inches of the protective plastic exposing the adhesive glue. Starting on one side and working my way across the front of the car in 12 inch increments I lightly pressed the lip into place to ensure the correct position and no gaps or bubbles. At this point it is still somewhat possible to adjust the position before firmly pressing and securing the EZLip for those who are paranoid about alignment like me. That being said, I was surprised at how naturally the product wanted to follow the curves of the car and resulted in a great look in the end. All in from start to finish, it took me about an hour to wash my car (as normal) but maybe 10 minutes total installation time for the EZLip. Living in Canada, the real test will be how it looks this time next year after experiencing a winter full of ice and salt. I will update this post if there are any signs of deterioration and at what KM/duration, as this is my commuter car and sees a lot of road.
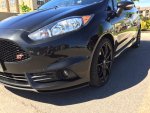
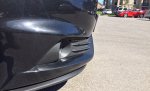
Final result photos attached.
With everything prepared, I layed the EZLip infront of my car and peeled the first 12 inches of the protective plastic exposing the adhesive glue. Starting on one side and working my way across the front of the car in 12 inch increments I lightly pressed the lip into place to ensure the correct position and no gaps or bubbles. At this point it is still somewhat possible to adjust the position before firmly pressing and securing the EZLip for those who are paranoid about alignment like me. That being said, I was surprised at how naturally the product wanted to follow the curves of the car and resulted in a great look in the end. All in from start to finish, it took me about an hour to wash my car (as normal) but maybe 10 minutes total installation time for the EZLip. Living in Canada, the real test will be how it looks this time next year after experiencing a winter full of ice and salt. I will update this post if there are any signs of deterioration and at what KM/duration, as this is my commuter car and sees a lot of road.
Final result photos attached.
Attachments
-
 874.3 KB Views: 183
 -
 795 KB Views: 141