Installed the Tow Hook kit this week
Hey everyone. I did the Tow Hook kit install this week and here are my impressions. Overall, very good. I would recommend this to anyone who is looking for a tow hook solution for your FiST. The material quality is very good and the fit is great. I would have liked to have had a set of instructions or guidelines to assist as much of what I did was based on the few photos available online and reading a few descriptions of installs. It's not overly complex, but drilling into structural members and visible trim is still a bit unnerving.
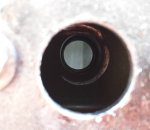
Here's the order I put mine in with, roughly. I pulled the bumper cover and positioned the bracket in the approximate location I wanted it. I realized that it best fits in the exact spot that you see it placed in the photos from PM, further over to the left. The bracket fit snugly and was happy in this spot. I marked the holes and the placement of the bracket on the beam. I then removed the bracket and marked the center of the 1" hole and the smaller 1/4" side holes with a center punch. Using a DeWalt battery powered drill I then drilled a pilot hole with a ~1/8" bit for the large hole. I applied some of the CRC foamy cutting fluid and began drilling with the 1" hole saw. The process was really easy, except that the center bit in my hole saw was bent a small bit! So, it was a bit wobbly at the beginning. Not a big deal as precision is not important here. The first hole was easy. For the second hole I sprayed some cutting fluid inside the beam, lined up the bit and cut away. Also, not too bad. I took my time, applied more cutting fluid and continued, brushing away any metal shavings as I went. The back of the beam seems a bit thicker, but all in all the hole saw and cutting fluid worked great! For the 1/4 holes, I drilled small pilot holes and used a 1/4 bit w/ cutting fluid. No problem. I cleaned up the holes with a round metal file, used a magnet to remove all the shavings around and inside the beam and cleaned it with some brake cleaner. I painted the bare metal with some Rustoleum (in
BLAAAAAAAAACK, 'natch.)
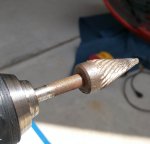
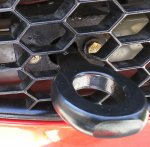
A test fit of the bracket and everything lined up well. I put the bracket on and installed the bolts, washers and nuts. Be careful here; I managed to give the bolt one too many ugga-dugga's and sent it into low earth orbit never to be seen from again. A friend provided a replacement and I was back in business. Touched up the bolt heads/washers with some Rustoleum and measured the height of the 1" hole from the floor of my garage. I measured to the center, as well as the top & bottom. Reinstalled the front bumper. Using my measurements I approximated the center point of the hole and drilled a small hole. I then verified alignment using a straight pick and continued drilling, with a slightly larger bit. I stepped up slowly, all they way to my largest bit at 1/2". At that point I could see approximately where I was in relation to the 1" hole in the bumper beam. I used a Dremel with a high speed cutting bit; it's the one that sort of looks like a spiral gear with pointed teeth. This worked like a charm. I slowly ate away at the plastic, test fitting the tow hook as I went. This part isn't pretty and requires a lot of patience and good light. Don't be surprised if you are off a tiny bit and need to eat away more of the grille than you wanted. In the end, it will be fine. Just go slow! Also remember, that should you ever need to use the tow hook, you should account for deflection of the hook and allow for space around it for the hook to move and not crack/break your grille! A little extra room is a good idea. Once done with the grinder I used a buffing wheel in the Dremel to clean up some of the plastic. I plan on coming back later with a polishing compound to really clean up the plastic more.
All in all, not as bad as I thought. If you're hesitant to do this install think it through and have everything on hand to make it easy on yourself. For me, the key was using the CRC foamy cutting fluid, a new hole saw and taking my time eating away the metal and plastic on the grille. In the end, the installed hook looks nice and is functional. I've stuck it in my glove box for now. I hope I never need it! Here are links to some of the tools I used:
![[cheers]](/images/smilies/icon_smile_cheers.gif "Cheers [cheers]") https://www.harborfreight.com/automatic-center-punch-with-brass-handle-62141.html
https://www.boschtools.com/us/en/boschtools-ocs/quick-change-kits-pcm38an-33230-p/
https://www.boschtools.com/us/en/boschtools-ocs/bi-metal-hole-saws-hb100-33458-p/
http://www.crcindustries.com/products/truetap-174-foamy-foaming-cutting-fluid-13-wt-oz-03410.html
https://www.dremel.com/en_US/products/-/show-product/tools/115-high-speed-cutter
https://www.harborfreight.com/automatic-center-punch-with-brass-handle-62141.html
https://www.boschtools.com/us/en/boschtools-ocs/quick-change-kits-pcm38an-33230-p/
https://www.boschtools.com/us/en/boschtools-ocs/bi-metal-hole-saws-hb100-33458-p/
http://www.crcindustries.com/products/truetap-174-foamy-foaming-cutting-fluid-13-wt-oz-03410.html
https://www.dremel.com/en_US/products/-/show-product/tools/115-high-speed-cutter

 . I would like to relocate my license plate over to this mount for when I am not on the track. Anyone know of a tow hook license plate mount that will fit this?
 Weird noise coming from the front right low, only when the car is cold
 Reyland Track 315mm Front BBK - Buy New Discs to Sell or Sell As Is?
 PierceMotorsports 6-point lower, upper strut tower, and rear braces installed