
Hello Everyone,
I spent most of last night installing my Zietronix ECA-2 (ethanol content analyzer) kit. I am posting this to give everyone a snap shot of how the install went. I will be including the write-up created by razorlab a little while back since it was deleted from this forum. I take no credit for this write-up as this was/ is the Ethanol Percentage Hardware Project created by razorlab and he is the one that the credit should go to. I'm just posting this to show how the install went for me and to add a few suggestions to it.
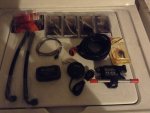
First off, I used the entire Zietronix ECA-2 kit vice the GM Continental VDO Flex Fuel sensor. Everything else was from Razorlab's writeup. See picture of everything that I used.
***Razorlab's Write up Start***
Parts list:
1. Continental VDO Flex fuel sensor. GM Part # 13577429, approx $55
I went with the smallest sensor they make for space reasons.
2. Russell 644123 -6AN Male to 3/8" SAE Fitting (2) $17/each @ Amazon
These are the quick connect fittings to the sensor. You can go cheaper with the plastic connect versions but there have been reports of the plastic breaking down with E85 so these are much safer and more robust.
3. Russell 644113 -6AN Male to 5/16" SAE Fitting (2) $21 @ Amazon
This connects to the OEM fuel pipe to the HPFP pump on top of the motor and the other to the OEM Fuel line at the firewall.
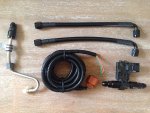
4. Radium PTFE -6AN Hose Assemblies - 11.4" Straight and 90* ends (2) $22.95/each @ Radium
PTFE for great ethanol resistance and -6AN connections for secure and non-leak fit. Pre assembled.
5. Zeitronix ECA Ethanol Content gauge $199
6. Zeitronix ECA 8ft wiring harness $29
You can find this harness cheaper to build yourself but this is well done and saves time
If you want to make the Sensor wire harness yourself, here are the part #'s for the connector:
Delphi GT 150 series connector, part # 13519047 (1) $1.62
Delphi GT 150 series Terminals part# 15326264 (3) $0.10 each
Delphi Loose Cable Seal part# 15366021 (3) $0.06 each
Or buy the GM connector harness already assembled and cut one end off GM Part# 13352241 $9.71
EFI Connection also sells a pre assembled connector pigtail for $15.00
http://www.eficonnection.com/eficonnection/ItemDetails.aspx?ItemId=1222
7. Add-A-Fuse $9 @ Amazon or local auto store
The two pre built Radium PTFE hoses and the Zeitronix ECA wiring harness makes this a basically plug and play affair. I highly recommend going this route to save time but of course you can build it all yourself if you want.
Wiring instructions
Orange wire : +12V (use Add-A-Fuse connection makes this a plug and play affair to the fuse box)
Brown: Ground (use one of the many grounds located behind the glove box or foot well areas
Green: Sensor output to Zeitronix ECA gauge
Fueling connections
The OEM hard line is located at the top right of the engine if you are looking at the windshield of the car.
BE SURE TO RELEASE FUEL PRESSURE BY PULLING THE FI FUSE IN THE FUSE BOX AND CRANKING THE CAR BEFORE DOING ANY OF THIS.
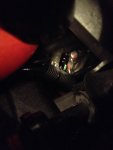
Undo the L-shaped connection with the two black prongs below:
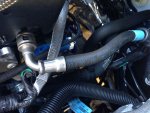
Follow this line down towards the firewall and undo the other side the same way you did the engine side of the hose.
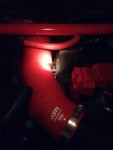
Install the Russell 644113 -6AN Male to 5/16" SAE Fitting on the OEM hard line at the top of the engine. Be sure to lube the o-ring in the connector first. Once you install this fitting onto the OEM hardline, install one of the Radium PTFE -6AN Hose Assemblies on this side, install the Continental VDO Flex fuel sensor on the end of this with the two Russell 644113 -6AN Male to 5/16" SAE Fitting fittings on it, then install the second Radium hose on the other end of this. Install the second Russell 644113 -6AN Male to 5/16" SAE Fitting on the OEM hard line at the firewall and then install the last open end of the second Radium hose. This completes the whole assembly.
As you are assembly all this you will see the proper way to orientate everything in the engine bay. It's really simple. I used black zip ties to make sure some of the hoses where secure and wouldn't flop around the engine bay.
Then connect the zeitronix wire harness to the sensor and find the way you want to bring it into the cabin depending on where you want the gauge placed. Wire everything up and there you go!
You can use cheaper hose if you want and regular fuel clamps instead of -AN connectors and such to save money. That is up to you. You will need the SAE fittings for both OEM hard lines though. Just get the hose end version of the fittings if you go that route.
There ya go, you read it all here first. Go forth and modify!
***Razorlab's Write up End***
Before we start, I apologize for the picture qualities as I didn't take pictures during the install. They were taken after the fact in poor lighting.
The install itself, though a PITA, wasn't too difficult. First off, you need to pull the fuel pump relay (engine compartment fuse box) and the crank the car and let it run until it shuts off (5-10 secs). To be able to get to the fuel line and to route the wiring from the sensor to the cabin, you need to: Remove the engine cover, Remove the intake assembly (box and inlet tube), remove the battery and remove the battery tray. This will make things much easier to get to. Make sure you also have rags on hand to catch the little bit of fuel when you disconnect the lines. Also, if you have an extra cheapo set of needle nose pliers in you toolbox, bending the tips like the picture below will make a great tool for removing the factory fuel line.

Once I had the above removed, I decided to tackle the job of routing the wiring from the sensor to the cabin first. I decided to use the sound synposer hose to route my wires through since I'm deleting it anyhow. All I did with this is cut the hose as close to the firewall as possible in the engine bay and cabin. Once I had the hose cut, I simply fed the wiring through the remaining hose and routed the wiring under/ behind the dash to the passenger foot well behind the glove box. Once I had that wiring routed, I pulled the center console and drilled a 1" hole in the top of the cubby to route the gauge wiring. I then routed the gauge wiring to behind the glove box as well. After that, I used the add-a-fuse to tap into the fuse box (see picture below) and used one of the dash frame bolts as a ground. Don't completely reassemble the console yet as you need to test it to make sure it works.
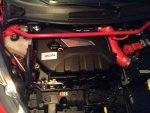
Back to the engine bay and fuel line....Using the modified needle nose pliers, I disconnected the factory fuel line that attaches the chassis hard line to the hard line that comes off of the injectors. I then assembled the hoses, fittings and sensor. The hoses that razorlab recommended work great, but are a little long when assembled. So, I took a break and emailed Radium to see if they can make me a custom 4" hose with both straight ends to replace the 11.4" hose between the chassis hard line and the sensor. I will update this thread when I hear back from them. After sending the email, I installed the new fuel line assembly making sure everything was tight. I then plugged the wiring harness into the sensor and made sure that the fuel line and wiring was secured and not interfering with anything else. Once that was done, I re-installed the fuel pump relay, battery tray, battery, intake assembly and engine cover. **use the next picture to reference the following pictures.

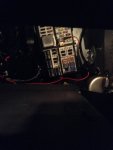
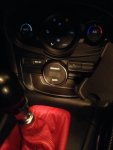
Once that was all complete, I primed the fuel pump by pressing the ignition button on an off a few times (not starting the car yet) while also stepping outside the car an looking at the fuel lines to check for leaks. I was also ensuring that the gauge was powering up. Now that I see that everything was working, I zip-tied the wiring up neatly behind the glove box and re-installed the console. I used 3m tape to attach the gauge to the console under the HVAC controls. Once that was complete, I started the car up, verified that the gauge powered on and showed an E% and went back to the engine bay and checked for leaks...all was/ is good.
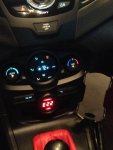
If you have any questions please let me know. If I confused you with anything here, I apologize but I'm tired and need to go get a few hours sleep, lol. Oh, BTW, I am currently running an e20 tune and a e20 mixture that I put in the tank before the guage, that's why you see e22 on the gauge.
I spent most of last night installing my Zietronix ECA-2 (ethanol content analyzer) kit. I am posting this to give everyone a snap shot of how the install went. I will be including the write-up created by razorlab a little while back since it was deleted from this forum. I take no credit for this write-up as this was/ is the Ethanol Percentage Hardware Project created by razorlab and he is the one that the credit should go to. I'm just posting this to show how the install went for me and to add a few suggestions to it.
First off, I used the entire Zietronix ECA-2 kit vice the GM Continental VDO Flex Fuel sensor. Everything else was from Razorlab's writeup. See picture of everything that I used.
***Razorlab's Write up Start***
Parts list:
1. Continental VDO Flex fuel sensor. GM Part # 13577429, approx $55
I went with the smallest sensor they make for space reasons.
2. Russell 644123 -6AN Male to 3/8" SAE Fitting (2) $17/each @ Amazon
These are the quick connect fittings to the sensor. You can go cheaper with the plastic connect versions but there have been reports of the plastic breaking down with E85 so these are much safer and more robust.
3. Russell 644113 -6AN Male to 5/16" SAE Fitting (2) $21 @ Amazon
This connects to the OEM fuel pipe to the HPFP pump on top of the motor and the other to the OEM Fuel line at the firewall.
4. Radium PTFE -6AN Hose Assemblies - 11.4" Straight and 90* ends (2) $22.95/each @ Radium
PTFE for great ethanol resistance and -6AN connections for secure and non-leak fit. Pre assembled.
5. Zeitronix ECA Ethanol Content gauge $199
6. Zeitronix ECA 8ft wiring harness $29
You can find this harness cheaper to build yourself but this is well done and saves time
If you want to make the Sensor wire harness yourself, here are the part #'s for the connector:
Delphi GT 150 series connector, part # 13519047 (1) $1.62
Delphi GT 150 series Terminals part# 15326264 (3) $0.10 each
Delphi Loose Cable Seal part# 15366021 (3) $0.06 each
Or buy the GM connector harness already assembled and cut one end off GM Part# 13352241 $9.71
EFI Connection also sells a pre assembled connector pigtail for $15.00
http://www.eficonnection.com/eficonnection/ItemDetails.aspx?ItemId=1222
7. Add-A-Fuse $9 @ Amazon or local auto store
The two pre built Radium PTFE hoses and the Zeitronix ECA wiring harness makes this a basically plug and play affair. I highly recommend going this route to save time but of course you can build it all yourself if you want.
Wiring instructions
Orange wire : +12V (use Add-A-Fuse connection makes this a plug and play affair to the fuse box)
Brown: Ground (use one of the many grounds located behind the glove box or foot well areas
Green: Sensor output to Zeitronix ECA gauge
Fueling connections
The OEM hard line is located at the top right of the engine if you are looking at the windshield of the car.
BE SURE TO RELEASE FUEL PRESSURE BY PULLING THE FI FUSE IN THE FUSE BOX AND CRANKING THE CAR BEFORE DOING ANY OF THIS.
Undo the L-shaped connection with the two black prongs below:
Follow this line down towards the firewall and undo the other side the same way you did the engine side of the hose.
Install the Russell 644113 -6AN Male to 5/16" SAE Fitting on the OEM hard line at the top of the engine. Be sure to lube the o-ring in the connector first. Once you install this fitting onto the OEM hardline, install one of the Radium PTFE -6AN Hose Assemblies on this side, install the Continental VDO Flex fuel sensor on the end of this with the two Russell 644113 -6AN Male to 5/16" SAE Fitting fittings on it, then install the second Radium hose on the other end of this. Install the second Russell 644113 -6AN Male to 5/16" SAE Fitting on the OEM hard line at the firewall and then install the last open end of the second Radium hose. This completes the whole assembly.
As you are assembly all this you will see the proper way to orientate everything in the engine bay. It's really simple. I used black zip ties to make sure some of the hoses where secure and wouldn't flop around the engine bay.
Then connect the zeitronix wire harness to the sensor and find the way you want to bring it into the cabin depending on where you want the gauge placed. Wire everything up and there you go!
You can use cheaper hose if you want and regular fuel clamps instead of -AN connectors and such to save money. That is up to you. You will need the SAE fittings for both OEM hard lines though. Just get the hose end version of the fittings if you go that route.
There ya go, you read it all here first. Go forth and modify!
***Razorlab's Write up End***
Before we start, I apologize for the picture qualities as I didn't take pictures during the install. They were taken after the fact in poor lighting.
The install itself, though a PITA, wasn't too difficult. First off, you need to pull the fuel pump relay (engine compartment fuse box) and the crank the car and let it run until it shuts off (5-10 secs). To be able to get to the fuel line and to route the wiring from the sensor to the cabin, you need to: Remove the engine cover, Remove the intake assembly (box and inlet tube), remove the battery and remove the battery tray. This will make things much easier to get to. Make sure you also have rags on hand to catch the little bit of fuel when you disconnect the lines. Also, if you have an extra cheapo set of needle nose pliers in you toolbox, bending the tips like the picture below will make a great tool for removing the factory fuel line.
Once I had the above removed, I decided to tackle the job of routing the wiring from the sensor to the cabin first. I decided to use the sound synposer hose to route my wires through since I'm deleting it anyhow. All I did with this is cut the hose as close to the firewall as possible in the engine bay and cabin. Once I had the hose cut, I simply fed the wiring through the remaining hose and routed the wiring under/ behind the dash to the passenger foot well behind the glove box. Once I had that wiring routed, I pulled the center console and drilled a 1" hole in the top of the cubby to route the gauge wiring. I then routed the gauge wiring to behind the glove box as well. After that, I used the add-a-fuse to tap into the fuse box (see picture below) and used one of the dash frame bolts as a ground. Don't completely reassemble the console yet as you need to test it to make sure it works.
Back to the engine bay and fuel line....Using the modified needle nose pliers, I disconnected the factory fuel line that attaches the chassis hard line to the hard line that comes off of the injectors. I then assembled the hoses, fittings and sensor. The hoses that razorlab recommended work great, but are a little long when assembled. So, I took a break and emailed Radium to see if they can make me a custom 4" hose with both straight ends to replace the 11.4" hose between the chassis hard line and the sensor. I will update this thread when I hear back from them. After sending the email, I installed the new fuel line assembly making sure everything was tight. I then plugged the wiring harness into the sensor and made sure that the fuel line and wiring was secured and not interfering with anything else. Once that was done, I re-installed the fuel pump relay, battery tray, battery, intake assembly and engine cover. **use the next picture to reference the following pictures.
Once that was all complete, I primed the fuel pump by pressing the ignition button on an off a few times (not starting the car yet) while also stepping outside the car an looking at the fuel lines to check for leaks. I was also ensuring that the gauge was powering up. Now that I see that everything was working, I zip-tied the wiring up neatly behind the glove box and re-installed the console. I used 3m tape to attach the gauge to the console under the HVAC controls. Once that was complete, I started the car up, verified that the gauge powered on and showed an E% and went back to the engine bay and checked for leaks...all was/ is good.
If you have any questions please let me know. If I confused you with anything here, I apologize but I'm tired and need to go get a few hours sleep, lol. Oh, BTW, I am currently running an e20 tune and a e20 mixture that I put in the tank before the guage, that's why you see e22 on the gauge.
") It was a blank fuse socket that has power and is switched. You can piggy back one with the add a fuse if necessary. Oddly enough, the moonroof had a fuse in it, but I don't have a moonroof, lol. I wonder if if is also used elsewhere.
It was a blank fuse socket that has power and is switched. You can piggy back one with the add a fuse if necessary. Oddly enough, the moonroof had a fuse in it, but I don't have a moonroof, lol. I wonder if if is also used elsewhere.