2017 Ambient Lighting No Longer Above Glove Box?!

Member ID
#8224
Messages
202
Likes
93
Tackling this project now. Using hispirish methods.


Do I now cut off red plastic ends and splice them together? Any other tips greatly appreciated.


Sent from my iPhone using Tapatalk
The ends with the red plastic connectors house the pins and sockets that you need. The trick is to remove those from the red connectors cleanly. What I did was lightly grind away the red plastic to just barely expose the metal connectors, then they pull right out. Once you have done that, you can go about inserting those into your Ford connectors. The bare ends that currently have inserted into those Ford connectors head to be soldered together.

Sent from my Pixel 2 using Tapatalk


Member ID
#8224
Messages
202
Likes
93
Tackling this project now. Using hispirish methods.


Do I now cut off red plastic ends and splice them together? Any other tips greatly appreciated.


Sent from my iPhone using Tapatalk
For reference.


Sent from my Pixel 2 using Tapatalk


Member ID
#8224
Messages
202
Likes
93
Tackling this project now. Using hispirish methods.


Do I now cut off red plastic ends and splice them together? Any other tips greatly appreciated.


Sent from my iPhone using Tapatalk
Here you go. This might help.

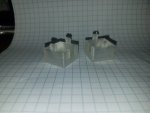
First, on the male connectors no grinding needed. Just use a pick to depress the locking tab and pull.


Then on the male connectors, grind those a bit on the side opposite of the little nub.


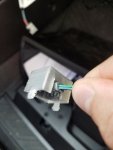
Insert those male pins (the ones that you removed by grinding) into the large Ford connectors. Slide the red locking tab on the Ford connector to the rear to expose more of the pin, then use needle nose pliers to pull it in and seat it. Once all 4 pins are inserted, slide the red locking tab forward.


The female sockets are much simpler. Just insert those into the smaller Ford connectors.

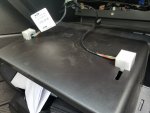
When you go to plug these into the car, you will need to make sure that the female sockets are given some forward pressure because they have some slop as you will see when you assemble them.

Sent from my Pixel 2 using Tapatalk


Member ID
#7880
Messages
50
Likes
16
Next step splicing the wires together.


Sent from my iPhone using Tapatalk


Member ID
#7880
Messages
50
Likes
16
How to accomplish which wires go with which? I apologize for my lack of electrical knowledge.


Sent from my iPhone using Tapatalk


Member ID
#7880
Messages
50
Likes
16
Everything looks good with the splice. Thanks for the step by step. Once this weather warms up, placing the leds will be a breeze.


Sent from my iPhone using Tapatalk


Member ID
#8224
Messages
202
Likes
93
Everything looks good with the splice. Thanks for the step by step. Once this weather warms up, placing the leds will be a breeze.


Sent from my iPhone using Tapatalk
Good deal!

Sent from my Pixel 2 using Tapatalk


Member ID
#7718
Messages
350
Likes
116
I made a Y harness and got everything hooked up. I lost some colors, no more green or amber? Also having some mismatch, but I can get blue red and pink to sync up. Indicative of a bad harness?


Member ID
#7811
Messages
30
Likes
9
If you bypass your Y harness, do you get the correct colors?


Member ID
#7718
Messages
350
Likes
116
Found out my issue. Didnt pull the pins through the male connectors enough. Lights are all good, and Ive got a special update to make later after snagging more pics.


Member ID
#7718
Messages
350
Likes
116
I designed and 3D printed a couple of mounts for the glovebox lights. They slip right over the LED housings on the OE harness and snap fit into the two slots on the backside of the glove box.

Attached are some photos.

I'll post the files up on thingiverse for anyone else to make, and might consider printing out a few sets and sell them to forum members if the rules allow for it, just to recover shipping and material costs.

Anyways, here's how it ended up!
FiST Light Mount.jpg

FiST Light Mount1.jpg

FiST Light Mount2.jpg

FiST Light Mount3.jpg


Member ID
#7670
Messages
478
Likes
235
I designed and 3D printed a couple of mounts for the glovebox lights. They slip right over the LED housings on the OE harness and snap fit into the two slots on the backside of the glove box.

Attached are some photos.

I'll post the files up on thingiverse for anyone else to make, and might consider printing out a few sets and sell them to forum members if the rules allow for it, just to recover shipping and material costs.

Anyways, here's how it ended up!
View attachment 17178

View attachment 17177

View attachment 17176

View attachment 17179
This is a great idea. PM sent, and thanks for coming up with these.


Member ID
#8224
Messages
202
Likes
93
I designed and 3D printed a couple of mounts for the glovebox lights. They slip right over the LED housings on the OE harness and snap fit into the two slots on the backside of the glove box.

Attached are some photos.

I'll post the files up on thingiverse for anyone else to make, and might consider printing out a few sets and sell them to forum members if the rules allow for it, just to recover shipping and material costs.

Anyways, here's how it ended up!
View attachment 17178

View attachment 17177

View attachment 17176

View attachment 17179
Looks great!

Sent from my Pixel 2 using Tapatalk


Member ID
#7753
Messages
33
Likes
8
Well done Apex1! Perfect use of 3D printing. I've made a few things over the years for my Bugeye Sprite.


Member ID
#7880
Messages
50
Likes
16
Amazing how this project keeps moving along with all these great ideas! Good work


Sent from my iPhone using Tapatalk


Similar threads


Top