Purge Valve with Filter?

XanRules

Active member
Member ID
#8027
Messages
699
Likes
364
#21
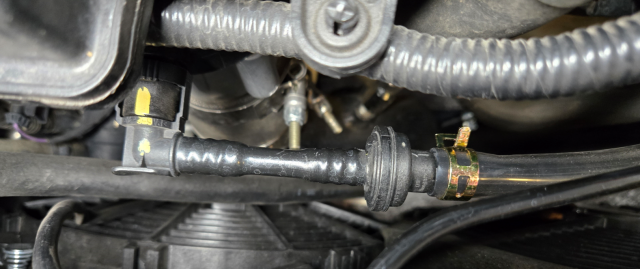
I replaced the purge valve about two years ago and haven't had any issues since. I fueled up today and didn't have any issues either. If your purge valve is already shot, you'll need to also replace it. Too soon to tell if addition of the filter is the solution but at least it's not causing any issues.
Got it - and you replaced JUST the purge valve, rather than the entire evap hose setup, is this correct? Thanks!


Member ID
#19884
Messages
277
Likes
492
#23
Got it - and you replaced JUST the purge valve, rather than the entire evap hose setup, is this correct? Thanks!
I actually replaced the entire harness. Only section I kept as is is the check valve and tubing that goes to the manifold after the throttle body.


Member ID
#8918
Messages
13
Likes
7
#24
I've cut open one ford purge valve, and found that the rubbery seal which is moulded to the piston was literally crumbling. I could squeeze it with my fingers and it would crumble into bits. If I still have my other bad purge valve kicking around, I might try to cut it open too. I know, sample size of 1, for a problem that thousands have.

Doesn't make sense to me, it should be some material which doesn't dissolve in gas, if it's used in evap. Maybe it's something else like heat that causes it to go brittle too quickly. These are only warrantied for 36k mi by the fed emissions warranty thingy, so not like it has to last very long.


TyphoonFiST

9000 Post Club
Premium Account
Member ID
#3304
Messages
11,967
Likes
8,396
#25
I actually replaced the entire harness. Only section I kept as is is the check valve and tubing that goes to the manifold after the throttle body.
Should do a DIY with all parts used Etc* [driving]


Member ID
#19884
Messages
277
Likes
492
#26
Should do a DIY with all parts used Etc* [driving]
I posted some pictures in my build thread but not sure there's enough content to do a DIY. It's basically:

3/8"silicon hose
metal tubing by the firewall -> purge valve -> check valve -> intake manifold

firewall to purge valve (this is where I spliced in the fuel filter later)
1739545005682.png

purge valve to check valve to intake manifold
1739545061724.png


I got rid of the other tubing associated with the venturi effect while under boost. My reasoning is that fuel utilization should go up while under boost and thus the fuel tank should not be under pressure at that time. Haven't had any issues since I did the mod a couple of months ago but it will be easy enough to add the other tubing back if needed.

Capped the cold-side pipe and induction hose.
1739545105367.png
1739545362486.png


XanRules

Active member
Member ID
#8027
Messages
699
Likes
364
#27
I posted some pictures in my build thread but not sure there's enough content to do a DIY. It's basically:

3/8"silicon hose
metal tubing by the firewall -> purge valve -> check valve -> intake manifold

firewall to purge valve (this is where I spliced in the fuel filter later)
View attachment 65411

purge valve to check valve to intake manifold
View attachment 65412


I got rid of the other tubing associated with the venturi effect while under boost. My reasoning is that fuel utilization should go up while under boost and thus the fuel tank should not be under pressure at that time. Haven't had any issues since I did the mod a couple of months ago but it will be easy enough to add the other tubing back if needed.

Capped the cold-side pipe and induction hose.
View attachment 65413
View attachment 65414
Thank you! Seems simple enough without spending several hundred dollars.


TyphoonFiST

9000 Post Club
Premium Account
Member ID
#3304
Messages
11,967
Likes
8,396
#28
I posted some pictures in my build thread but not sure there's enough content to do a DIY. It's basically:

3/8"silicon hose
metal tubing by the firewall -> purge valve -> check valve -> intake manifold

firewall to purge valve (this is where I spliced in the fuel filter later)
View attachment 65411

purge valve to check valve to intake manifold
View attachment 65412


I got rid of the other tubing associated with the venturi effect while under boost. My reasoning is that fuel utilization should go up while under boost and thus the fuel tank should not be under pressure at that time. Haven't had any issues since I did the mod a couple of months ago but it will be easy enough to add the other tubing back if needed.

Capped the cold-side pipe and induction hose.
View attachment 65413
View attachment 65414
I like this Idea A Lot* I think i may convert in the warmer months. Thanks for he Info and parts list!


Member ID
#34638
Messages
4
Likes
1
#29
I posted some pictures in my build thread but not sure there's enough content to do a DIY. It's basically:

3/8"silicon hose
metal tubing by the firewall -> purge valve -> check valve -> intake manifold

firewall to purge valve (this is where I spliced in the fuel filter later)
View attachment 65411

purge valve to check valve to manifold intake
View attachment 65412


I got rid of the other tubing associated with the venturi effect while under boost. My reasoning is that fuel utilization should go up while under boost and thus the fuel tank should not be under pressure at that time. Haven't had any issues since I did the mod a couple of months ago but it will be easy enough to add the other tubing back if needed.

Capped the cold-side pipe and induction hose.
View attachment 65413
View attachment 65414
Nice work on the modification! Removing the venturi-related tubing to improve fuel utilization under boost makes sense, and having the option to revert if needed is a smart approach. Glad to hear it's been running smoothly so far!


Member ID
#35472
Messages
68
Likes
43
#30
Well, I'm dealing with the purge valve issue and doing the research about the best way to go about solving the problem. I really like Bull Run's approach.
Can anyone else corroborate that the intake hose and the cold side intercooler pipe can be capped off and that part of the harness eliminated without causing a CEL or other issues? We don't have visual inspections here in GA and if that works it would be a wonderful and inexpensive solution.


Member ID
#35472
Messages
68
Likes
43
#32
Just use this and end it all already. Very easy install..Customer service is Top notch.

2014-2015 Ford Fiesta Evap Harness Conversion – SVT Design & Fab https://share.google/jFUFrSFm0Pyl2VSv2
I am aware of that item.

By the way, what exactly are the differences between the 2014-15 harness and the later one?


Last edited:

TyphoonFiST

9000 Post Club
Premium Account
Member ID
#3304
Messages
11,967
Likes
8,396
#33
Alot of people go to the 14-15 harness due to less Gobbledygook to deal with. There is a bunch of Threads here that talk about it. I did it on mine and changing out the Purge valve is easy as pie now.


Member ID
#35472
Messages
68
Likes
43
#34
Alot of people go to the 14-15 harness due to less Gobbledygook to deal with. There is a bunch of Threads here that talk about it. I did it on mine and changing out the Purge valve is easy as pie now.
I have been going through as many threads as I can find on the subject.
Yep, since purge valve failure is a common occurrence the goal is to make changing it as painless as possible.


Similar threads


Top