• Sign Up! To view all forums and unlock additional cool features

    Welcome to the #1 Fiesta ST Forum and Fiesta ST community dedicated to Fiesta ST owners and enthusiasts. Register for an account, it's free and it's easy, so don't hesitate to join the Fiesta ST Forum today!


Bull's street "go-kart" build

OP
Bull Run

Bull Run

Member
U.S. Army Veteran
Messages
244
Likes
398
Location
Chandler, AZ, USA
Thread Starter #101
Some even put the DNA Racing spherical bearing bushings into the beam axle, but that is really overkill for the street.
Funny you mention that, since I asked Ron about this one first but he also said not needed unless it's a track car. Glad that I went with Powerflex street version instead since it does what I want it to do without crazy NVH.


OP
Bull Run

Bull Run

Member
U.S. Army Veteran
Messages
244
Likes
398
Location
Chandler, AZ, USA
Thread Starter #104
Seibon TM-style hood ordered back in December finally arrived. It met my primary objectives of saving weight and adding hood vents. I'm not the type to do aesthetics-only type of modes, but this is the first black car I owned and I'll have to admit that carbon fiber looks really good on black. Even my wife, who's not into cars, mentioned that it looks good.

I don't have a scale suitable to weigh hoods, but the hood is noticeably lighter than stock and I was able to install it by myself without issues. Looking at the forum comments, this hood should be around half the weight of the stock for ~13 lbs of weight savings.

I ended up using leftover shim washers (two per stud) from Wilwood BBK to raise the rear of the hood to get it even. I ended up doing something similar on the Mustang for a different brand hood, so perhaps this is common with CF hoods?

1677351188621.png

After shimming. The hood almost touched the window trim without shims.
1677351210069.jpeg
1677351254483.jpeg
1677351269751.jpeg
1677351288777.jpeg


OP
Bull Run

Bull Run

Member
U.S. Army Veteran
Messages
244
Likes
398
Location
Chandler, AZ, USA
Thread Starter #107
Adam (Tune+) mentioned during the tuning process that stock airbox and catted downpipe were hurting the spool. I switched to ITG intake back then but kept the Cobb catted DP. Since I'm running out of things to do, I ordered and installed Whoosh V1 catless downpipe to see what kind of difference going catless made for the Fiesta.

Forgot to take pictures but here are my observations:
  • Swapping an aftermarket DP with another one is much easier that swapping from stock. All I had to do from the top was to disconnect two O2 senor connectors. All three DP to turbo nuts were accessible from the bottom.
  • I was able to snake out the existing DP with O2 sensors on, swap them on the bench, and snaked in the new DP.
  • Added the O2 extender option and used the middle-sized restrictor. No CEL so far.
  • Used the 3" to 2.5" adapter ring that came with the DP since I'm currently running the stock cat-back. I reused the OEM gasket didn't have any issues with leaks.
  • Stock cat-back seems to be about 2" in diameter as the gasket looks about .5" smaller in diameter than the adapter ring.
  • Boost seems to come on a little quicker (similar to catless DPs I tried on other cars) but still not like the "donkey kick" with the stock turbo. I have a 2.5" diameter cat-back on order so will see if that'll help.
  • I definitely noticed the smell when I tried catless DPs on other cars in the past, but not so much with the Fiesta. I wonder if it's because smaller engine = smaller exhaust volume/smell or if this engine just burns much cleaner compared to older cars.


Last edited:
OP
Bull Run

Bull Run

Member
U.S. Army Veteran
Messages
244
Likes
398
Location
Chandler, AZ, USA
Thread Starter #110
Do you like to look at your AP gauges while driving but forgot to disconnect it after a drive, and your battery drained after a few days? Are you worried that repeatedly connecting and disconnecting your AP after driving may break the port? Or are you lazy like me and want to automate “true power off” for AP or other ODB2 port-based accessories? I have a solution for you!

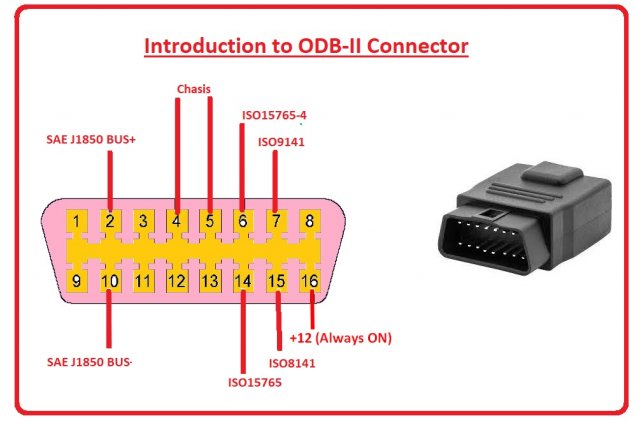
The issue with the ODB2 port is that it only has one pin (#16) for power and it’s always on. When you turn the car off, AP says it’s turning off but recommends that you disconnect it to avoid draining the battery. It’s because AP goes into a deep sleep mode (and consumes a small amount of power) rather than truly powering off, so it can wake itself up when the car turns back on. I’ve also seen cases there the AP doesn’t even go into the sleep mode and stays on.

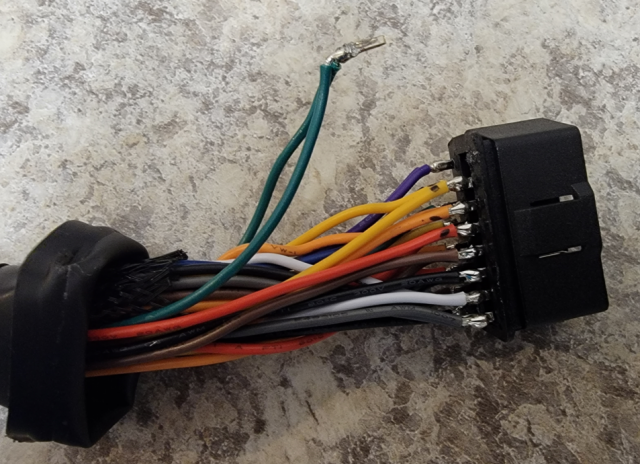
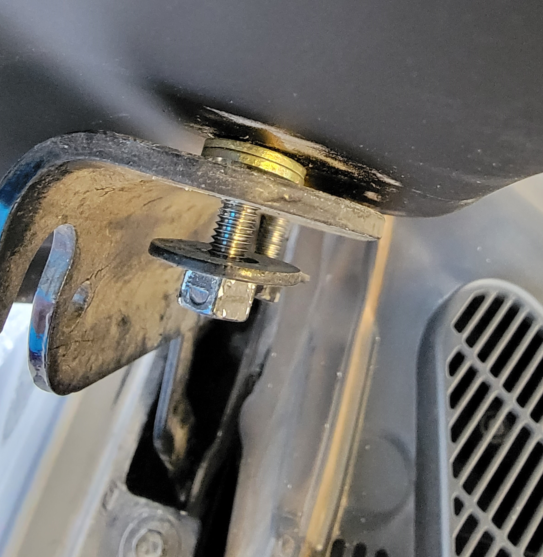
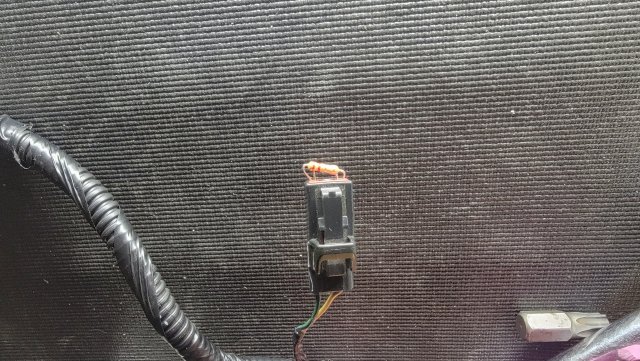
I decided to replace the always on 12V source with a switched source. In order to make it easily reversible, I bought a cheap OBD2 16pins Male 1 to 2 Female Splitter on Amazon for $11. I cut the wires going to pin #16 on the male end and connected them to a fused switched 12V source for both female ports. Another option is to just cut one of the wires if you want the other port to have constant power.
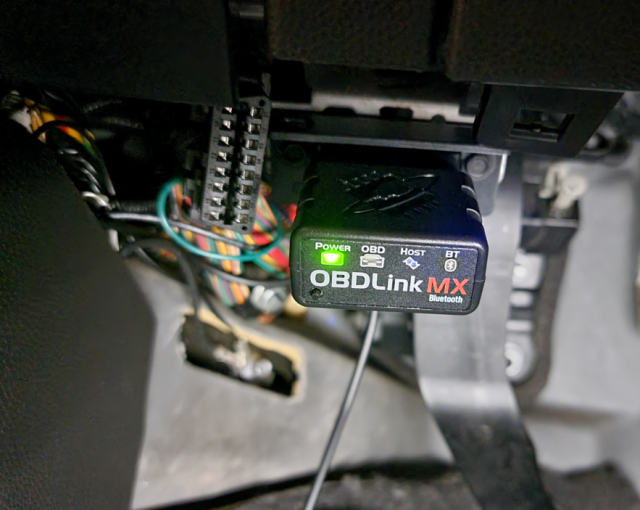
I ran the initial test with an old OBDLink MX Bluetooth adaptor to avoid frying a much more expensive AP. Before, it turns on as soon as I plug it in and remains on until I unplug it (or the battery dies). With the new set up, it stays off until I turn the car on, and turns off when I turn the car off. This allows me to leave it plugged in for Torque Pro or FORScan without worrying about it draining the battery. AP behaves the same way as it turns off instantly when I turn the car off, as if I disconnected it manually.

One warning is that I’d not use the switched 12V source when flashing a new tune. In that case, just unplug the splitter and plug the AP in the original port, or use the constant power port if you only modified one port.
1682050910248.jpeg
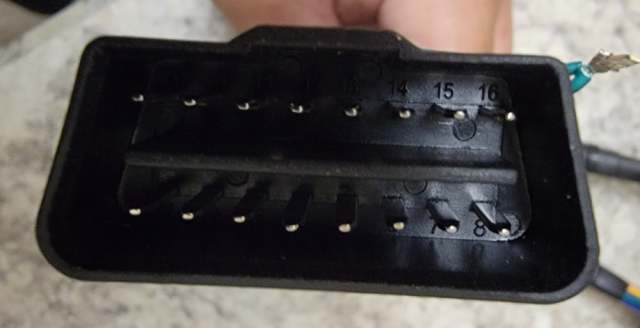
While the price was cheap, the splitter seems to be well made enough. The pins are numbered, which made double checking easier.
1682050941877.png
Cut the power wire for both female ports.
1682050958761.png
OBDLink MX stayed off when plugged in with the car off.
1682050976868.png
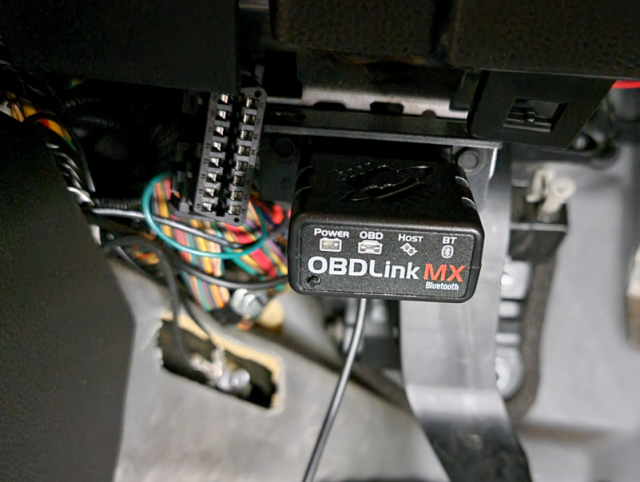
It powered on as soon as I turned the car on.
1682050992498.png


OP
Bull Run

Bull Run

Member
U.S. Army Veteran
Messages
244
Likes
398
Location
Chandler, AZ, USA
Thread Starter #115
Update on the OBD2 port mod:

1. I left the AP connected while I was on a trip. The car started up without any issues after sitting for over three weeks.
2. Had the emissions test done yesterday and the test equipment was able to get readings from the port without issues.


OP
Bull Run

Bull Run

Member
U.S. Army Veteran
Messages
244
Likes
398
Location
Chandler, AZ, USA
Thread Starter #116
While Whoosh 2-Point Trac Bar didn't have issues with clearing the driveway curb and parking lot speed bumps, one thing that I didn't account for was wheel guide rails at the automatic car wash. This bar rubs against the inner rail, and while the dent itself isn't significant, it made loud screeching sounds.
20230830_185731.jpg
1693851334913.png

I swapped the bar out with a Swave and Summit Front Lower 4 Point Subframe Brace to gain extra clearance. Aside form it clearing the guide rail, it feels like the 4-point brace provides little more of torque street reduction compared to the 2-point bar.
20230830_195638.jpg


OP
Bull Run

Bull Run

Member
U.S. Army Veteran
Messages
244
Likes
398
Location
Chandler, AZ, USA
Thread Starter #117
Swave and Summit GT Full Titanium Exhaust with Resonator finally arrived last month and had it on the car for almost a month now. I'll see if any of my friends have GoPro or similar equipment suitable for recording exhaust sounds at speed. Meanwhile, the following are my impressions so far:

Pros
Weight: I don't have a scale suitable for weighing large objects but it definitely feels lighter than stock. Whoosh page says it weighs 15.25 lbs. Since stock weighs about 36 lbs, this is around 20 lbs of weight savings.
Piping size: Whoosh page says 2.5" but it measured almost 3", so I didn't even have to use 3" to 2.5" reducer that came with Whoosh V1 downpipe. Stock cat-back's ID is about 2", so there's an abrupt decrease in the exhaust track diameter even with the reducer. It may be all in my head, but it feels like the turbo spools up quicker now.
Sound: Just slightly louder at idle and cruising without droning. A little louder with deeper sound when you get on it. I'm not into loud exhausts so this is a pro for me and the main reason why I went with this vs. even lighter Tune+ version. If you like it loud, Tune+ sells titanium cat-back with smaller or no muffler option.

Cons
Price: This is probably one of the least cost effective mods for weight reduction, but I already have most of the cost effective mods. Lighter seats and carbon fiber hatch are in my future plans.
Slip fit connections: I wish this came with band type clamps rather than cheapie ones because it was leaking from the slip fit joints. I had some aluminum exhaust tape that took care of it, but will switch to band clamps if it leaks again. Tune+ version has flanged joints, which I like better.

Looks nice, too bad you can't see it once it's mounted.
1697725146296.jpeg

Measurement of the inlet for stock cat-back.
1697725336466.jpeg


OP
Bull Run

Bull Run

Member
U.S. Army Veteran
Messages
244
Likes
398
Location
Chandler, AZ, USA
Thread Starter #118
Since I'm still working from home and only drive the car half the time by my self, I decided to be more extreme and turn it into a two seater build. Thus, I change the name of this thread to Bull's street "go-kart" build.

To save around 50 additional pounds, I removed the back seat, including the brackets and seat belts. Since I don't intend to carry anything in the back area, I opted not to go the false floor route as it adds back some weight. Instead, I just laid a thin black emergency blanket I had in the car.

I ordered door cards and vehicle specific thermoformed Lexan windows for rear doors to save additional weight. I also ordered Lexan window for the hatch for when I'm ready to do the carbon fiber hatch swap.
1698639751362.jpeg


OP
Bull Run

Bull Run

Member
U.S. Army Veteran
Messages
244
Likes
398
Location
Chandler, AZ, USA
Thread Starter #119
While Recaro seats are nice, they are heavy, coming in at almost 50 pounds per the weight thread. I had good luck with Corbeau seats in the past so I order a Forza model as it is their lights fixed back seat at 19 pounds per Corbeau's site, along with the bracket with sliders weighing around 8 pounds.

I shoved a 2.2 ohms resister into the airbag connecter and taped it to keep the airbag light off.
1698640197009.jpeg

As no wiring goes to the seat, I zip tied it to the bracket before installing the seat.
20231022_202842.jpg

Note that, due to the side supports, you'll need to either remove the steering wheel or slide the seat back to get in or out. I don't plan on getting a removable steering wheel as I don't mind sliding the seat back and forth, but it's something to keep in mind for folks wanting a fixed back seat. The seat and bracket sits about 1.5 inches higher than Recaros at its lowest position. Bottom seat cushion comes out easily from the top, so you can shave it as needed. Sitting a little higher doens't bug me so I'll leave it as is for now.
1698641269142.png


Last edited:

M-Sport fan

9000 Post Club
Messages
14,122
Likes
6,762
Location
Princeton, N.J.
You likely saved a bit more than just 50 lbs. from all that you removed behind the front seats. [wink] [thumb]

I've done the same, but I also even removed those fabric wheel well trim covers as well, for even more of a 'gutted' look.


Top