• Sign Up! To view all forums and unlock additional cool features

    Welcome to the #1 Fiesta ST Forum and Fiesta ST community dedicated to Fiesta ST owners and enthusiasts. Register for an account, it's free and it's easy, so don't hesitate to join the Fiesta ST Forum today!


Bull's street "go-kart" build

Dpro

6000 Post Club
Messages
6,197
Likes
5,833
Location
Los Feliz (In the City of Angels)
While Whoosh 2-Point Trac Bar didn't have issues with clearing the driveway curb and parking lot speed bumps, one thing that I didn't account for was wheel guide rails at the automatic car wash. This bar rubs against the inner rail, and while the dent itself isn't significant, it made loud screeching sounds.
View attachment 57710
View attachment 57711

I swapped the bar out with a Swave and Summit Front Lower 4 Point Subframe Brace to gain extra clearance. Aside form it clearing the guide rail, it feels like the 4-point brace provides little more of torque street reduction compared to the 2-point bar.
View attachment 57712
ya I have wound up scraping my SWave Even with my front lifted from where I used to run it. LA just has terribly cut driveway entrances and rutted out from Buses roads. I have just given up on on not scraping it and just have chalked it up to a wear and tear piece that will need to be eventually replaced. Honestly for those of us that drive the Crest it’s inevitable even with the Whoosh or Pierce they will get dented and or bent due to rocks on the road. Buddy has gone through 2-3 Pierce bars because of that.


Last edited:
OP
Bull Run

Bull Run

Member
U.S. Army Veteran
Messages
244
Likes
398
Location
Chandler, AZ, USA
Thread Starter #123
Where did you order the door cards and Lexan from?
I didn't see an option to order rears only from the other guy, so I ordered rears from https://www.racecardoorcards.co.uk/product-page/ford-fiesta-mk7

Rear hatch Lexan: https://www.acwmotorsportplastics.co.uk/search/finder/42/
Rear door Lexan (this site says windows won't be shipped until December, but this is only site I saw that offered rear windows for 5-door Fiestas): https://www.plastics4performance.co...indows-and-kits/ford/fiesta-mk7-5dr-hatchback


OP
Bull Run

Bull Run

Member
U.S. Army Veteran
Messages
244
Likes
398
Location
Chandler, AZ, USA
Thread Starter #124
Since I still needed to get a seat for the passenger side, I decided to move Forza over and got a Corbeau Evolution X as a replacement. I'll have to say Evolution X is street car friendly, as I can get in and out out it without sliding back. Seating height is comparable to the lowest setting on Recaros, which was how I had mine set.

1702095425036.png

This is an update to the passenger seat occupancy sensor part 1 from other day.

Ecosport's occupancy classification sensor looks physically identical to Fiesta's with only difference being the part number on the label. However, plugging it in and turning the car on results in RCM throwing "Incorrect Component Installed", followed by OCSM throwing "Lost Communication with ECM/PCM A" error.
View attachment 59340 View attachment 59341

As a follow on test, I moved the bag from Ecosport's sensor to Fiesta's and did not end up with any low fluid errors. For the next step, I connected passenger seatbelt to its buckle to simulate someone occupying the passenger seat. "PASS AIRBAG OFF" light came on with nothing or a light object on the bag. Light turned off when I set on the bag, so it appears that Ecosport bag works fine with Fiesta's OCSM.
View attachment 59342 View attachment 59343

I installed the bag bottom of a Corbeau Forza seat. Sides fit snugly, so I only needed a couple of zip ties to prevent it from moving forward or backward. I ran the above test again after installing the seat and it still worked as expected. Cost of both used Fiesta OCSM and used Ecosport OCSM + Bag end up being about half of a new Fiesta OCSM + Bag, so I'm still happy with the result.
View attachment 59344


Attachments

OP
Bull Run

Bull Run

Member
U.S. Army Veteran
Messages
244
Likes
398
Location
Chandler, AZ, USA
Thread Starter #126
Lexan rear door windows came in last week. I followed the directions in
View: https://youtu.be/R3Ibozg73-I?feature=shared
and it ended up being much easier than expected.

Picture below shows one of the Lexan windows laid on top of the OEM one. Top and sides were exact match. The bottom was cut slightly different but it's not visible and didn't impact the installation at all.

1703044523699.png

Once installed, you can't tell that it's not glass by just looking at it.

1703045048799.png
1703045186689.png

1703045213174.png


OP
Bull Run

Bull Run

Member
U.S. Army Veteran
Messages
244
Likes
398
Location
Chandler, AZ, USA
Thread Starter #127
I semi-gutted the rear doors and related the trims with door cards for additional weight savings.
1703045385344.png
I used three of the existing trim holes to facilitate quick removal and minimalize screw holes, plus one screw at the corner to prevent rattles.

1703045584737.png

Here's the weight of the removed components for both sides in pounds:
Door windows: 10.8
Speakers and window regulator motors: 6.8
Door trims: 8.8
Total weight removed: 26.4

Lexan windows were light enough to not to trigger the bathroom scale. I used "weigh myself with and without them" method and the difference was 5.9. Door cards hardly weighs anything, but estimating them at a half pound ends up in net weight savings of 20 pounds.

Lexan hatch window arrived the other day, plan is to install it along with carbon fiber on order when it arrives. I estimate that combo should save around 20 additional pounds.


OP
Bull Run

Bull Run

Member
U.S. Army Veteran
Messages
244
Likes
398
Location
Chandler, AZ, USA
Thread Starter #128
Seibon carbon fiber hatch ordered during Black Friday sale arrived as week and found some time this weekend to install it. I don't have a way to weigh them but I estimate a weight savings of around 18 lbs based on various weight threads.

Waxed the hatch (except for window mounting points) and glued Lexan window on the night before.
1705207251070.jpeg

With the OEM hatch removed.
1705207395972.jpeg

Nylon hose from the water RO system worked great for guiding wires through the hatch. Maybe its because European models a little different but I had to drill some holes to mount various wirings. There were "dimples" where I needed to drill, which helped.
1705207609959.jpeg
A shot of the mounted hatch before few final adjustments. Adding three washers to move the latch helped it shut with a good seal. I couldn't re-use Whoosh rear-wiper delete plug due to some differences in molding, so I ordered a different style plug that sits flush. Also ordered a Ford badge.
1705207555929.jpeg


Messages
100
Likes
72
Location
Maui
From Post #51 of this thread:
Here are some pictures of the ITG intake install. I saw instruction videos for UK version of Fiesta, but USDM version required undoing some wiring wraps and splitting/re-routing them.


I'm installing the ITG intake/filter from AET in my 2017 USA Fiesta St. As BullRun said, the online video instructions are for the UK models, which have different wiring. I need to disconnect the large harness connector with the gray "handle" latch on the side. I've released the handle, and the male connector releases from the female connector about 1/8 inch, and then stops. Is there an additional catch/latch I need to release?
Any help is appreciated.


OP
Bull Run

Bull Run

Member
U.S. Army Veteran
Messages
244
Likes
398
Location
Chandler, AZ, USA
Thread Starter #133
From Post #51 of this thread:
I'm installing the ITG intake/filter from AET in my 2017 USA Fiesta St. As BullRun said, the online video instructions are for the UK models, which have different wiring. I need to disconnect the large harness connector with the gray "handle" latch on the side. I've released the handle, and the male connector releases from the female connector about 1/8 inch, and then stops. Is there an additional catch/latch I need to release?
Any help is appreciated.
If I remember correctly, I was able to swing the latch up by 90 degrees using the pull path and was able to disconnect.

1705622574699.png


Messages
100
Likes
72
Location
Maui
Thanks Bull Run. I was finally able to disconnect it. I cleaned it well with electronic contact cleaner and then warmed the female side with a heat gun. It eventually started to wiggle a little, but it still took a ton of effort to get it apart. Before reconnecting it, I smeared a little SylGlide on the male side, to hopefully make it easier to disconnect next time. I'm following your photos to help align the long hose to sit within the semi-circular ITG guide/bracket, and I'm still re-routing wires. It looks like the hood release cable can stay in place without interfering. To maximize airflow I'm trying to avoid pressing the filter flat against the inside of the fender...but it might be unavoidable.


OP
Bull Run

Bull Run

Member
U.S. Army Veteran
Messages
244
Likes
398
Location
Chandler, AZ, USA
Thread Starter #135
Thanks Bull Run. I was finally able to disconnect it. I cleaned it well with electronic contact cleaner and then warmed the female side with a heat gun. It eventually started to wiggle a little, but it still took a ton of effort to get it apart. Before reconnecting it, I smeared a little SylGlide on the male side, to hopefully make it easier to disconnect next time. I'm following your photos to help align the long hose to sit within the semi-circular ITG guide/bracket, and I'm still re-routing wires. It looks like the hood release cable can stay in place without interfering. To maximize airflow I'm trying to avoid pressing the filter flat against the inside of the fender...but it might be unavoidable.
Glad to hear that you were able to get it done. Climate around here's dry so I didn't have to deal with caked on dirt or rust.


OP
Bull Run

Bull Run

Member
U.S. Army Veteran
Messages
244
Likes
398
Location
Chandler, AZ, USA
Thread Starter #136
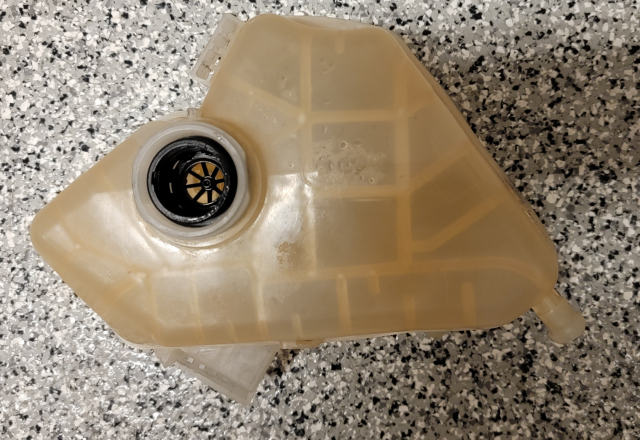
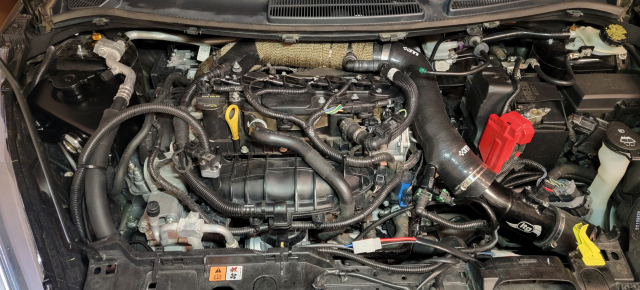
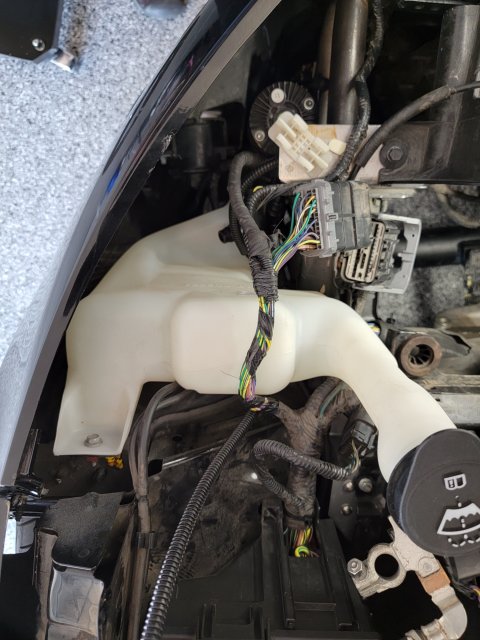
It finally happened to me; I tried to take the coolant tank cap off to top off the coolant, and the top part of it broke off, leaving the bottom portion stock in the tank. I also broke parts of the clip from both of upper and lower tank hoses previously, so I decided to go with the Pro Alloy coolant tank,.along with new hoses.
1706070268636.png

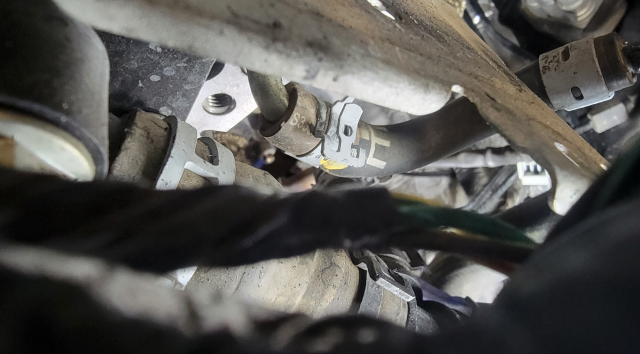
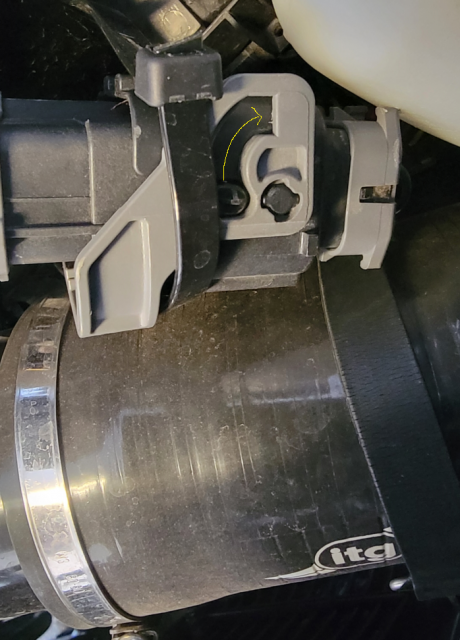
Hardest part was taking the coolant hose off from back of the engine. I removed the intake hose along with front and rear O2 senor connectors and slightly bent the connector mounting plate in order to see the clamp for the hose. Afterwards, I reached the clamp from the back with a needle nose plier to loosen it and pulled the hose off.
1706070623157.png

Only lost a small amount of coolant, mostly from the old tank.
1706070878810.png
Removed the passenger size headlight to screw in the mounting bolts, connected all hoses, then filled up the tank with new coolant. Sight glass made it easy to see the coolant level.
1706070940668.png
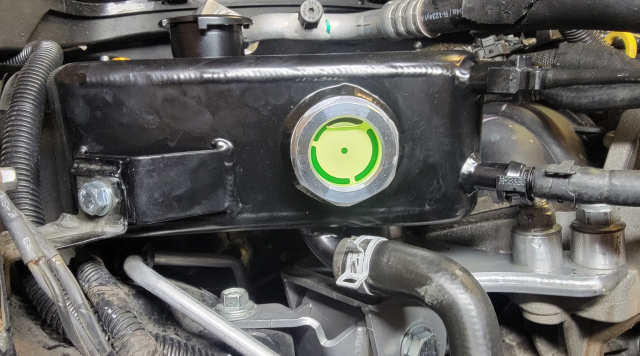
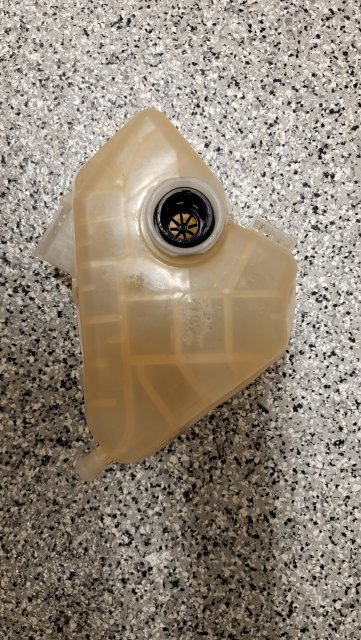
I chose the "Black Satin" color option to go along with the black theme of the engine bay. The tank is well made and felt light.
1706071104177.png
1706071147900.png


Attachments

Messages
207
Likes
144
Location
none
I'm on my third coolant cap and when I get the car back together second stock coolant tank. I feel your pain with that damn cap and especially those brittle hoses. The old version of the front one goes brittle and cracks extremely easy.


OP
Bull Run

Bull Run

Member
U.S. Army Veteran
Messages
244
Likes
398
Location
Chandler, AZ, USA
Thread Starter #140
I'm on my third coolant cap and when I get the car back together second stock coolant tank. I feel your pain with that damn cap and especially those brittle hoses. The old version of the front one goes brittle and cracks extremely easy.
To add insult to injury, when I removed the smaller lower hose, the plastic insert broke off inside the tank. I was definitely glad that I had new hoses on hand to swap.


Top