
-
Sign Up! To view all forums and unlock additional cool features
Welcome to the #1 Fiesta ST Forum and Fiesta ST community dedicated to Fiesta ST owners and enthusiasts. Register for an account, it's free and it's easy, so don't hesitate to join the Fiesta ST Forum today!
Feisty the "Family Car"
- Thread starter Dialcaliper
- Start date
OP
Thread Starter
#202
Thread Starter
#202
Brakes Part 4/5:
Into the meat of the engineering design process.
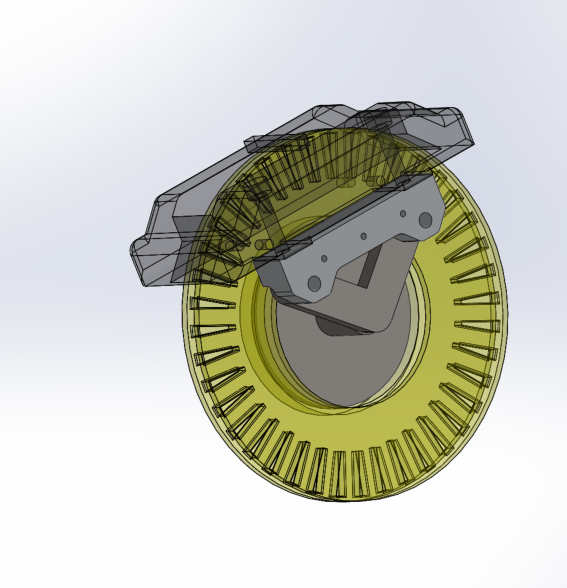
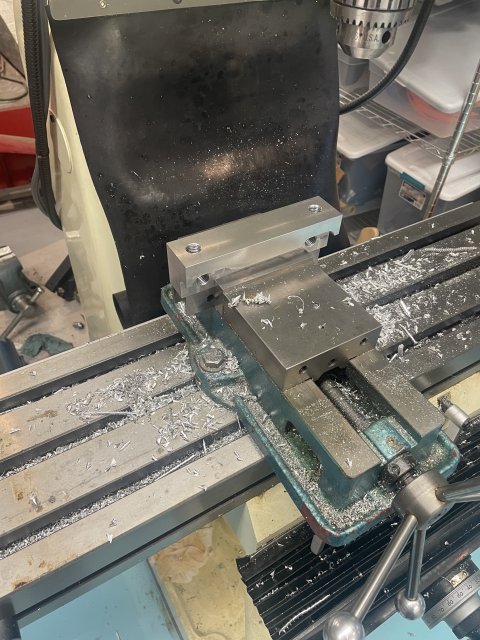
Using the spare Mk8 hubs that didn’t work out the way I wanted on the car (but have correct caliper mounts), I was able to measure and mock up the brakes off the car. It is a tight fit - the caliper needs to sit about 2.125” from the rotor face which starts at the same offset as the stock rotor
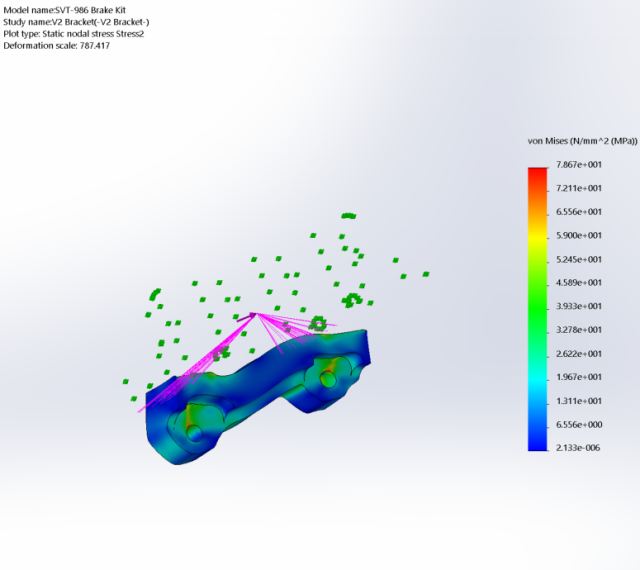
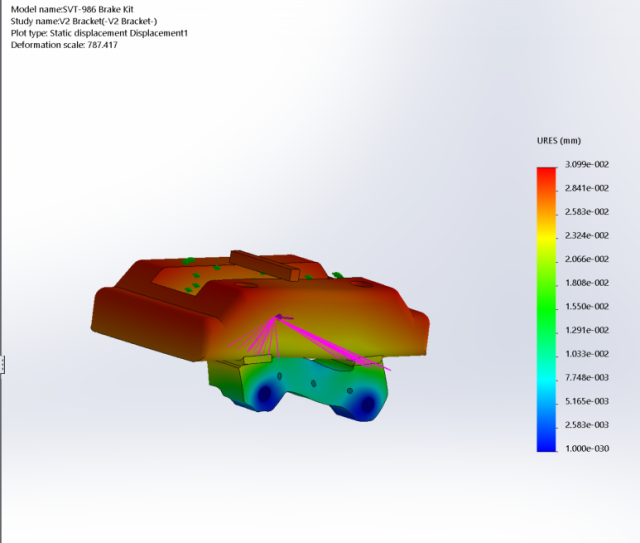
Lots more measurements, CAD, making two dummy (non structural) brackets. Then another complete redesign from scratch, finite element analysis to show a greater than 10:1 margin on yield strength for long term durability and one 3D print test later, I came up with a final design to start cutting. It pays to prototype and iterate to get it damn right.
Crude CAD based on hub and rotor measurements - just enough to capture all the critical interfaces to design the bracket:
FEM Stress and Displacement. Always take these with a grain of salt as they’re only as good as the inputs you give them. So I left plenty of margin on material strength
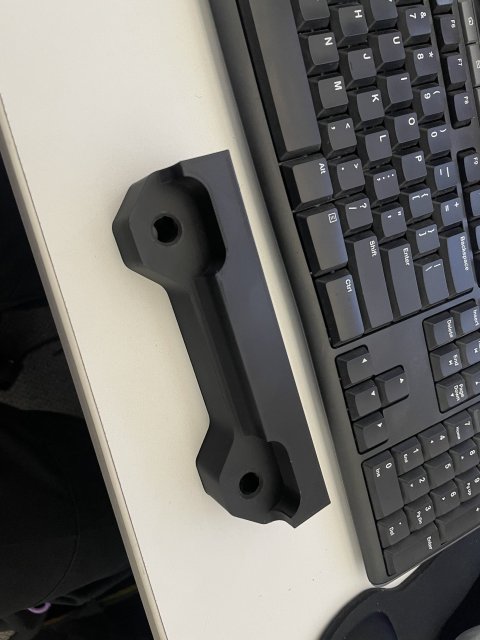
Test 3D Print in plastic:
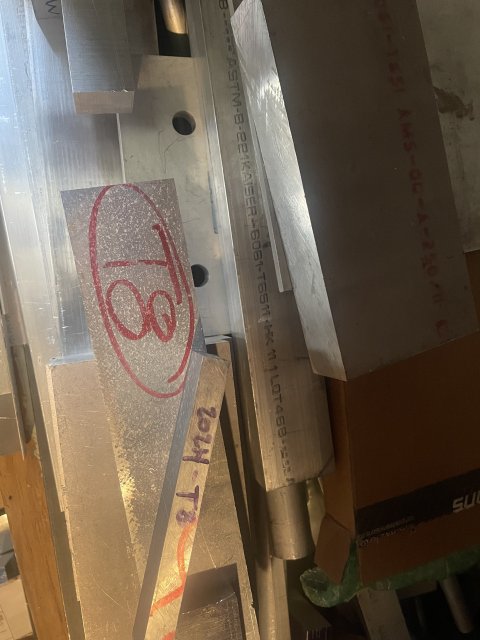
I decided this was as good a time as any to bust out the fancy bar of 2024-T8 high temp, high strength aluminum scrounged from my old job that I’ve been sitting on for something like a decade in the garage trying to figure out what to do with. It has 1.5x the yield strength of the typical go-to 6061-T6 that aluminum most stuff is made of, and maintains higher strength at 150C than 7075-T6. In other words, this is a perfect application.
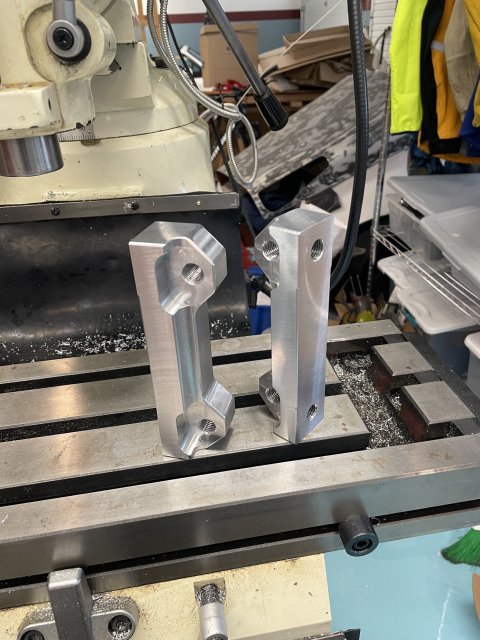
A couple weekends and evenings later, and I have finished brackets! The Mk8 hubs are slightly different where the dust shield mounts so I ended up having to clearance the ends a bit. The final brackets are fairly chunky, about a pound each, but the Boxster calipers are light, so probably still less than the stock iron calipers in total.
Brackets:
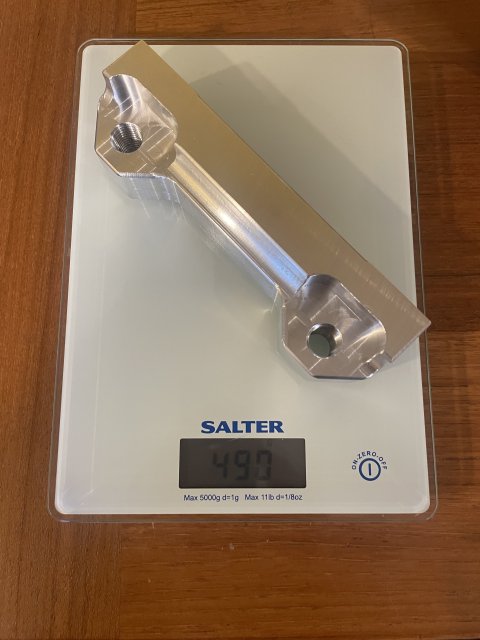
Weigh-in about 500g:
Partly because Alloy 2024 is less corrosion resistant than 6061, and partly because I just like machined aluminum parts to look sexy even if no one but me will ever see them again, I went for hard anodize (for corrosion resistance) with blue dye (for more awesome) again, because for some reason it’s not as common a color and I liked the way they turn out. This time the anodized left the parts in longer so they came out a deep navy blue color. At first I was hoping for a lighter shade, but the navy blue has grown on me and isn’t that far from the car in Kona Blue. Threw in the 3/4”x1” shift pedal spacer I made a while back as well since anodizing is a lot charge up to something like 20lb of aluminum parts.
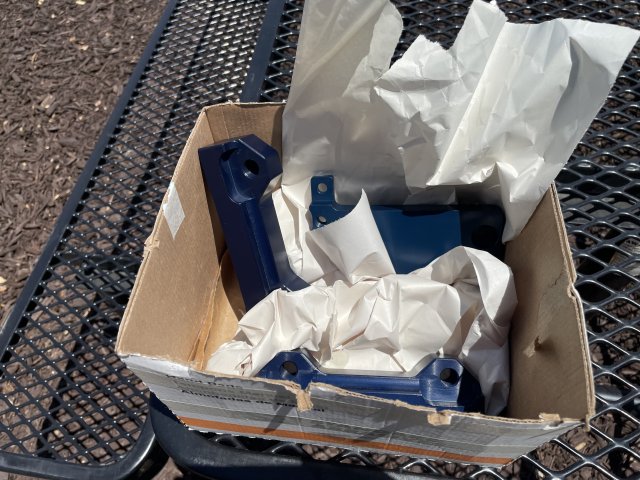
Fresh from the anodizing shop:
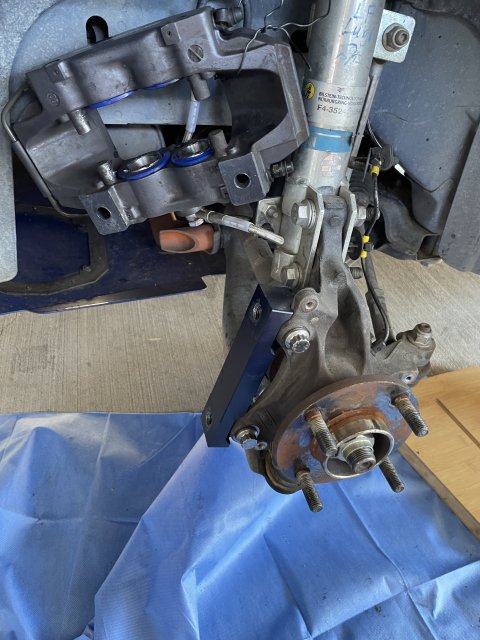
I designed the parts from the beginning to accept helicoils for extra strength and to stand up to repeated installations (required to swap the rotors)
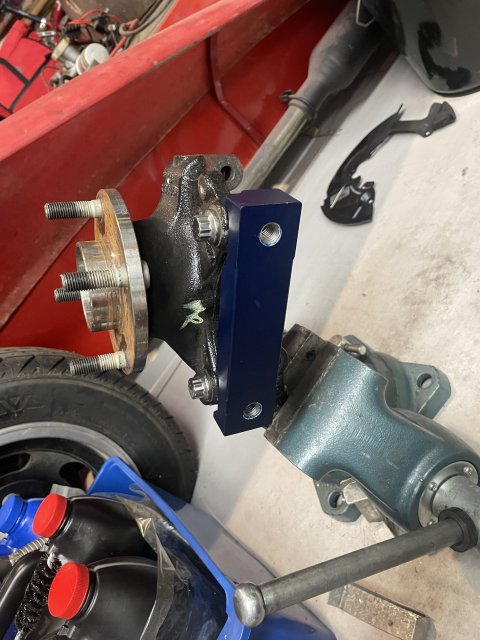
Brackets with ARP Stainless bolts to the hub:
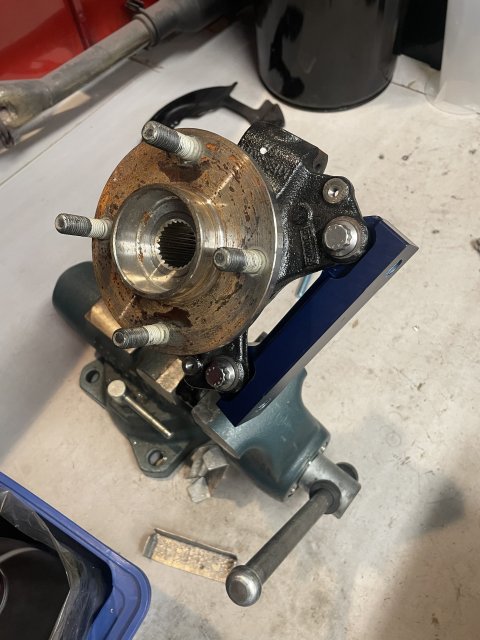
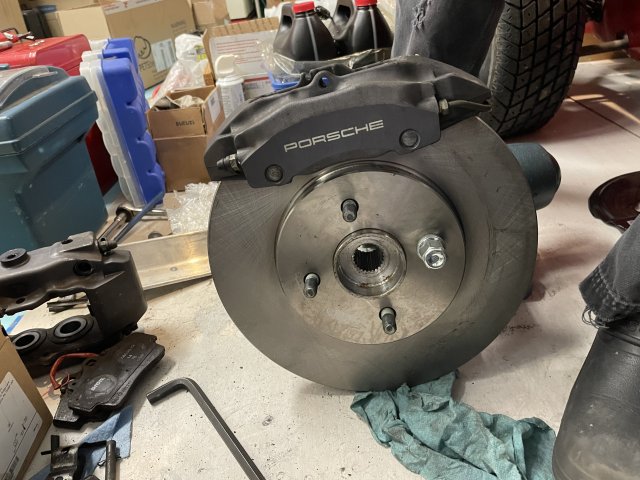
Final mockup with finished brackets:
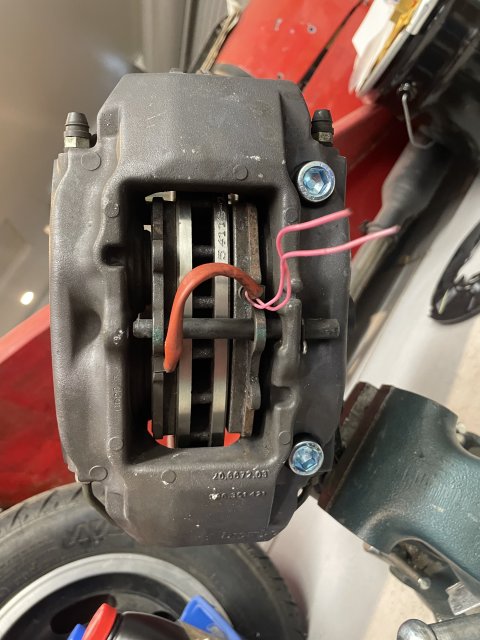
Inside:
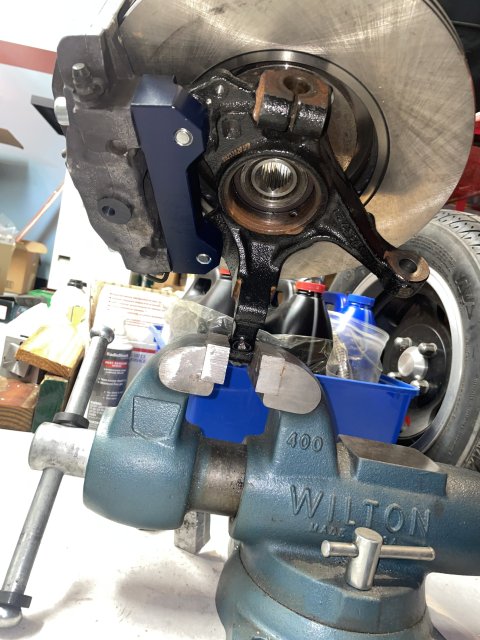
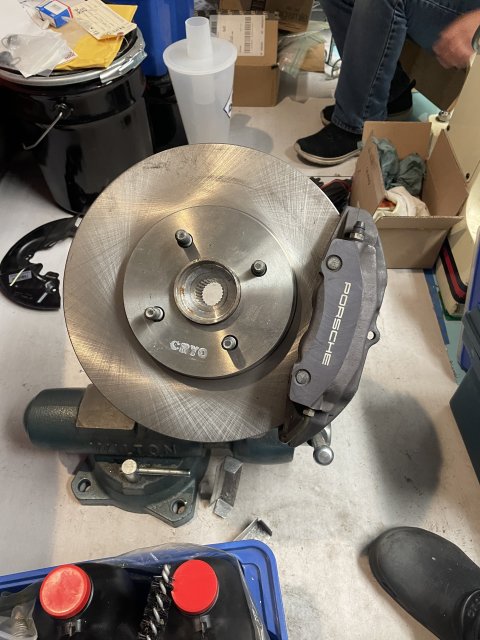
Rotor and Pad Alignment. Grade 12.9 bolts into Helicoils for the caliper to avoid the OEM Porsche Torx bolts which are not reusable:
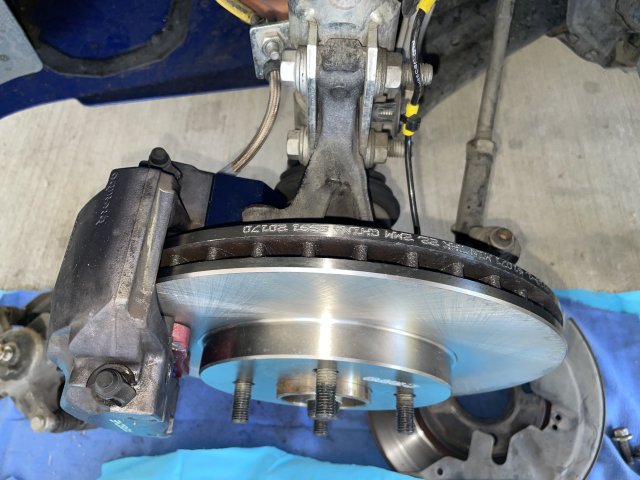
What’s left is roughly 6-7mm to clear the wheel weights, which confirms that by a hair it would be difficult if not impossible to fit the 324mm rotors, by a hair. Would need that number to be at least 15mm clearance to work (basically talking 17” wheels at that point).
The Porsche calipers clear with basically the minimum 2-3mm to spare to the 16x8” 42ET Dekagrams with no spacers. Which I why I went through so much effort to get it perfectly aligned. My winter wheels actually fit even better because I opted for 35mm ET 16x7’s that put the outer sidewall similar to the Dekagrams instead of a closer to stock option.
Spoke and Barrel. “Porsche” is etched into the caliper anodizing, so it will just stay. I actually kind of like that they are grey and not bright red like the Boxster “S” calipers. My car came with silver stock calipers (despite also coming with black wheels) - I don’t care for a ton of exterior bling.
Inside:
Unclear if the PBR calipers would have fit with the bigger 324mm rotors. I’d have to just buy calipers and rotors to check the fit.
Into the meat of the engineering design process.
Using the spare Mk8 hubs that didn’t work out the way I wanted on the car (but have correct caliper mounts), I was able to measure and mock up the brakes off the car. It is a tight fit - the caliper needs to sit about 2.125” from the rotor face which starts at the same offset as the stock rotor
Lots more measurements, CAD, making two dummy (non structural) brackets. Then another complete redesign from scratch, finite element analysis to show a greater than 10:1 margin on yield strength for long term durability and one 3D print test later, I came up with a final design to start cutting. It pays to prototype and iterate to get it damn right.
Crude CAD based on hub and rotor measurements - just enough to capture all the critical interfaces to design the bracket:
FEM Stress and Displacement. Always take these with a grain of salt as they’re only as good as the inputs you give them. So I left plenty of margin on material strength
Test 3D Print in plastic:
I decided this was as good a time as any to bust out the fancy bar of 2024-T8 high temp, high strength aluminum scrounged from my old job that I’ve been sitting on for something like a decade in the garage trying to figure out what to do with. It has 1.5x the yield strength of the typical go-to 6061-T6 that aluminum most stuff is made of, and maintains higher strength at 150C than 7075-T6. In other words, this is a perfect application.
A couple weekends and evenings later, and I have finished brackets! The Mk8 hubs are slightly different where the dust shield mounts so I ended up having to clearance the ends a bit. The final brackets are fairly chunky, about a pound each, but the Boxster calipers are light, so probably still less than the stock iron calipers in total.
Brackets:
Weigh-in about 500g:
Partly because Alloy 2024 is less corrosion resistant than 6061, and partly because I just like machined aluminum parts to look sexy even if no one but me will ever see them again, I went for hard anodize (for corrosion resistance) with blue dye (for more awesome) again, because for some reason it’s not as common a color and I liked the way they turn out. This time the anodized left the parts in longer so they came out a deep navy blue color. At first I was hoping for a lighter shade, but the navy blue has grown on me and isn’t that far from the car in Kona Blue. Threw in the 3/4”x1” shift pedal spacer I made a while back as well since anodizing is a lot charge up to something like 20lb of aluminum parts.
Fresh from the anodizing shop:
I designed the parts from the beginning to accept helicoils for extra strength and to stand up to repeated installations (required to swap the rotors)
Brackets with ARP Stainless bolts to the hub:
Final mockup with finished brackets:
Inside:
Rotor and Pad Alignment. Grade 12.9 bolts into Helicoils for the caliper to avoid the OEM Porsche Torx bolts which are not reusable:
What’s left is roughly 6-7mm to clear the wheel weights, which confirms that by a hair it would be difficult if not impossible to fit the 324mm rotors, by a hair. Would need that number to be at least 15mm clearance to work (basically talking 17” wheels at that point).
The Porsche calipers clear with basically the minimum 2-3mm to spare to the 16x8” 42ET Dekagrams with no spacers. Which I why I went through so much effort to get it perfectly aligned. My winter wheels actually fit even better because I opted for 35mm ET 16x7’s that put the outer sidewall similar to the Dekagrams instead of a closer to stock option.
Spoke and Barrel. “Porsche” is etched into the caliper anodizing, so it will just stay. I actually kind of like that they are grey and not bright red like the Boxster “S” calipers. My car came with silver stock calipers (despite also coming with black wheels) - I don’t care for a ton of exterior bling.
Inside:
Unclear if the PBR calipers would have fit with the bigger 324mm rotors. I’d have to just buy calipers and rotors to check the fit.
Attachments
-
 2.7 MB Views: 9
 -
 2.3 MB Views: 10
Last edited:
OP
Thread Starter
#204
Thread Starter
#204
Brakes Part 5/5:
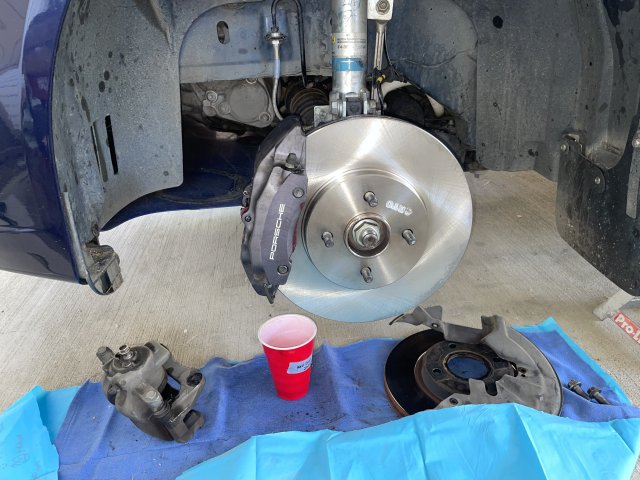
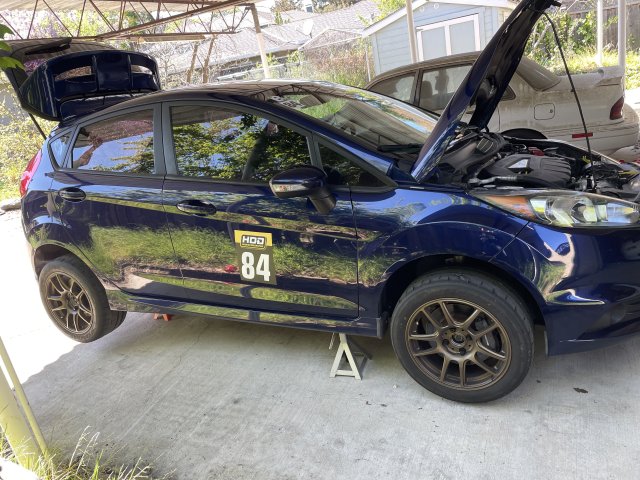
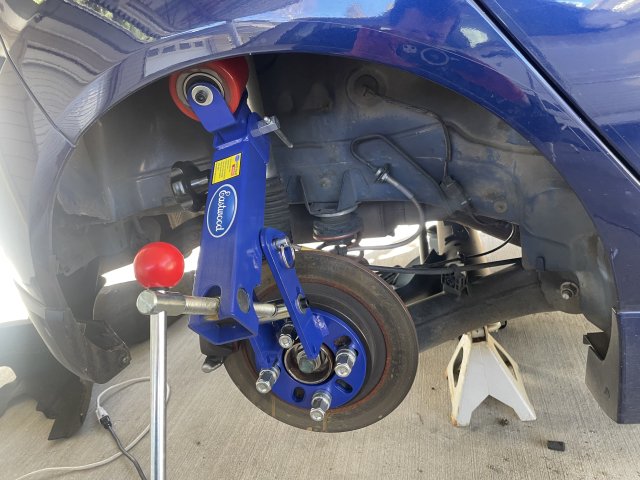
Finally mounted up to the car after some fiddling. Opted for ARP stainless bolts with a coarser thread pitch to bolt to the knuckle and 12.9 socket head screws for the caliper (ARP heads are too big for the caliper counterbores)
Because Brembo, the calipers will accept either a flare fitting, or there’s a machined flat that bolts right up to the stock FiST 10mm banjo brake lines. I did need to source some extra short 18mm length banjo bolts (from GKtechif you’re curious) to avoid bottoming the bolt before the banjo is fully clamped
Bracket mounted and stock style (Mountune) banjo lines attached with 18mm long banjo bolt
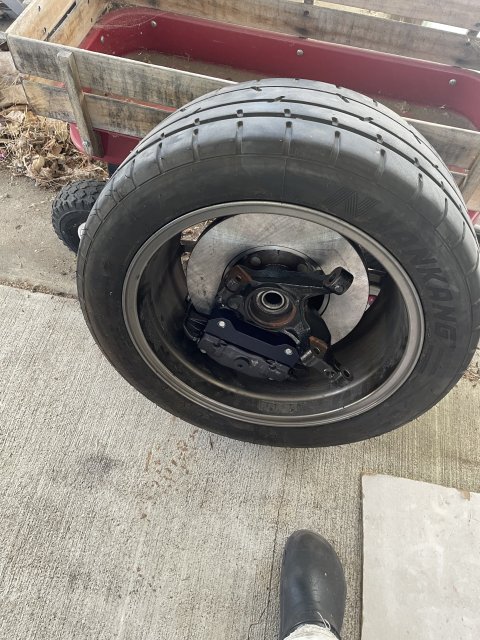
Calipers and rotors bolted up:
Almost there:
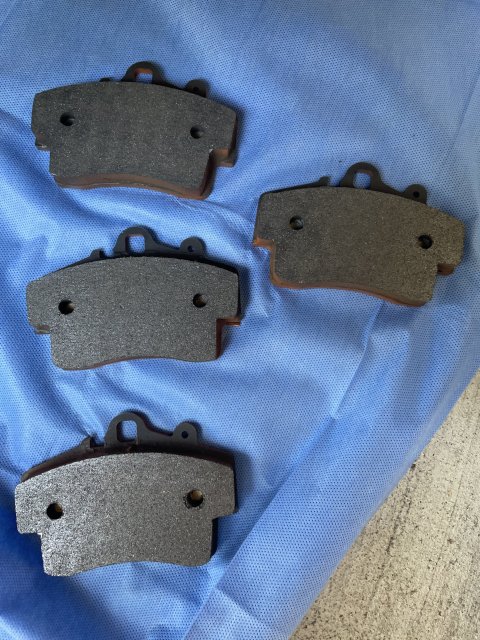
To round it all up, I got G-Loc to send me some R10 compound pads for the track, as well as some GS-1’s for the street.
G-Loc R10’s - forgot to take a photo with the stock pads, but they seem like they have meaningfully more pad area
Drove the R10’s for the trackday and impressions are awesomely positive. The pedal is extremely stiff in a good way with Endless RF650 fluid. The pads modulate and stop really well, and they stood up to all the abuse I sent them. With the Nankangs warmed up, I got little to no ABS triggering.
Forscan Bleed Time!

The only downside is that the R10s squeal like a banshee when coming to a cold stop on the street. Hopefully the GS-1s will be better, but I did paint myself into corner slightly with the RB stainless pistons, as their larger ID means the factory Porsche pad dampers will no longer fit. There are some other things I can try for the street.
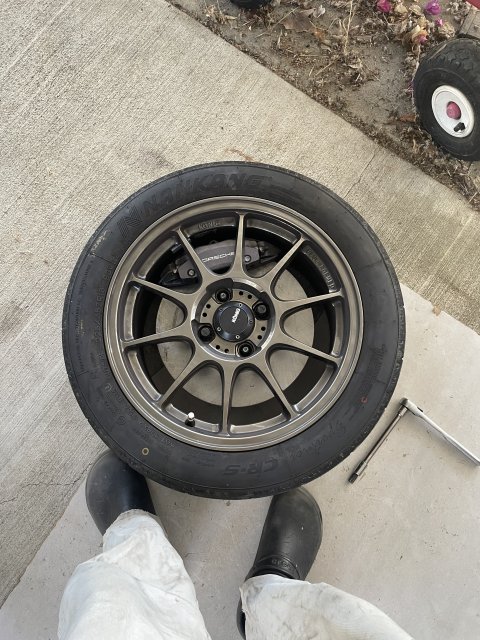
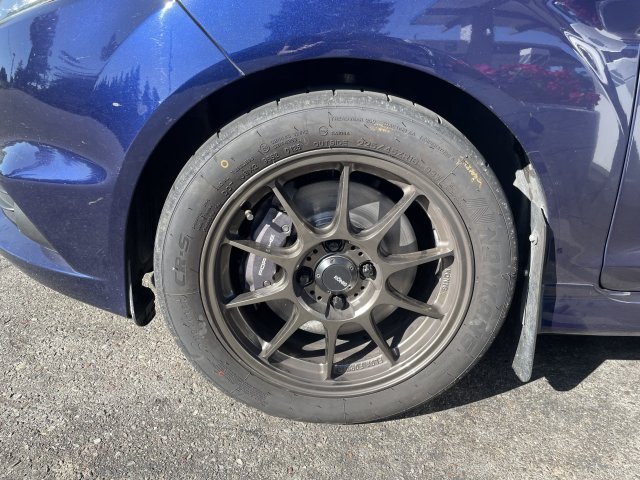
They roll! 16x8 ET42 Dekagrams. No spacers, just barely fits!
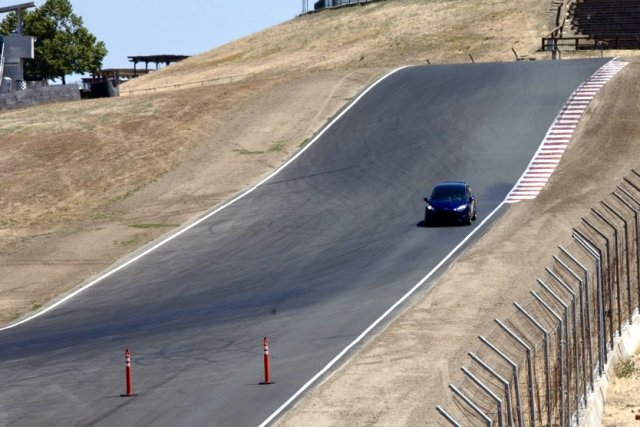
I feel like the extra rotor mass and vane area definitely helped, as I exercised the brakes pretty hard on the track without fading, even without extra brake cooling measures like some people have. At Sonoma I don’t think I’m hitting too much over 100-110mph, so that equation might change on a faster track like Laguna Seca, or if I ever get around to installing a LSD and/or upgrade to a Hybrid turbo, but I’m absolutely thrilled with how they turned out!
Braking deep at Sonoma (not quite NASCAR slicks late by the rubber marks though!)
Finally mounted up to the car after some fiddling. Opted for ARP stainless bolts with a coarser thread pitch to bolt to the knuckle and 12.9 socket head screws for the caliper (ARP heads are too big for the caliper counterbores)
Because Brembo, the calipers will accept either a flare fitting, or there’s a machined flat that bolts right up to the stock FiST 10mm banjo brake lines. I did need to source some extra short 18mm length banjo bolts (from GKtechif you’re curious) to avoid bottoming the bolt before the banjo is fully clamped
Bracket mounted and stock style (Mountune) banjo lines attached with 18mm long banjo bolt
Calipers and rotors bolted up:
Almost there:
To round it all up, I got G-Loc to send me some R10 compound pads for the track, as well as some GS-1’s for the street.
G-Loc R10’s - forgot to take a photo with the stock pads, but they seem like they have meaningfully more pad area
Drove the R10’s for the trackday and impressions are awesomely positive. The pedal is extremely stiff in a good way with Endless RF650 fluid. The pads modulate and stop really well, and they stood up to all the abuse I sent them. With the Nankangs warmed up, I got little to no ABS triggering.
Forscan Bleed Time!
The only downside is that the R10s squeal like a banshee when coming to a cold stop on the street. Hopefully the GS-1s will be better, but I did paint myself into corner slightly with the RB stainless pistons, as their larger ID means the factory Porsche pad dampers will no longer fit. There are some other things I can try for the street.
They roll! 16x8 ET42 Dekagrams. No spacers, just barely fits!
I feel like the extra rotor mass and vane area definitely helped, as I exercised the brakes pretty hard on the track without fading, even without extra brake cooling measures like some people have. At Sonoma I don’t think I’m hitting too much over 100-110mph, so that equation might change on a faster track like Laguna Seca, or if I ever get around to installing a LSD and/or upgrade to a Hybrid turbo, but I’m absolutely thrilled with how they turned out!
Braking deep at Sonoma (not quite NASCAR slicks late by the rubber marks though!)
Last edited:
OP
Thread Starter
#206
Thread Starter
#206
So what are the odds of buying a set of the adapters to mount those calipers to my car? Or the cad file to run on the cnc at work. This looks like exactly the Droid im looking for.
https://www.fiestastforum.com/threa...a-run-of-budget-big-brake-kit-brackets.33733/
OP
Thread Starter
#207
Thread Starter
#207
Okay, its time for one of those "I wish I knew about this before" moments
For a little while now, the steering has been a bit darty, which I chalked up to the zero toe in my latest alignment. But I've started realizing that sometimes I randomly get a pull to one side, almost like my camber is off. But it sometimes goes away, and sometimes randomly pulls in the opposite direction. Happens most often shortly after startup, but things have always felt a little squirrelly under acceleration and braking, ever since I got the car.
But, I started wondering if it was something electronic. I was searching around, and came across some random posts like this one on Ford's "adaptive learning" and something called "drift pull compensation" in EPAS steering systems.
After searching how to reset on the Fiesta it and coming up with only the Ford factory service software demos and Forscan to reset on the PSCM (power steering module) for the FoST and other cars and how you're supposed to reset it after changing your battery (for some inexplicable reason), and not figuring it out, I noticed this service procedure in Forscan, on the PCM called vaguely "Reset all adaptations". Given the centralized nature of the Fiesta control system, I guess I shouldn't be surprised.
I decided that since I've been through something like 2 battery changes, 5 suspension swaps and 8-10 different DIY alignments (including some where I didn't get things quite right and had to redo) since owning the car, that its quite possible it's learned some bad habits. And since it's an adaptive system, the worst thing that could happen is that everything gets reset, not just the steering algorithms. I decided to give it a try.
Wow. All of a sudden the steering is precise, no pulls or nervousness and the car tracks straight as an arrow on the freeway! It also seems to have reset the ECU's octane learning on the tune, and probably a bunch of other stuff, but I am one seriously pleased customer! I have another trackday coming up, and I'm REALLY looking forward to seeing how the car does, especially with the "booty shake" I was getting under heavy braking.
Be advised that an extended license purchase of Forscan is required for this service procedure (my previous year's one had expired), but so worth it, especially if you're experiencing any steering weirdness.
View attachment 66471
Just recently, I realized that my steering wheel was very slightly off center. Like, subtly enough that it didn’t really register it between camber pull and tire tramlining until I looked at it closely and couldn’t unsee it.
I adjusted my tie rods in the same direction by a tiny amount - 1/6th of a turn (one wrench flat), and brought the wheel back on center. Ever the last reset I haven’t had much of the darty behavior returning.
My new theory is that because the EPS and steering angle sensor are all integrated into the steering column, and recalibration happens off the steering rack and angle sensor, the computer was seeing a constant off-center when the car was actually driving straight, and a constant pull whenever the wheel was centered, leading to a buildup of whatever correction the DPC logic tracks.
Moral of the story, make sure your toe and steering center are aligned dead nuts on center!
Moral of the story, make sure your toe and steering center are aligned dead nuts on center!
I also wonder if there's an OBD signal for those corrections.
Last edited:
OP
Thread Starter
#210
Thread Starter
#210
Are the steering resets able to be done through the accessport or does this need to be done by a ford dealer/with forscan?
OP
Thread Starter
#211
Thread Starter
#211
Last time at the alignment, they asked me to check whether I thought the steering wheel was centered because they weren't sure due to all of the curved surfaces on the dashboard. Now I'm wondering if we got it right or not; I'm thinking to come up with a bubble level jig for next time.
I also wonder if there's an OBD signal for those corrections.
I also wonder if there's an OBD signal for those corrections.
I think it’s possible to read the steering angle sensor from the PSCM through Forscan.
I looked through service manual and don't see anything about wheel alignment
 I'll ask the advisor at the Ford shop if that's what they do next time I'm in for service.
The pedal is extremely stiff in a good way with Endless RF650 fluid.
Forscan Bleed Time!
View attachment 67262
Forscan Bleed Time!
View attachment 67262
If so, does the pedal, 'take-up' or engagement point feel any different, as well as is there any greater fade resistance (no 'spongy', or vague feeling clutch pedal) from accumulated heat during a track day (or in SoCal 'parking lot' traffic)?
How often do you plan on a full out of both systems with the Endless fluid?
OP
Thread Starter
#214
Thread Starter
#214
Do you use the Endless fluid in the clutch hydraulics as well?
If so, does the pedal, 'take-up' or engagement point feel any different, as well as is there any greater fade resistance (no 'spongy', or vague feeling clutch pedal) from accumulated heat during a track day (or in SoCal 'parking lot' traffic)?
How often do you plan on a full out of both systems with the Endless fluid?
The Endless fluid is supposed to absorb water more slowly. Right now I’m planning on yearly fluid changes, we’ll see how that goes or if I’ll need to budget for more (it’s pretty expensive unfortunately)
Yes, a shared reservoir, but one could potentially use different fluids in each system since the two different fluids will not mix together all of the way down to/at the parts they activate.
You could flush out the clutch system with one type of brake fluid, and then flush out the brakes with a different one, and the fluids will only 'mix' right at the juncture of the 'down spout' tube for the clutch master.
You could flush out the clutch system with one type of brake fluid, and then flush out the brakes with a different one, and the fluids will only 'mix' right at the juncture of the 'down spout' tube for the clutch master.
OP
Thread Starter
#216
Thread Starter
#216
Yes, a shared reservoir, but one could potentially use different fluids in each system since the two different fluids will not mix together all of the way down to/at the parts they activate.
You could flush out the clutch system with one type of brake fluid, and then flush out the brakes with a different one, and the fluids will only 'mix' right at the juncture of the 'down spout' tube for the clutch master.
You could flush out the clutch system with one type of brake fluid, and then flush out the brakes with a different one, and the fluids will only 'mix' right at the juncture of the 'down spout' tube for the clutch master.
If you think about it for a minute, how would you suppose that moisture gets eventually infused into the fluid inside the calipers, where it can boil to cause brake fade, when the lines and bleeders are sealed from air, and the only part of the system exposed to air/humidity is the top surface of the fluid in the reservoir?
If that is the case, then why couldn't we just keep draining the reservoir with a syringe/pump, and refill it repeatedly over time (yes, tedious as that is) to get fresh fluid down into the calipers and slave cylinder, performing an 'effective flush'??
If the fluid itself ever does boil, I always understood that alone would cause moisture to build in the system, no?
Also, is there not still some permeability in the caliper's piston seals (and the clutch master and slave cylinder seals as well) allowing moisture intrusion, albeit very slowly?
If the fluid itself ever does boil, I always understood that alone would cause moisture to build in the system, no?
Also, is there not still some permeability in the caliper's piston seals (and the clutch master and slave cylinder seals as well) allowing moisture intrusion, albeit very slowly?
OP
Thread Starter
#219
Thread Starter
#219
Been a while since I updated this. Been a bit distracted over the winter doing a “mild” brake upgrade on the NA Miata (nothing custom this time)
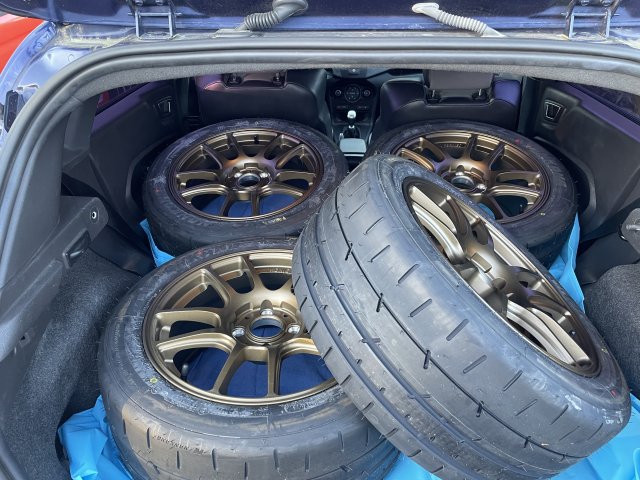
Decided since I’ve started doing track days and only got about 3 days and 5000-8000 miles out of a set of 200TW, to take the plunge and buy some “track wheels” and get street tires that will last a couple years, so I’m not going through 2 sets of tires every year! The BFG and Bridgestones did “okayish” on the street, but the Nankangs wear really fast in street driving. Also sketchy in the occasional wet.
Snagged a sweet deal some Konig Heligrams back on Black Friday, and just this month snagged a new set of 225/45R16 Nankang CR-S for the track:
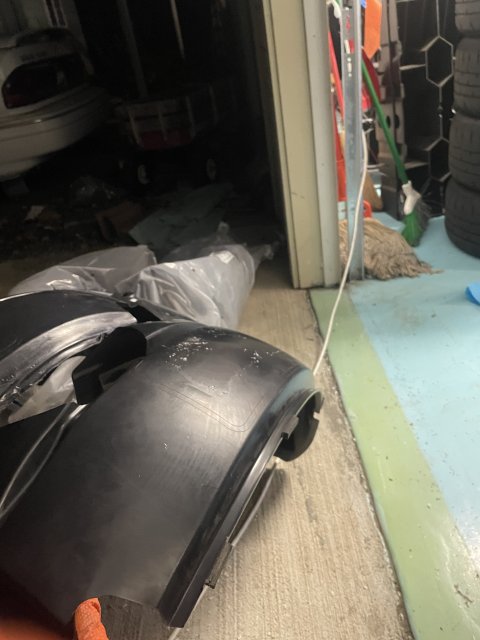
Also, a couple of tries, but trying to solve the tire rub has been a challenge, especially since my B14’s have been modified with ~3/4” extra compression travel. Never rub on the street, but evidently a I’ve been using it on track.
Drastic measures! Borrowed a friend’s fender roller to roll the flange up at an angle and pull the fenders out slightly. Bought a new set of fender liners, and I’ve trimmed and reshaped them into a high arch with a heat gun to almost parallel/vertical with the fender. Trimmed back the bumper mounting bolt all the way up to a smaller bolt head. Because I just like how the the chunky 225/45’s drive that much…
Hope it works this time, if not I’ll need to consider taking the shocks apart and adding some bumpstop packers
Decided since I’ve started doing track days and only got about 3 days and 5000-8000 miles out of a set of 200TW, to take the plunge and buy some “track wheels” and get street tires that will last a couple years, so I’m not going through 2 sets of tires every year! The BFG and Bridgestones did “okayish” on the street, but the Nankangs wear really fast in street driving. Also sketchy in the occasional wet.
Snagged a sweet deal some Konig Heligrams back on Black Friday, and just this month snagged a new set of 225/45R16 Nankang CR-S for the track:
Also, a couple of tries, but trying to solve the tire rub has been a challenge, especially since my B14’s have been modified with ~3/4” extra compression travel. Never rub on the street, but evidently a I’ve been using it on track.
Drastic measures! Borrowed a friend’s fender roller to roll the flange up at an angle and pull the fenders out slightly. Bought a new set of fender liners, and I’ve trimmed and reshaped them into a high arch with a heat gun to almost parallel/vertical with the fender. Trimmed back the bumper mounting bolt all the way up to a smaller bolt head. Because I just like how the the chunky 225/45’s drive that much…
Hope it works this time, if not I’ll need to consider taking the shocks apart and adding some bumpstop packers
Attachments
-
 4.1 MB Views: 12
 -
 3.5 MB Views: 12
 -
 1.6 MB Views: 8
 -
 1.7 MB Views: 6
 -
 2.9 MB Views: 6
 -
 1.6 MB Views: 6
Last edited:
Königs just looks so good on our little cars. Their bronze colors look very nice with most colors. But most pictures of just the wheel in bronze usually portrait them as much lighter than they really are.
I have a nice set of 16x8 Dekagrams for my Mk7 ST and contemplating 17x8 Hexaform on my MK8 ST. But now I need to see if I can find some Hexigrams...
I have a nice set of 16x8 Dekagrams for my Mk7 ST and contemplating 17x8 Hexaform on my MK8 ST. But now I need to see if I can find some Hexigrams...
Similar threads
-
-

-
 Got together with the Family for eaSTer so we took ST family photos
- Started by Sanity
- Replies: 7
-

-
-
 The new 2016 Kona Blue Fiesta ST in the family!
- Started by Azrael
- Replies: 11
-
-

-
-
