• Sign Up! To view all forums and unlock additional cool features

    Welcome to the #1 Fiesta ST Forum and Fiesta ST community dedicated to Fiesta ST owners and enthusiasts. Register for an account, it's free and it's easy, so don't hesitate to join the Fiesta ST Forum today!


Overheated today, suggestions?

Messages
782
Likes
919
Location
Texas
#1
Hello everyone,

Today while on the way back from lunch I hear the chime, see the red temp light, and the coolant temp boxes maxed out. Car went into limp mode, was able to get it off of the highway and into a parking lot. Ran for maybe a minute after being alerted. I opened the hood and noticed that the coolant expansion tank hose was dripping, coolant levels were a bit lower than the minimum line, another concerning thing was the bubbling coming into the tank from the line that was leaking. Once I got the accessport plugged it was reading temp of 245.

I let the car sit for about 10 minutes and decided to see if I could get the temp to come down with the help of max defrost/heat. This worked and the temp slowly got itself back down to 190’s. I cleared the codes (overheat, limp mode, and something about the cylinder head temp) so that I could get out of limp mode. The weird part about it was even though it was on defrost with max heat the air was still coming out ice cold. It wasn’t until driving 10 minutes that the heat came on full blast. The car would also bounce between 180 and 190 and when I got up to highway speed the temp would skyrocket again to 210. The car drives fine, no smoke, no smell out of the exhaust, idles fine. Oil looks like fine, coolant looked fine, tiniest bit of air coming out of the tank when I put my hand over it while running but I feel like that’s normal as the coolant circulates?

Is that coolant tank likely the cause of the overheating because it was low and maybe developed an air bubble or should I be concerned for the headgasket?

About the car:
MY16, mountune rad, last fluid change summer of 20 with 70/30 motorcraft coolant/distilled water. Full bolt on, E30 tune. No recent mods done other than replacing my old coilovers.

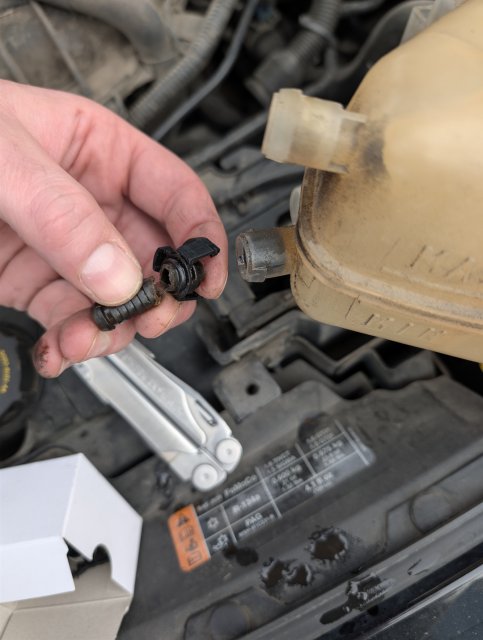
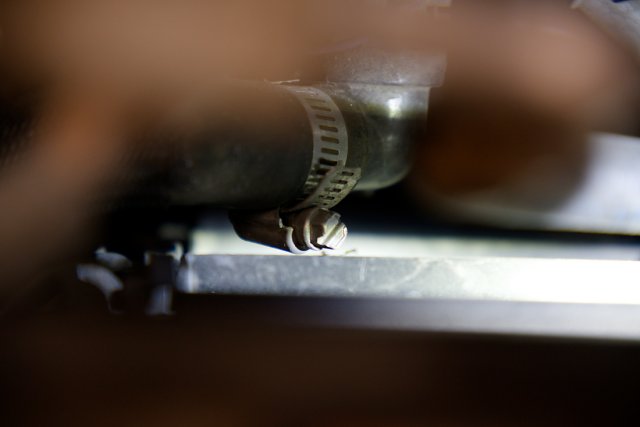
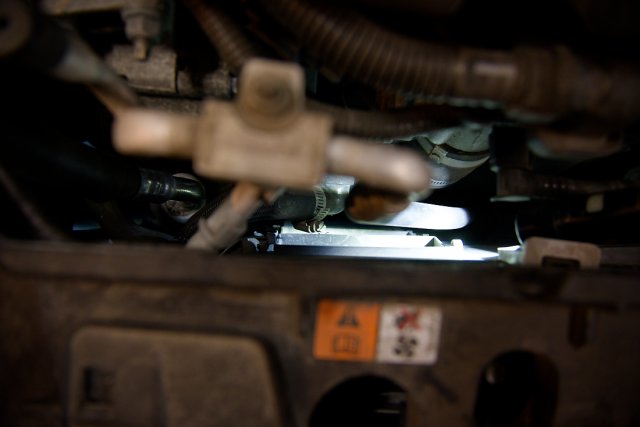
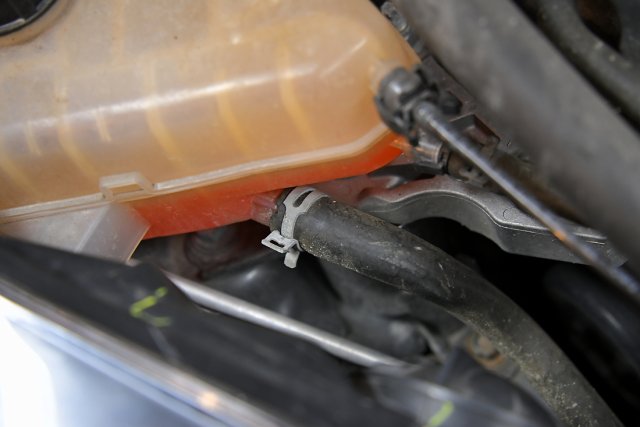
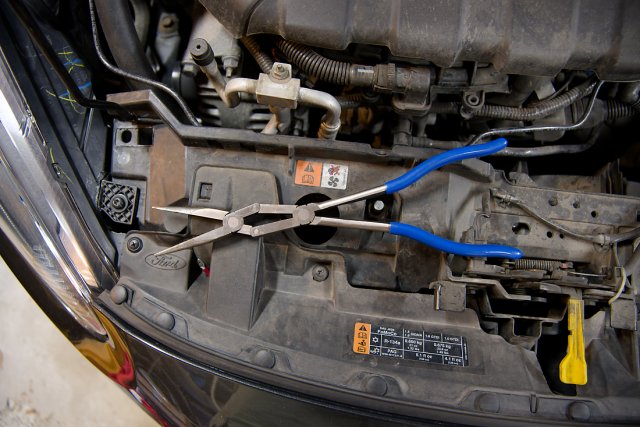
Where it was leaking until it got below that level:

IMG_2601.jpeg


OP
E

Erick_V

Active member
Messages
782
Likes
919
Location
Texas
Thread Starter #3
I was hoping it wouldn’t be the thermostat or pump. I think I’ll likely buy the reservoir, water pump and thermostat in case the tank alone doesn’t fix the issue


Cneu

Member
Premium Account
Messages
140
Likes
189
Location
Hillsboro, Oregon, USA
#4
That's funny, i literally just had this problem a few days ago.

MIne never got to the limp stage, but I noticed a few weeks ago that my defrost wasn't exactly hot. I had a very, very small/slow leak from the turbo coolant hose. I had a bubble that settled in my heater core so my heat wasn't working. At first I thought my head gasket had blown, lol.

That stupid connector piece. It got brittle and fell apart the second I touched it.

I was unable to find the connector piece as a stand alone part. It seems there are some china-sourced ones but the ship time is insane and they might not be correct.

What I wound up having to do is visit a couple of local ford dealers to get the correct part, which is C1BZ-8B081-?. There's a question mark because there are variations on this part, depending on the model it goes into. The 8B081 is the base part number which you'll see in parts diagrams.

Whoosh sells it here, https://whooshmotorsports.com/products/motorcraft-engine-coolant-reservoir-hose-2014-2019-fiesta-st if you have time to wait. I didn't, which is why I drove around for 3 hours to find the correct part.

Replacing the part is super simple. It's a foot of hose with a clamp on the far end, then you just shove the connector in to the reservoir. There's one guidance clamp on top of the engine.

If anyone is reading this and their fiesta has 100k miles on it, you should have this part on hand because that lil piece of plastic is going to fall apart on you. When it does there is no easy fix. It sucks. This is something that I would "upgrade" to a more standard connector if I had more time. Just a simple hose clamp makes more sense, idk why ford did it the way they did.


Attachments

Last edited:
OP
E
Messages
782
Likes
919
Location
Texas
Thread Starter #5
I ended up buying the whoosh coolant reservoir kit and it comes with the hoses. Looks like I got all the right parts and am picking up the motorcraft coolant and distilled water today. Luckily I have a second vehicle to use. Funny you say anyone over 100k should replace this, mine failed at 103k! Thank you for the reply


Cneu

Member
Premium Account
Messages
140
Likes
189
Location
Hillsboro, Oregon, USA
#6
I ended up buying the whoosh coolant reservoir kit and it comes with the hoses. Looks like I got all the right parts and am picking up the motorcraft coolant and distilled water today. Luckily I have a second vehicle to use. Funny you say anyone over 100k should replace this, mine failed at 103k! Thank you for the reply
lol yeah im usually pretty hesitant to straight up say "this was a dumb decision" cuz im an electrical/mech engineer, so I get it, but this is really one of those things that I looked at and just thought "heh..what?"

My only idea is that this has to do with the suction that happens when the car gets turned off. But I still don't get understand the need for a narrow ass piece of plastic in this circumstance instead of just making the hole on the reservoir smaller. Maybe something to do with siphoning pressure or something.


Messages
490
Likes
564
Location
Metro Detroit
#7
I have had the same problem, however mine is a 2019. The cause was the MOUNTUNE radiator shifting the plastic fan shroud/holder towards the engine and a ridge on that plastic had rubbed a notch into a hose on the radiator side of the engine. Once it started leaking the fluid loss led to the engine over heating. Take a look at the radiator side of your engine with a flashlight and look for anything on the fan shroud that is contacting any hose on the engine. That point of contact is where you may find your leak. BTW we do have different years and I know that Ford change the reservoir in the 2015ish time frame so there may be differences between 2016 and 2019.

Lessons learned.

One is to insure that plastic fan shroud assembly does NOT contact any hose on the engine anywhere. Carefully positioned plastic wire ties are quite useful for this and available at most auto parts shops. Look for the longest you can find and if you shop doesn't have 8-12 inch wire ties MSC Industrial Supply does have a huge variety of wire ties.

Two is that a patch for a bicycle patch can provide a temporary repair of the wrap the finished patch with Duct Tape. BTW the patch stops the leak, the Duct Tape provides support, one without the other will not work. Note it took two weeks to get that hose assembly after ordering it at a dealer. I will also note that I had to purchase double joint extended pliers to get the clamps for the hose shifted and slender forearms is a Must. If you are a beefy person find a skinny friend or the entire fan shroud will have to be removed.

Three is that a Vacuum Filler Kit is an absolute must. You will also need an air compressor because most of these kits feature a vacuum generator that is powered by compressed air. BTW, this functions due to the Bernoulli Principle. On my 2019 there is not pressure relief at the top of the radiator so a giant air bubble can form in the radiator if you have a fluid leak. Fortunately an Advanced Auto 3/10 mile from my house had a kit in stock. I will also note that on my reservoir there is an overflow vent on the bottom of the tank and that must be sealed in order for the Vacuum Filler to work. I used a small piece of electrical tape for that. Once the system is totally air tight the drill is to draw a vaccum over -20 PSI and then seal off the system and open a valve for a hose in a coolant filled bucket. Note I used a 5 gallon bucket to insure I didn't run out of coolant during the fill. Keep that kit handy because any time you see the reservoir is low doing a vacuum fill is the best way to top up the fluid.
SDW_0787_DxO.jpg
The clamp is just below the rib shown that rubbed a notch in the hose. Note the DJ pliers were used to remove the spring clamp that was in the position of this hose clamp. The plastic part this hose mounts to also has a second hose attached and the damaged hose could only be purchased in the 108 dollar complete assembly. I went hose only because removing the plastic housing would require removing the radiator.
SDW_0788_DxO.jpg
SDW_0790_DxO.jpg
The other end of the hose I had to replace.
SDW_0792_DxO.jpg
The double Joint Pliers I used to remove the spring clamp.


Last edited:


Top