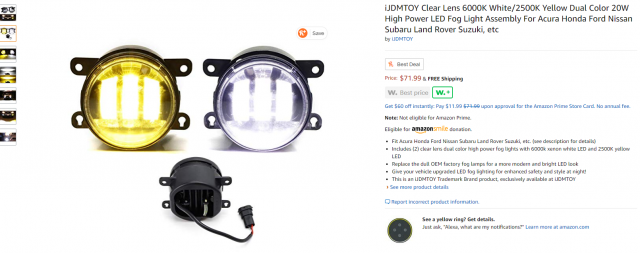
So I have been looking at fog light options and of course we have the Diode Dynamics Luxeon and Morimoto XB as options and they are excellent. But if we can get great LED headlight bulbs for $35, why can't we get a decent set of projector LED fog lights for less than $100? So after a LOT of searching and research, we actually have a very common fog housing light size shared with many earlier Ford's, Subaru's, Honda's, Acura's etc. It took me a long time to find these as they have the 2014 Fiesta ST as the only year. But, as I've come to see this as common in parts searches for our cars, many places only list the 2014 or maybe '14-'15 as compatible when the later years are always compatible too, the only exception really being updated shocks/struts for '17+ but I digress... These were only $72 from Amazon HERE and really not a whole lot of choices available without ordering directly from overseas where most also have gimmicky high beam wiring, etc. that I didn't want to deal with anyway... Although not Prime, they did arrive in about 3 days, not bad.
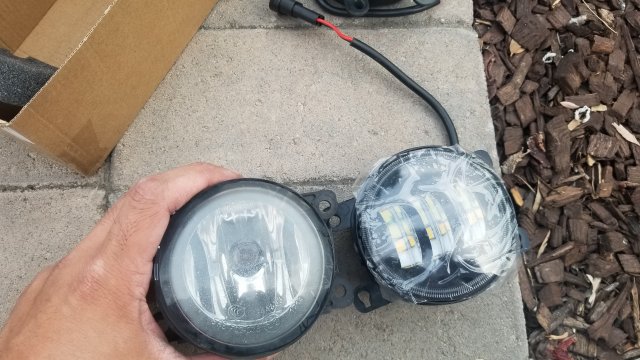
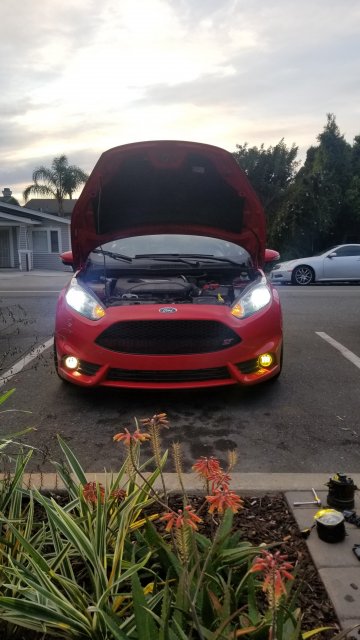
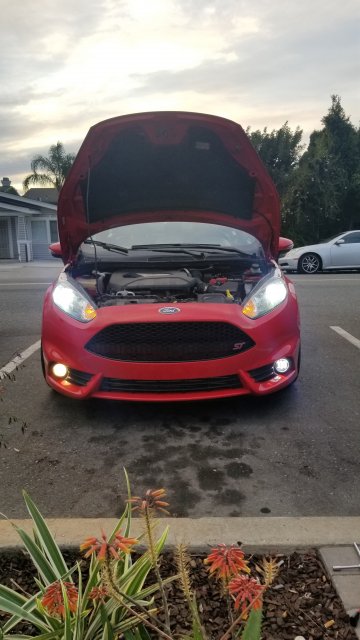
As you can see, like the 2 far more expensive options, they are complete housings with fully contained LED's with no bulbs to replace. With LED lifespan of like 50k+ hours, it's a total non-issue to me... Listed wattage is also a non-issue, we have seen 24w of actual draw LED headlight bulbs end up brighter than 36w actual draw ones. Honestly, these come across as more like a 30w+ actual draw, or maybe 65-75w halogen if I had to guess as far as comparable halogen brightness, these are definitely very bright, the white alone could almost be used as headlights as you will see below.
Install:
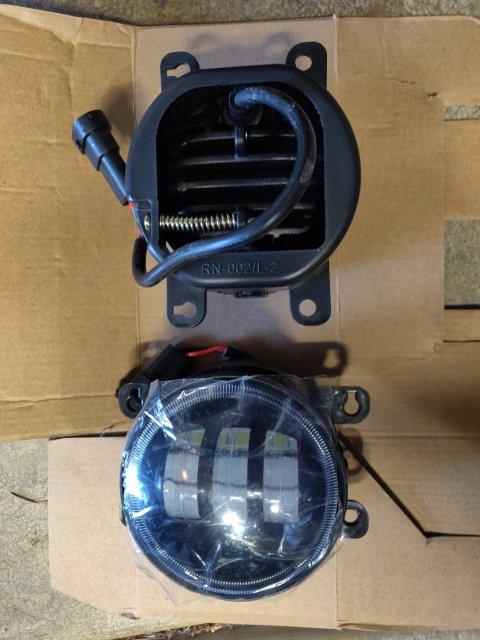
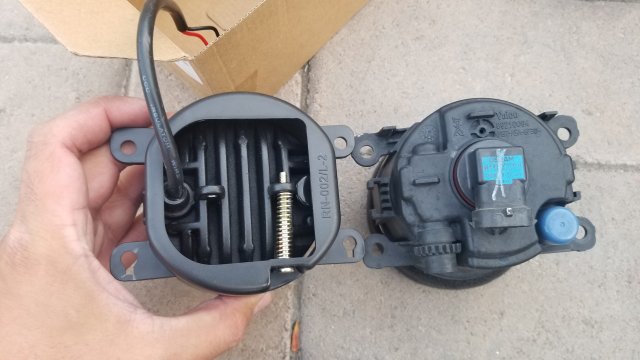
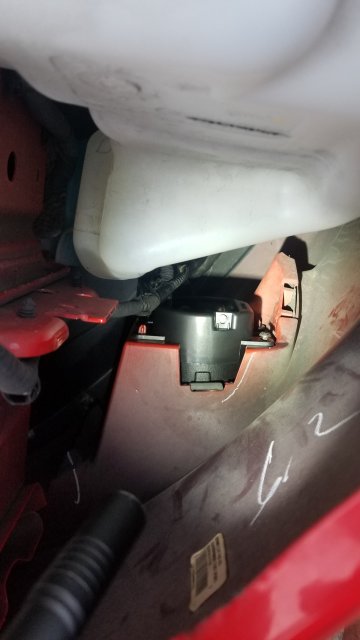
Build quality is very solid, feels stronger than the wimpy factory Valeo reflector garbage. Install was a bit of a bear because I didn't have a T25 stubby or hex key so I had to take a T25 bit, put it into a 1/4" socket on a small 1/4" drive wrench. I pulled the headlights as going in through fender was tough to reach the screws for the housings. As you can see, there are 4 mounting holes, 2 just rest on posts and 2 spots have actual screws. The driver side lower screw was really hard to reach with the washer fluid tank in the way, I ended up finally getting it off by holding the wrench perfectly perpendicular to the fender and slowly working the ratchet in the limited amount of throw area I had. Anyway, passenger side was much easier, just a nasty sharp end of a zip tie in the way to make sure it's not too easy, of course... hehe. So yes, these are plug and play but like many things in our tiny car, are not super easy to reach. Just make sure you have a T25 bit stubby screwdriver or, preferably a T25 hex key (I'm buying one now!) available before starting and this can be done in about 30 minutes. After mounting into place, I did have to remove the white inserts that were inside each plug for them to connect correctly to the factory wiring, this is a key factor in connecting them! Apparently I have been just jamming connectors together when the tabs don't match up between the 2 sides, but if you see that after removing the white inserts that they still won't stay connected in the direction to keep them powered on, then you may need to remove one of the tabs as @SrsBsns explains in his write up below.
AIMING -For the 2 different colors, they use 2 different rows of LED's aimed at different heights, depending on which side you install up or down, the white or yellow would the higher and lower and vice versa... Now, these did not come with even a tiny fold out or even any basic printing on the box for instructions at all, so I wasn't sure which way was up or down. The vertical aiming is done by a single screw that can be oriented either on top or bottom, so I decided to orient them with the screw on top to adjust from top side of the car, and this was WRONG. You will need to orient them with the adjustment screw on bottom for a clean projection cutoff with yellow cutoff higher than white to help pierce fog and white will hit lower to help fill in up close that headlights don't ill in. You will have to play with the adjustment screw with the housing out in your hands, you really can't reach the adjustment screw with them mounted this proper way unfortunately. This will be a bit time consuming, so save some time, start with them both aimed all the way down and apply about 10 full turns back toward up to start with, then mount them without the screws to test against the wall and make adjustments from there. You will want to try with the headlights on too and you will want the yellow hitting a good few inches lower than your headlight cutoff from 5 feet out close against a garage door or wall, whatever.
You may get a strange mix of brown and white if you still are using halogen bulbs for your headlights, so with the latest advances in proper LED design for reflectors, I highly suggest the Cougar X-small, TechMax Gen 2, or if you REALLY want to run rear covers, even if you need new 85mm domed ones, then go for the coolest running in the TechMax Gen1 Mini LED for your H11 low beam, then the 6000k white color of the fogs will blend in perfectly, as you will see below. Anyway, I ended up using the adjustment screw pretty much all the way down, so when you are on the white setting it blends into the headlights while also getting more white light right in front of the car. Then when switching to yellow (fog knob off and back on) it shoots nice and low.
Results:
IMPORTANT: I screwed up and didn't realize mine were in "upside down". All these pics below are with them in upside down and you can see the cutoff still isn't bad! LOL I can assure you that cutoff is now much cleaner and sharper now. As I mentioned above, they are reversed with yellow the higher color nd I have them aimed so the yellow is hitting clearly a bit lower than my headlight cutoff to help pierce actual fog and the white hitting low to fill in up front in the headlights. I'll update pics soon!
I'm REALLY happy considering how inexpensive these are for complete housing replacement fogs.
Keep in mind, I was I an hurry and used my own driveway at *downward incline and only at about 15 feet of distance* but should still give you an idea. Yes, I did re-aim the right down a tiny bit after these shots, it was very closed to the end of adjustment screw, but works great maxed out that direction. Cell phone camera had flash and all night processing, etc disabled.
First, just my Euro headlights with Katana LED's for reference:
Next, I have added the white fogs, note that looks the same on the wall, with just a touch of additional glare/lighting above the cutoff, but now have illumination right in front of car. If you have factory halogen bulbs in your factory reflector headlights still, you may get a strange effect from the colors mixing, again I recommend LED for the reflector headlights now, the Cougar X-small being the cleanest and among the very brightest for only ~$36. After trying these on the tree lined back woods in very dark conditions, in the white mode they DO add a touch of glare up VERY high all the way into the trees but leaving them like that with headlights and white fogs, I haven't been flashed yet, the amount of glare is VERY low.
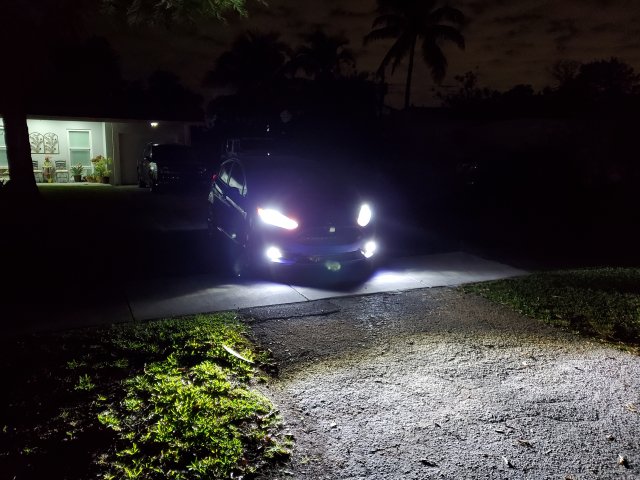
OK, so here is JUST the white fogs! YES, I did try where it was safe and for reference I WAS able to drive on pitch black country road with just these, hehe... I also adjusted the right side down a tiny bit more after these shots were taken too.

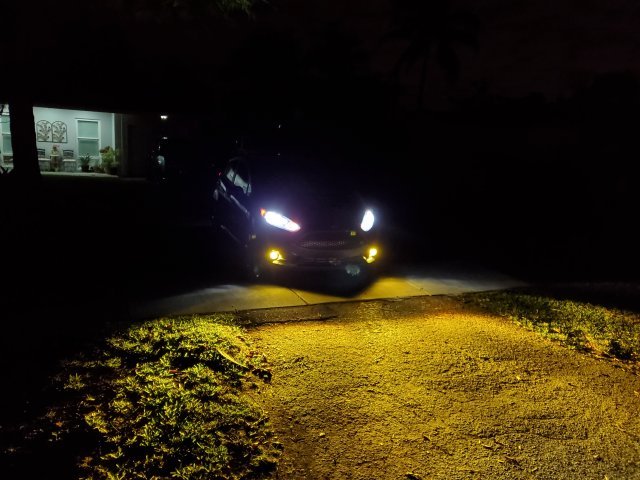
And just Yellow... Note that they shoot much lower, and sorry again, by facing downward you can't see the true level of the actual fogs, but I assure you, they look great on flat ground. Nice and bright with clear projector cutoff, these seem to be as bright as the options 2-3x the cost... BUT... BUT, this is where I have to be honest and say the camera is making them brighter than they really are, they are clearly not as bright as this in person, but still look great. I WAS just recently "flashed" by a pedestrian with a flashlight waiting to cross at an intersection at about the 10-11 o'clock position across the street from me, can't believe he thought it was OK to blind someone driving and making a left turn right in front of me, but I just shielded my eyes and kept going as I already knew he was likely just a dick butt-hurt there was minor glare at eye level right across from me
And yellow fogs with headlights:
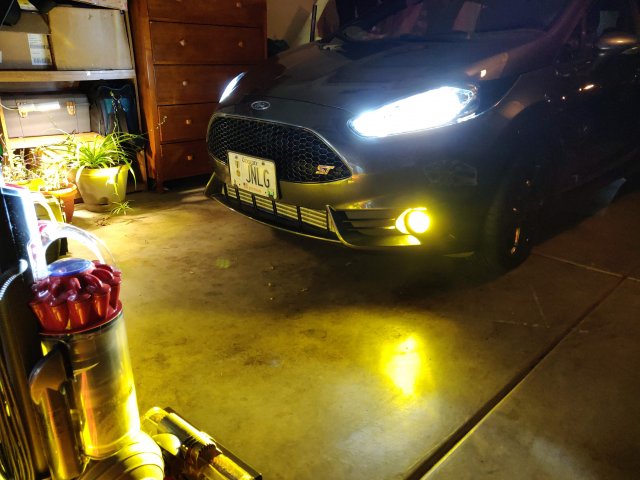
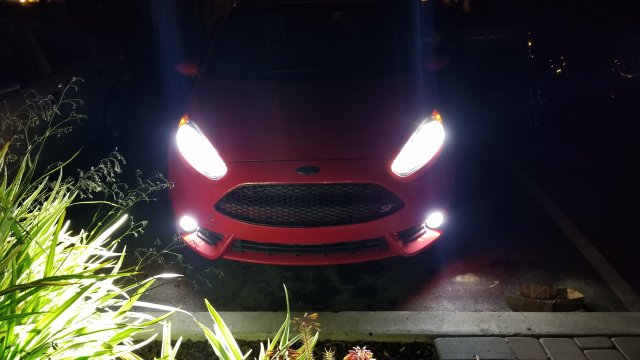
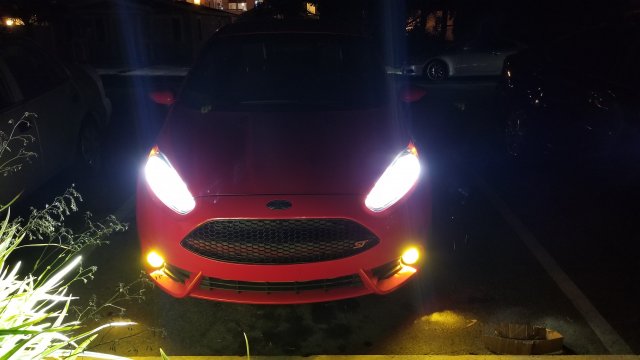
And finally, quick front view shot in white for now:
Final Thoughts
So there you have it for my quick review, I should also add that each side stayed in perfect sync in color which is HUGE when dealing with dual color! Highly recommended! I REALLY wish I found these sooner instead of spending money on yellow Lamin-X and a few different sets of LED's that always gave green final output despite even trying a set claimed as 4300k neutral white (Like factory HID's run) and still crappy actual output that just glares.
One possible caveat for some: OK, so after further experimenting, it does change color EVERY time the power is cut then reapplied, except on ignition off and on, which is good it at least keeps the last color you were using when shutting off the engine last... So this means every time the headlights lights go on and off if using Auto mode with fogs on, every time you use your high beams and then back to low beams (There is a bambi mode switch in ForScan so fogs and high beams stay on together, I'm not going to bother) so you will have to stay on top of it and either do a quick pull back flash if safe on your high beams or reach over and push in and back out on the fog light switch to keep the color you want.
I'm happy to answer questions you may have!
As you can see, like the 2 far more expensive options, they are complete housings with fully contained LED's with no bulbs to replace. With LED lifespan of like 50k+ hours, it's a total non-issue to me... Listed wattage is also a non-issue, we have seen 24w of actual draw LED headlight bulbs end up brighter than 36w actual draw ones. Honestly, these come across as more like a 30w+ actual draw, or maybe 65-75w halogen if I had to guess as far as comparable halogen brightness, these are definitely very bright, the white alone could almost be used as headlights as you will see below.
Install:
Build quality is very solid, feels stronger than the wimpy factory Valeo reflector garbage. Install was a bit of a bear because I didn't have a T25 stubby or hex key so I had to take a T25 bit, put it into a 1/4" socket on a small 1/4" drive wrench. I pulled the headlights as going in through fender was tough to reach the screws for the housings. As you can see, there are 4 mounting holes, 2 just rest on posts and 2 spots have actual screws. The driver side lower screw was really hard to reach with the washer fluid tank in the way, I ended up finally getting it off by holding the wrench perfectly perpendicular to the fender and slowly working the ratchet in the limited amount of throw area I had. Anyway, passenger side was much easier, just a nasty sharp end of a zip tie in the way to make sure it's not too easy, of course... hehe. So yes, these are plug and play but like many things in our tiny car, are not super easy to reach. Just make sure you have a T25 bit stubby screwdriver or, preferably a T25 hex key (I'm buying one now!) available before starting and this can be done in about 30 minutes. After mounting into place, I did have to remove the white inserts that were inside each plug for them to connect correctly to the factory wiring, this is a key factor in connecting them! Apparently I have been just jamming connectors together when the tabs don't match up between the 2 sides, but if you see that after removing the white inserts that they still won't stay connected in the direction to keep them powered on, then you may need to remove one of the tabs as @SrsBsns explains in his write up below.
AIMING -For the 2 different colors, they use 2 different rows of LED's aimed at different heights, depending on which side you install up or down, the white or yellow would the higher and lower and vice versa... Now, these did not come with even a tiny fold out or even any basic printing on the box for instructions at all, so I wasn't sure which way was up or down. The vertical aiming is done by a single screw that can be oriented either on top or bottom, so I decided to orient them with the screw on top to adjust from top side of the car, and this was WRONG. You will need to orient them with the adjustment screw on bottom for a clean projection cutoff with yellow cutoff higher than white to help pierce fog and white will hit lower to help fill in up close that headlights don't ill in. You will have to play with the adjustment screw with the housing out in your hands, you really can't reach the adjustment screw with them mounted this proper way unfortunately. This will be a bit time consuming, so save some time, start with them both aimed all the way down and apply about 10 full turns back toward up to start with, then mount them without the screws to test against the wall and make adjustments from there. You will want to try with the headlights on too and you will want the yellow hitting a good few inches lower than your headlight cutoff from 5 feet out close against a garage door or wall, whatever.
You may get a strange mix of brown and white if you still are using halogen bulbs for your headlights, so with the latest advances in proper LED design for reflectors, I highly suggest the Cougar X-small, TechMax Gen 2, or if you REALLY want to run rear covers, even if you need new 85mm domed ones, then go for the coolest running in the TechMax Gen1 Mini LED for your H11 low beam, then the 6000k white color of the fogs will blend in perfectly, as you will see below. Anyway, I ended up using the adjustment screw pretty much all the way down, so when you are on the white setting it blends into the headlights while also getting more white light right in front of the car. Then when switching to yellow (fog knob off and back on) it shoots nice and low.
Results:
IMPORTANT: I screwed up and didn't realize mine were in "upside down". All these pics below are with them in upside down and you can see the cutoff still isn't bad! LOL I can assure you that cutoff is now much cleaner and sharper now. As I mentioned above, they are reversed with yellow the higher color nd I have them aimed so the yellow is hitting clearly a bit lower than my headlight cutoff to help pierce actual fog and the white hitting low to fill in up front in the headlights. I'll update pics soon!
I'm REALLY happy considering how inexpensive these are for complete housing replacement fogs.
Keep in mind, I was I an hurry and used my own driveway at *downward incline and only at about 15 feet of distance* but should still give you an idea. Yes, I did re-aim the right down a tiny bit after these shots, it was very closed to the end of adjustment screw, but works great maxed out that direction. Cell phone camera had flash and all night processing, etc disabled.
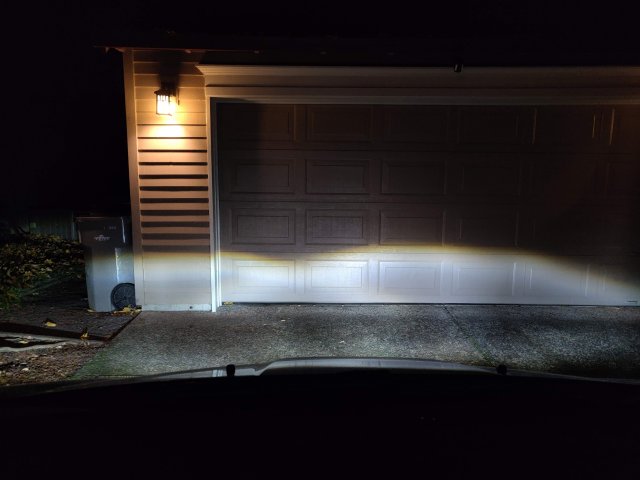
First, just my Euro headlights with Katana LED's for reference:
Next, I have added the white fogs, note that looks the same on the wall, with just a touch of additional glare/lighting above the cutoff, but now have illumination right in front of car. If you have factory halogen bulbs in your factory reflector headlights still, you may get a strange effect from the colors mixing, again I recommend LED for the reflector headlights now, the Cougar X-small being the cleanest and among the very brightest for only ~$36. After trying these on the tree lined back woods in very dark conditions, in the white mode they DO add a touch of glare up VERY high all the way into the trees but leaving them like that with headlights and white fogs, I haven't been flashed yet, the amount of glare is VERY low.
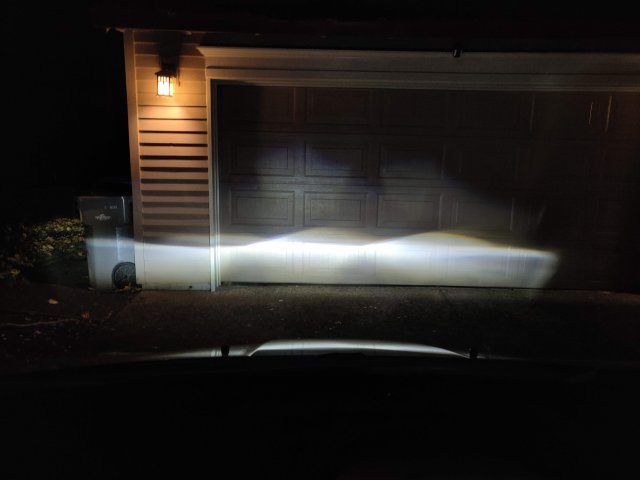
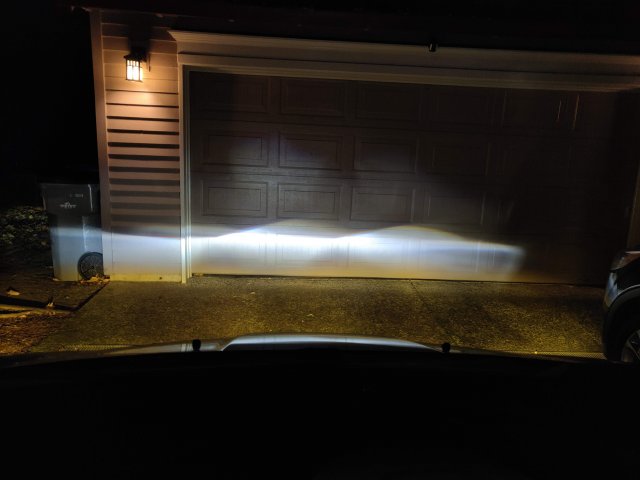
OK, so here is JUST the white fogs! YES, I did try where it was safe and for reference I WAS able to drive on pitch black country road with just these, hehe... I also adjusted the right side down a tiny bit more after these shots were taken too.
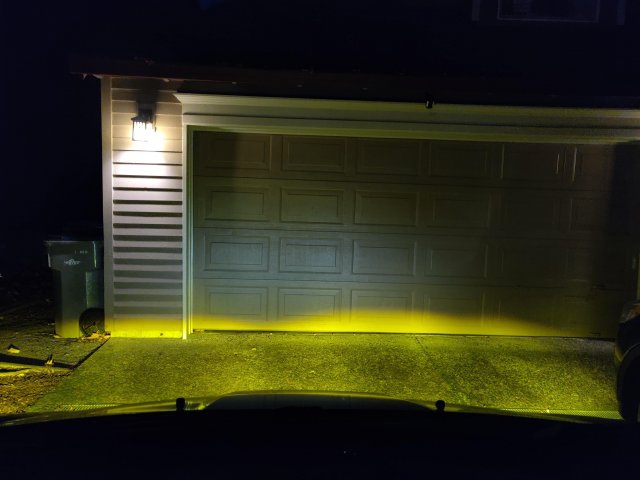
And just Yellow... Note that they shoot much lower, and sorry again, by facing downward you can't see the true level of the actual fogs, but I assure you, they look great on flat ground. Nice and bright with clear projector cutoff, these seem to be as bright as the options 2-3x the cost... BUT... BUT, this is where I have to be honest and say the camera is making them brighter than they really are, they are clearly not as bright as this in person, but still look great. I WAS just recently "flashed" by a pedestrian with a flashlight waiting to cross at an intersection at about the 10-11 o'clock position across the street from me, can't believe he thought it was OK to blind someone driving and making a left turn right in front of me, but I just shielded my eyes and kept going as I already knew he was likely just a dick butt-hurt there was minor glare at eye level right across from me
And yellow fogs with headlights:
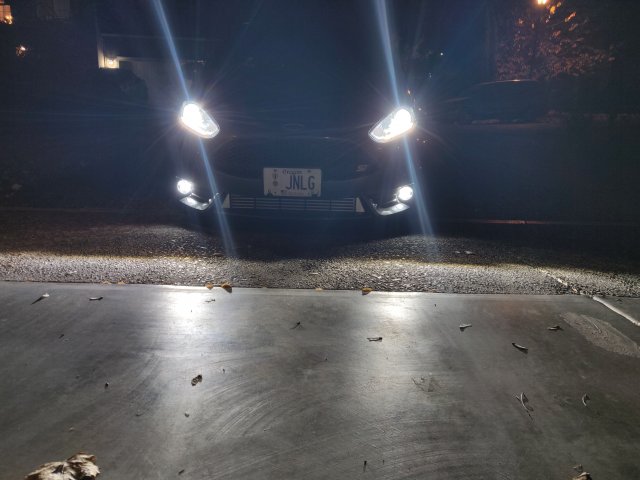
And finally, quick front view shot in white for now:
Final Thoughts
So there you have it for my quick review, I should also add that each side stayed in perfect sync in color which is HUGE when dealing with dual color! Highly recommended! I REALLY wish I found these sooner instead of spending money on yellow Lamin-X and a few different sets of LED's that always gave green final output despite even trying a set claimed as 4300k neutral white (Like factory HID's run) and still crappy actual output that just glares.
One possible caveat for some: OK, so after further experimenting, it does change color EVERY time the power is cut then reapplied, except on ignition off and on, which is good it at least keeps the last color you were using when shutting off the engine last... So this means every time the headlights lights go on and off if using Auto mode with fogs on, every time you use your high beams and then back to low beams (There is a bambi mode switch in ForScan so fogs and high beams stay on together, I'm not going to bother) so you will have to stay on top of it and either do a quick pull back flash if safe on your high beams or reach over and push in and back out on the fog light switch to keep the color you want.
I'm happy to answer questions you may have!
Last edited:
")