Previous budget: 842.46
New parts:
Used k&n from a90s? ford truck going to the crusher: 5
Another aluminum intake tube from some thing else going to the crusher: 5
Silicone reducer: 2
Misc shop supplies (like zip ties, hose clamps, scraps of aluminum, used bolts, etc) 20
New total: 874.96
This week sees me with ten inches of snow, and a laundry list of things to finish.
 20260201_102538
 by
Michael Crawford, on Flickr
 20260201_102948
 by
Michael Crawford, on Flickr
First up was motor mounts. The car came with the rear motor mount inserts, and I bought the trans and passengers side mounts. Used the arbor press at work to push the rubber out of the rear, sandblasted and repainted the trans, and put it all together. I’m looking forward to seeing how it drives.
 20260128_164401
 by
Michael Crawford, on Flickr
 20260128_173009
 by
Michael Crawford, on Flickr
 20260131_153030
 by
Michael Crawford, on Flickr
second was the battery relocation. I connected the 4 gauge with butt splice and my hydraulic crimps, bent up a piece of scrap 1/8 aluminum that was taken off the floor of my Winston cup car as an ECU mount. I also used the ecu mount as a place to mount the battery stud. Used 3/16 rivets to do that. When I tested everything, I got error codes for not reconnecting the battery monitoring system. After a little head scratching, I cut the negative post down, mounted it to a stud behind the ecu mount, and plugged it all back together. I still need to tidy up the wiring, and make things pretty after the intake is finalized. But the battery monitoring system is happy, and there’s all sorts of room for activities now.
 20260131_153013
 by
Michael Crawford, on Flickr
 20260201_173811
 by
Michael Crawford, on Flickr
To finish the battery, I wanted a trunk floor. The car had come with the factory flooring for the hatch. So I made a cardboard template and cut the floor to clear the battery box. By the way, it’s a neat resin impregnated corrugated cardboard like substance. Cuts nice with a jigsaw. Wound up having to shim a corner of the battery box with a plywood scrap to make it sit level.
 20260202_132618
 by
Michael Crawford, on Flickr
 20260131_162157
 by
Michael Crawford, on Flickr
Built an a-pillar mount out of some scrap 1 inch aluminum stock, a j-nut and some time.
 20260126_145038
 by
Michael Crawford, on Flickr
 20260131_092546
 by
Michael Crawford, on Flickr
 20260131_092814
 by
Michael Crawford, on Flickr
 20260131_093200
 by
Michael Crawford, on Flickr
Then, I mounted up the rally armor mud flaps that came with the car while I was reinstalling the inner fenders, and test fit the spacers that came with the box of parts as well. those, coupled with the 225/40 on the SVT wheels make the wheelwell STUFFED. Looks great. I also was able to get three degrees negative up front between making out the camber slots on the coil overs and the camber plates up top. I finally decided not to cut the strut tops. The final decision for me was that to use the camber plates, id still have to remove the cowl. So it didn’t save me a lot of effort in making adjustments. Current alignment specs are -3 up front, 1/16 toe out. Factory rear setup. Whoosh coil overs, white line rear bar. Upper brace in the back, front of the front control arms toed together with a brace.
 20260202_144811
 by
Michael Crawford, on Flickr
 20260202_144759
 by
Michael Crawford, on Flickr
Mounted up the race seat to finish the interior. I still haven’t received my side mounts, so I’m still rocking it in the manner in which TB set it up. Good enough for the first event. And it really shows why I did what I did with the roll bar….
 20260201_173748
 by
Michael Crawford, on Flickr
 20260201_173733
 by
Michael Crawford, on Flickr
Took the tint off the headlights, which made me sad. And spent an hour with 3m adhesive remover cleaning the residue off. Then polished them. Hopefully this makes night driving less treacherous, as my chosen work assignments are always at the very start of the even doing waivers. I’m up at 5am anyway, may as well get to the track! Before putting the headlights in that I took no pictures of, I repaired the broken mounting tab on the cowl. TB had glued it together, and that had failed. So first I tried the soldering iron, then reinforced with the hot stapler.
 20260202_163451
 by
Michael Crawford, on Flickr
 20260202_170708
 by
Michael Crawford, on Flickr
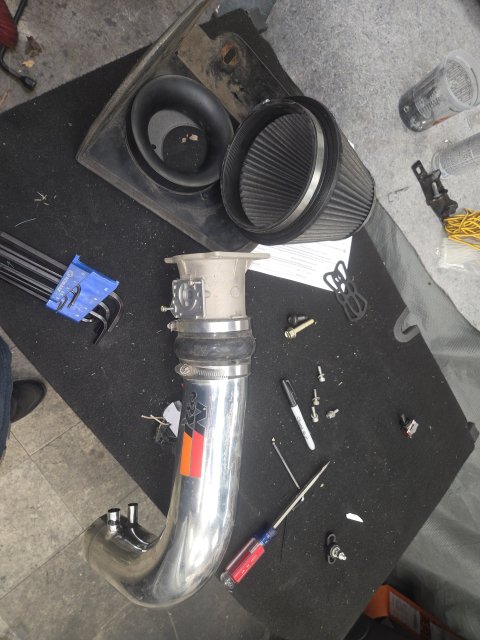
Lastly for this update, I wanted a different intake. Partly because im a 90s kid, and partly because the factory one had nowhere to mount anymore. As the GRM challenge makes for strange happenings, I made things work.
First up, the parts: I buy all the cold air intakes and cone filters my scrap guy gets. He charges me $5 a pop for them. I figure they’ll come in handy for something someday, and over the years they have turned into intercooler piping, a Datsun 280z cold air setup, supercharger intake piping, you get the idea. I have also collected random free leftpvers from intercooler piping kits and such, for the same reaspoins. Id assume most reading have the same kind of stash of parts. Im just more organized, with amore understanding wife and more space for hoarding.
Anyway, I started with a mod motor ford (90s I think) k&n setup from a truck. Even had the MAF on it still! This is 3.5 inch diameter. I also had a random aluminum tube that looks honda-ish, and is 3 inch. Add in a blue reducer valued at 2 bucks (junkyard price) from 3 inch to 2.5 for the turbo intake elbow, and some hose clamps from my bucket of used hose clamps, and we have the start of something hideous. I apparently didn’t take before pictures in as purchased condition of either intake. Sorry.
 20260131_144831
 by
Michael Crawford, on Flickr
 20260201_092122
 by
Michael Crawford, on Flickr
 20260201_094335
 by
Michael Crawford, on Flickr
Cutting the “honda” tube down to make it a 45ish and ending straight got us to the above picture. Close. You can see the maf housing has a nice bellmouth that bolts to it for that giant filter, and I wanted to retain all that. However, it’s full of cast in crap, and my maf in the fiesta is a rectangle. So I had to MacGyver some shit up.
Started by cutting the majority of the crap out of the tube with a Sawzall, then chucked the housing in my 50s era atlas benchtop drill press to make the beginnings of the slot.
 20260201_145903
 by
Michael Crawford, on Flickr
After that, I dremeled the protrusions in the bore of the maf housing the best I could for airflow and structure, and made the drill press series of holes a rectangle via a series of files and a lot of effort.
 20260201_160635(0)
 by
Michael Crawford, on Flickr
What bit me at that point was the rpund hole for the original maf sensor. It was slightly outside the o-ring seal for the fiesta maf. Couple ideas presented themselves, but the most bulletproof solution I could think of was making a more solid flat plat with a better hole and attaching it to the top of the 90s ford maf housing. So, I used a scrap of the cut-up aluminum form the floor of the cup car that I made my ECU mount out of, and made another rectangle hole in a chunk roughly shaped like the flange of the factory 90s ford MAF.
 20260201_160642
 by
Michael Crawford, on Flickr
I then drilled and tapped two 10-32 holes in the patter of the fiesta maf through both the plate and the 90s housing. Slightly crowned the plate, slathered a LIBERAL amount of RTV around, bolted the fiesta maf in to clamp the plate down, and then since I’m a belt and suspenders kind of guy I clamped it some more.
 20260201_163224
 by
Michael Crawford, on Flickr
 20260201_163228
 by
Michael Crawford, on Flickr
Once that all cured, I went and got my hose box out (all those leftover scraps of hoses at the end of a project? I keep them. Same with the random hoses in silicone hose kits that don’t fit whatever the hell they’re supposed to, the good hoses from part outs, etc. they go in the box. This box used to be three boxes, I recently purged). Out of the hose box I used some scraps to tie in the evap line and the valve cover breather that had gone to the factory intake tube. It took a bit of fuckery, but we got there.
 20260202_170032
 by
Michael Crawford, on Flickr
 20260202_172254
 by
Michael Crawford, on Flickr
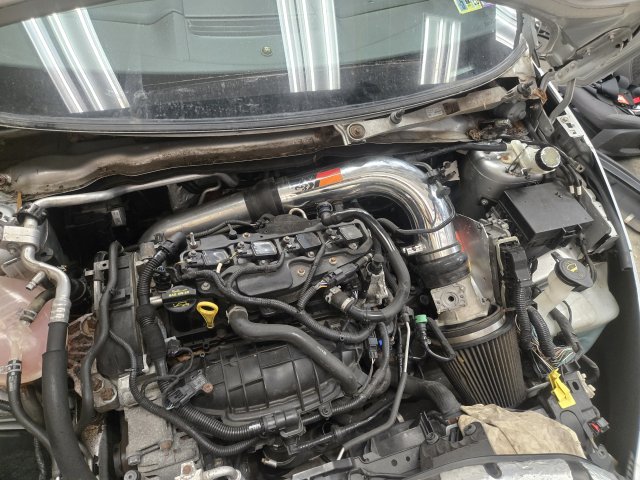
All buttoned up. I think I’m going to take a chunk of aluminum and tie one of the bellmouth bolts to the motor mount bolts to give it a secure bracket. Id love to come up with some heat shielding too, but that’s a future me problem.
 20260202_172240
 by
Michael Crawford, on Flickr
The most important thing: it makes intake and blow off noises now. That makes the 90s kid in me happy.

 20260307_093915
 20260307_093928
 Screenshot_20260307_160655_Chrome
 Screenshot_20260411_193206_eBay
 20260321_063059
 20260329_080724
 20260321_171323
 20260320_183901
 20260329_100138
 Screenshot_20260411_192020_Amazon Shopping
 20260331_163009
 20260415_184127
 20260318_185725
 20260320_190048
 20260320_190230
 20260318_185049
 20260319_064236
 Gemini_Generated_Image_7xo9bl7xo9bl7xo9
 199606_4
 Screenshot_20260411_191926_Amazon Shopping
 Screenshot_20260411_191915_Amazon Shopping
 20260322_162820
 20260322_164734
 20260324_210156
 20260325_170615
 20260408_170420
 20260408_170429
 20260408_170456
 20260408_170502
 20260408_170830
 20260408_170906
 20260415_171147
 20260416_203727
 20260418_092221
 Image00004
 104753142-2026_04_18_73951
 Image00011
 Screenshot_20260418_170610_Chrome
 Image00337
 Image00341
 20260420_084916
 20260420_090723
 Screenshot_20260420_054711_Chrome
 20260502_163937

 The fist manual trans is delightfully easy to drive
