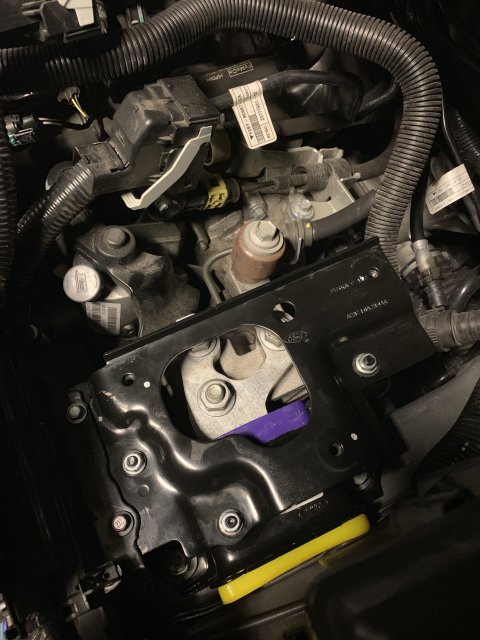
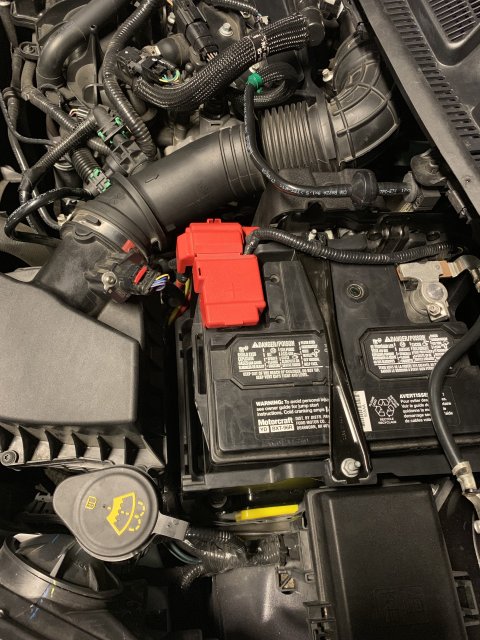
Powerflex Motor Mount Inserts

D1JL

7000 Post Club
Staff Member
Premium Account
Member ID
#1011
Messages
7,929
Likes
4,187
Members of our local driving group tell me these are a good thing.
Just ordered the black Powerflex engine and trans mount inserts along with the upper engine mount bolt upgrade from Whoosh.
I also ordered new OEM mounts from Tasca as mine may be already worn (cheap enough).
This way I can do the upgrade and then just a quick replacement of the mounts.


Member ID
#9823
Messages
91
Likes
18
I have the yellow Power flex inserts (from Ron) on the transmission, and passenger side.

I also have the AWR 88a (I think) RMM.

At idle, when it drops to 750rpm, it does vibrate enough for me to notice it in the side mirrors.
I also notice it the most when flooring it from a lower (~1200) rpm.

Other than that, when I'm driving down the highway, it feels the same as stock, Even when driving down a city street it feels stock.

It's just when I step on the gas a little more firmly that I notice it.

Doesn't bother me at all.


D1JL

7000 Post Club
Staff Member
Premium Account
Member ID
#1011
Messages
7,929
Likes
4,187
I received this email from Powerflex today.

Hey David,

I am emailing you regarding our phone conversation the other day. I got word back from our engineers and R&D team. It looks like this problem has been recognized before, and there is a solution in the works.

The material of those O-rings is being changed from Nitrile, which is susceptible to the deterioration you, and many others have experienced, to Viton. Viton is more resilient to heat, oil, UV exposure, etc.

As soon is this change is approved, Every new set of PFF19-2025(BLK) will be sent out with this new O-ring, and any customers with perished O-rings will be eligible to receive a replacement O-ring in the new material.

I hope that this is the news that you were looking for, and I thank you again for bringing this to my attention.

Best regards,

Jake Palladini
Sales & Customer Service
PH: 855.374.1877
Jake@PowerflexUSA.com | www.PowerflexUSA.com


Member ID
#8356
Messages
246
Likes
126
removing the headlight requires the cowls to be removed. to remove the cowls the wipers have to come off. too many bolts, nuts and clips to mess with, it's easier and quicker for me siphon the coolant out.
Since when? I've always removed my headlights without removing the cowl.


D1JL

7000 Post Club
Staff Member
Premium Account
Member ID
#1011
Messages
7,929
Likes
4,187
Since when? I've always removed my headlights without removing the cowl.
This was corrected in post #91, two posts after the one you quoted. ;)
However, thank you for bringing it up again, as others may have missed it as well. :)


CanadianGuy

4000 Post Club
Member ID
#2134
Messages
4,097
Likes
946
This was corrected in post #91, two posts after the one you quoted. ;)
However, thank you for bringing it up again, as others may have missed it as well. :)

Prediction the previous post you quote will be erupted in 5 pages. 😉


Member ID
#8356
Messages
246
Likes
126
This was corrected in post #91, two posts after the one you quoted. ;)
However, thank you for bringing it up again, as others may have missed it as well. :)
Gah... sorry man. That’s what I get for skimming! I’m scrolling to see if someone posted a walk through for the driver side!


Sent from my iPhone using Tapatalk


OP
koozy

koozy

3000 Post Club
Member ID
#22
Messages
3,213
Likes
1,905
Thread Starter #209
Since when? I've always removed my headlights without removing the cowl.
since then, things have changed. I've learned new things since then.


Member ID
#8356
Messages
246
Likes
126
since then, things have changed. I've learned new things since then.
Haha! Care to help me find the section where someone explain the driver side install?


Sent from my iPhone using Tapatalk


D1JL

7000 Post Club
Staff Member
Premium Account
Member ID
#1011
Messages
7,929
Likes
4,187
Personally, I would change one step.
Rather than disconnecting the PCM, I would just unbolt it from the battery box and leave the PCM in the car.
Less chance of screwing up a pin in those large connectors.


Ford ST

2000 Post Club
Member ID
#8645
Messages
2,925
Likes
3,071
Personally, I would change one step.
Rather than disconnecting the PCM, I would just unbolt it from the battery box and leave the PCM in the car.
Less chance of screwing up a pin in those large connectors.
Smart Man. I would never mess with a PCM connection unless 100% absolutely necessary.

Sent from my LG-LS997 using Tapatalk


Member ID
#8356
Messages
246
Likes
126
Successful install.

Passenger Side:
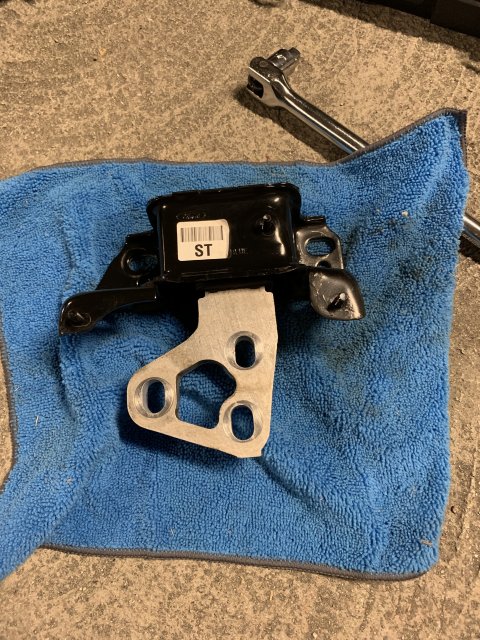
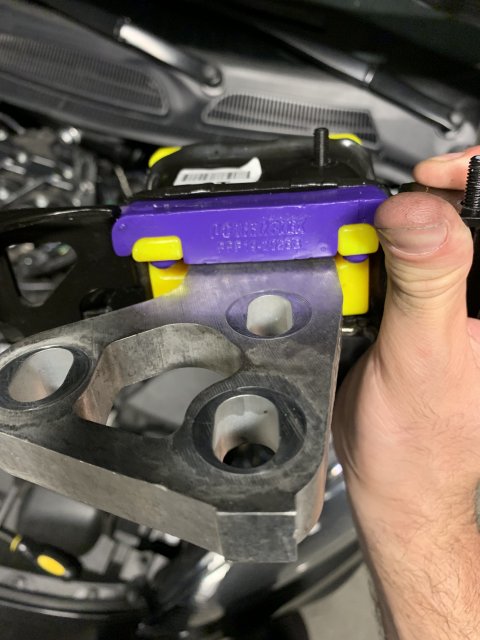
I will say, I had to redo the passenger side because I rushed and forgot to replace the old bolt with the new arp bolt from Whoosh... Also, not torquing the bolt town before installation caused for the bushing to sink into the gaps in the top of the mount but since I had to unmount the top bracket which connects to the deck I just kept the engine jacked, removed the bracket, realigned the bushing, put the bracket back on, tightened the bolts down on to the engine block and then pulled the engine towards me while threading the new bolt in. Once the car was on the ground the bushing went into place and was perfectly flat.
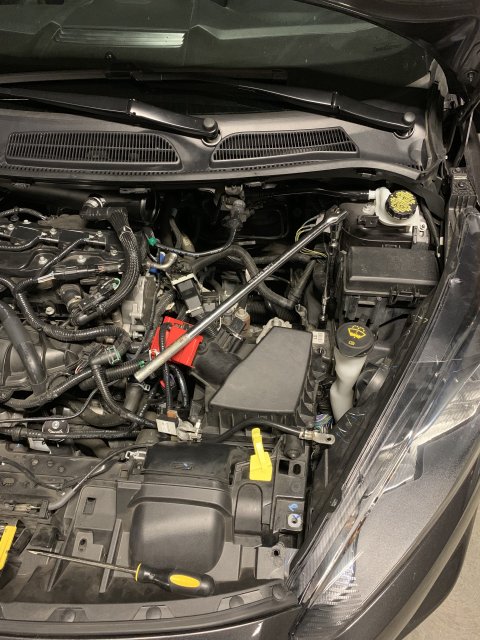
Driver Side:
I removed everything including the PCM/ECU connectors, not a big deal if you are careful and know what your doing. My only snag was the bolts mounted to the frame of the car.... took many attempts with a breaker bar, a breaker bar extension... then impact... then penetrating oil to get them off.


All that to say, everything feels great, really happy with the shifting feel, less slopy acceleration etc..

Questions:
Is it me or is the alignment really a thing to worry about with these cars? Seems like the mounts didn't have much place to move but i still did my best to reference where the bolts and parts mated from before.

Did anyone else experience the nut and the bolt coming out together on the passenger side deck? 2/3 fully came out on me. Luckily i have a E12 bit and tightened the bolts back in first before torquing the nuts.


Last edited:
Member ID
#9436
Messages
159
Likes
175
I got the driver side mount done today after putting it off a couple weeks. Definitely a much bigger job than the passenger side. You don’t have to take out the headlight just a million other things to get to that mount. Everything went back as it came out, no codes, and no problems. +1 on the breaker bar for the frame bolts. Torque steer is further eliminated down to almost none. I also had to fix the pineapple slide that slid down inside the mount.


Attachments

Member ID
#10279
Messages
387
Likes
291
I got the driver side mount done today after putting it off a couple weeks. Definitely a much bigger job than the passenger side. You don’t have to take out the headlight just a million other things to get to that mount. Everything went back as it came out, no codes, and no problems. +1 on the breaker bar for the frame bolts. Torque steer is further eliminated down to almost none. I also had to fix the pineapple slide that slid down inside the mount.
Did you remove the headlight for the passenger mount? I just moved the overflow tank out of the way and didn’t need to touch the headlight.


Sent from my iPhone using Tapatalk


Member ID
#9436
Messages
159
Likes
175
Did you remove the headlight for the passenger mount? I just moved the overflow tank out of the way and didn’t need to touch the headlight.


Sent from my iPhone using Tapatalk
You’re right I probably didn’t have to. It’s just funny how so many mods start with removing your headlights, like upgrading the intercooler for instance.


Member ID
#10279
Messages
387
Likes
291
You’re right I probably didn’t have to. It’s just funny how so many mods start with removing your headlights, like upgrading the intercooler for instance.
Doing my intercooler is when I noticed my pineapple slice was fucked [emoji23] but I totally agree


Sent from my iPhone using Tapatalk


Member ID
#10436
Messages
2,088
Likes
970
All street bushings and mounts with CPE rmm. Zero nvh. Disclaimer: idle is at 950rpm because of the cams. 🤗


Top